Learn how to use the MobileNet SSD model pre-trained on the COCO dataset in Python to run on edge devices with full code and non-maximum suppression.
Tensorflow has recently released its object detection API for Tensorflow 2 which has a very large model zoo. However, they have only provided one MobileNet v1 SSD model with Tensorflow lite which is described here. In that blog post, they have provided codes to run it on Android and IOS devices but not for edge devices. With the increase in popularity of edge devices and the release of spatial AI kits by OpenCV, I wanted to fill the missing gap. So that’s exactly what we are going to see here.
Requirements
This does not require the installation of the Tensorflow Object Detection API to run. A simple Tensorflow installation, along with OpenCV for image processing is enough to run it.
pip install tensorflow
pip install opencv
I have used some code provided in the Object Detection API to make the work easier, but there is no need to worry about it as does not require its explicit installation and you can find the whole code here.
The pre-trained model can be downloaded from Tensorflow’s blog from here or it is provided with the code as well.
Labels
Our first step to make the labels in the format required later on that is as a nested dictionary having id and label inside. We will use the label map text file provided with the model and convert it to the required format.
Note:- The labels with “???” need to be ignored and those indices are skipped except for the first one. So each label is shifted one place back. For example, the label “person” is on the first row but it will be assigned a label 0 and so on.
This can be found commented in its Java implementation.
// SSD Mobilenet V1 Model assumes class 0 is background class
// in label file and class labels start from 1 to number_of_classes+1,
// while outputClasses correspond to class index from 0 to number_of_classes
This can be done with the following code:
def create_category_index(label_path='path_to/labelmap.txt'):
    f = open(label_path)
    category_index = {}
    for i, val in enumerate(f):
        if i != 0:
            val = val[:-1]
            if val != '???':
                category_index.update({(i-1): {'id': (i-1), 'name': val}})

    f.close()
    return category_index
Here, to ignore the first line, I am using an if statement and storing i-1. This creates a dictionary as shown below.


It will have 80 rows with keys going to 89.
TfLite Interpreter
With labels done, let’s understand TfLite’s interpreter and how we can get the results.
Initialize the Interpreter
import tensorflow as tfinterpreter = tf.lite.Interpreter(model_path="path/detect.tflite")
interpreter.allocate_tensors()
Just load the correct model path of your tflite model and allocate tensors.
Input and Output Details
To get input and output details, write:
input_details = interpreter.get_input_details()
output_details = interpreter.get_output_details()
Now, let’s study them to see what type of inputs to give and the outputs we will get.
The input details are a list of only 1 element which is a dictionary as shown below.


Here, we can see the input shape to be [1, 300, 300, 3]. Other than this it requires the input image to have a datatype of np.uint8.
The output details are a list of 4 elements, each containing a dictionary like the input details. Each call returns 10 results with the first item storing the rectangle bounding boxes, the second item the detection classes, the third item the detection scores, and finally the last item the number of detections returned. The bounding boxes returned are normalized so they can be scaled to any input dimension.
To get the outputs we need to read the image, convert it to RGB if OpenCV is used, resize it appropriately, and invoke the interpreter after setting the tensor with the input frame. Then the required values can be achieved using the get_tensor function of the interpreter.
import cv2img = cv2.imread('image.jpg')
img_rgb = cv2.cvtColor(img, cv2.COLOR_BGR2RGB)
img_rgb = cv2.resize(img_rgb, (300, 300), cv2.INTER_AREA)
img_rgb = img_rgb.reshape([1, 300, 300, 3])interpreter.set_tensor(input_details[0]['index'], img_rgb)
interpreter.invoke()de_boxes = interpreter.get_tensor(output_details[0]['index'])[0]
det_classes = interpreter.get_tensor(output_details[1]['index'])[0]
det_scores = interpreter.get_tensor(output_details[2]['index'])[0]
num_det = interpreter.get_tensor(output_details[3]['index'])[0]
Using Object Detection code for drawing
For visualization, I used the python code available here, which not only can be used to draw bounding boxes but also keypoints and instance masks if required. We need to pass the image to draw on, bounding boxes, detected classes, detection scores, and the labels dictionary. Other than that we also set the normalized coordinates to true as we receive normalized bounding box coordinates from the interpreter.
from object_detection.utils import visualization_utils as vis_utilvis_util.visualize_boxes_and_labels_on_image_array(
    img,
    output_dict['detection_boxes'],
    output_dict['detection_classes'],
    output_dict['detection_scores'],
    category_index,
    use_normalized_coordinates=True,
    min_score_thresh=0.6,
    line_thickness=3)
Results
It will give the results something like shown below.

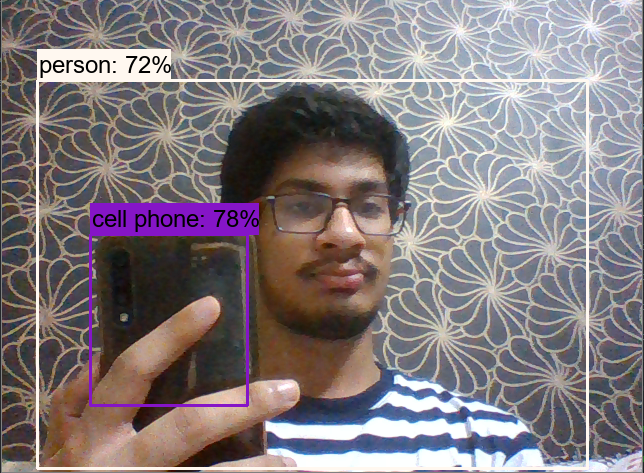
However, there is still one problem to address as shown below.


This can be done via non-maximum suppression.
Non-Maximum Suppression
I am not going to explain it as it has already been covered in-depth across various articles throughout the internet. One such example is this article. To implement it, I am going to use combined_non_max_suppression Tensorflow Image to perform this task as it allows us to work with multiple classes at once. It takes the outputs and returns the predictions left after the threshold.
def apply_nms(output_dict, iou_thresh=0.5, score_thresh=0.6):q = 90 # no of classes
    num = int(output_dict['num_detections'])
    boxes = np.zeros([1, num, q, 4])
    scores = np.zeros([1, num, q])
    # val = [0]*q
    for i in range(num):
        # indices = np.where(classes == output_dict['detection_classes'][i])[0][0]
        boxes[0, i, output_dict['detection_classes'][i], :] = output_dict['detection_boxes'][i]
        scores[0, i, output_dict['detection_classes'][i]] = output_dict['detection_scores'][i]
    nmsd = tf.image.combined_non_max_suppression(
    boxes=boxes,
    scores=scores,
    max_output_size_per_class=num,
    max_total_size=num,
    iou_threshold=iou_thresh,
    score_threshold=score_thresh,
    pad_per_class=False,
    clip_boxes=False)

    valid = nmsd.valid_detections[0].numpy()
    output_dict = {
                   'detection_boxes' : nmsd.nmsed_boxes[0].numpy()[:valid],
                   'detection_classes' : nmsd.nmsed_classes[0].numpy().astype(np.int64)[:valid],
                   'detection_scores' : nmsd.nmsed_scores[0].numpy()[:valid],
                   }
    return output_dict
The full code is given below and or you visit my Github repo which also contains visualization_utils.py and models.
Before ending, I would like to clear up a thing, that if you try to run it on Windows with an Intel processor, you will get a terrible fps. I got ~2 on an i5 and for comparison, the same Tensorflow model without tflite gave me ~8 fps. This is explained here. However, on edge devices that won’t be a problem, and it’s considerably less memory footprint would benefit their memory limitations.
Although this model is not very accurate, I hope I would have provided a boilerplate to make your task easier when using an Object detector if Tflite.


No comments:
Post a Comment