Familiarity with the cloud is one of those skills that, as a data scientist, machine learning engineer, or developer — is a game-changer.
No matter which domain we work in, data is always the center of attention, closely followed by our end-users. A good cloud-based database service will cater to both of these needs.
We offload our data to a location where our end-users will be able to access it via an interface that anyone can use. This interface could be a web-app — or API for the more technical end-users.
Firestore is Google’s cloud-hosted NoSQL database service offering. There are several key benefits of the service, namely:
- Flexible data storage (NoSQL)
- Native libraries support most popular languages (Python)
- You learn for free (surpassing the free tier limits takes a lot of data)
- Everything is simple — we can spin up a database quicker than the time it takes to make coffee
- Authentication (can be) handled by Google, we maximize security with minimal work
- Automated scaling to meet demand
- Intuitive documentation, possibly the best of the big three cloud-providers (Azure, AWS, GCP)
In this article, we will set up our Firebase project (the platform hosting Firestore), create a database using the web-UI, and create a simple Python script performing all of the essential Firestore functions. It will look like this:
In Firebase
> Create a Project
> Initialize Database
> Get Credentials
In Python
> Install gcloud Libraries (+ venv)
> Authenticate
> Connect to Firestore
> Get
> Create
> Modify
> Delete
> Queries
Let’s get started.
Firebase
Create a Project
Fortunately, Google is good at making things easy. Go to the Firebase website and click the big Get started button.

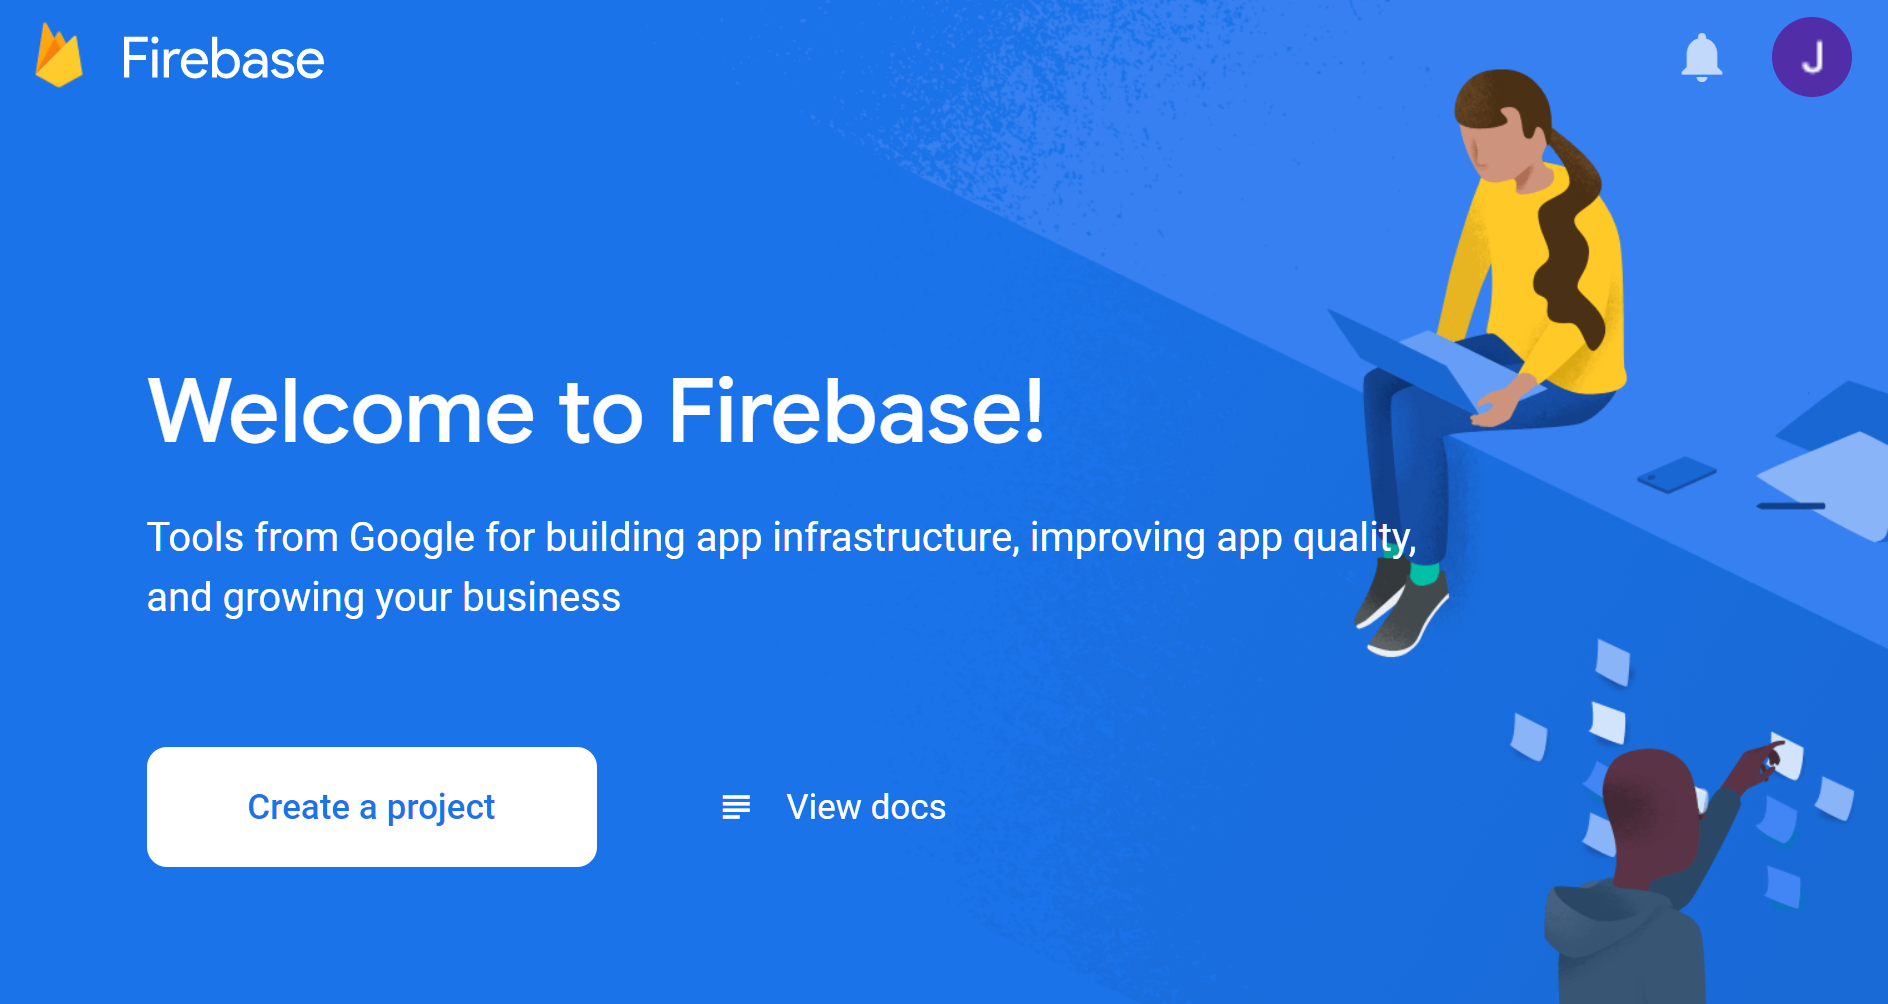
We should now see the ‘Welcome to Firebase’ page above — create a project and give it a cool name (it should probably be relevant to your project too).
I’ve named this one ‘antigravity’.
You should see a window asking whether we would like to enable Google Analytics — this is entirely your choice, we won’t be using it, but it will also cost you nothing.


Our project will initialize, and on clicking Continue, we are taken to the Project Overview page of our new project.
Initialize a Database

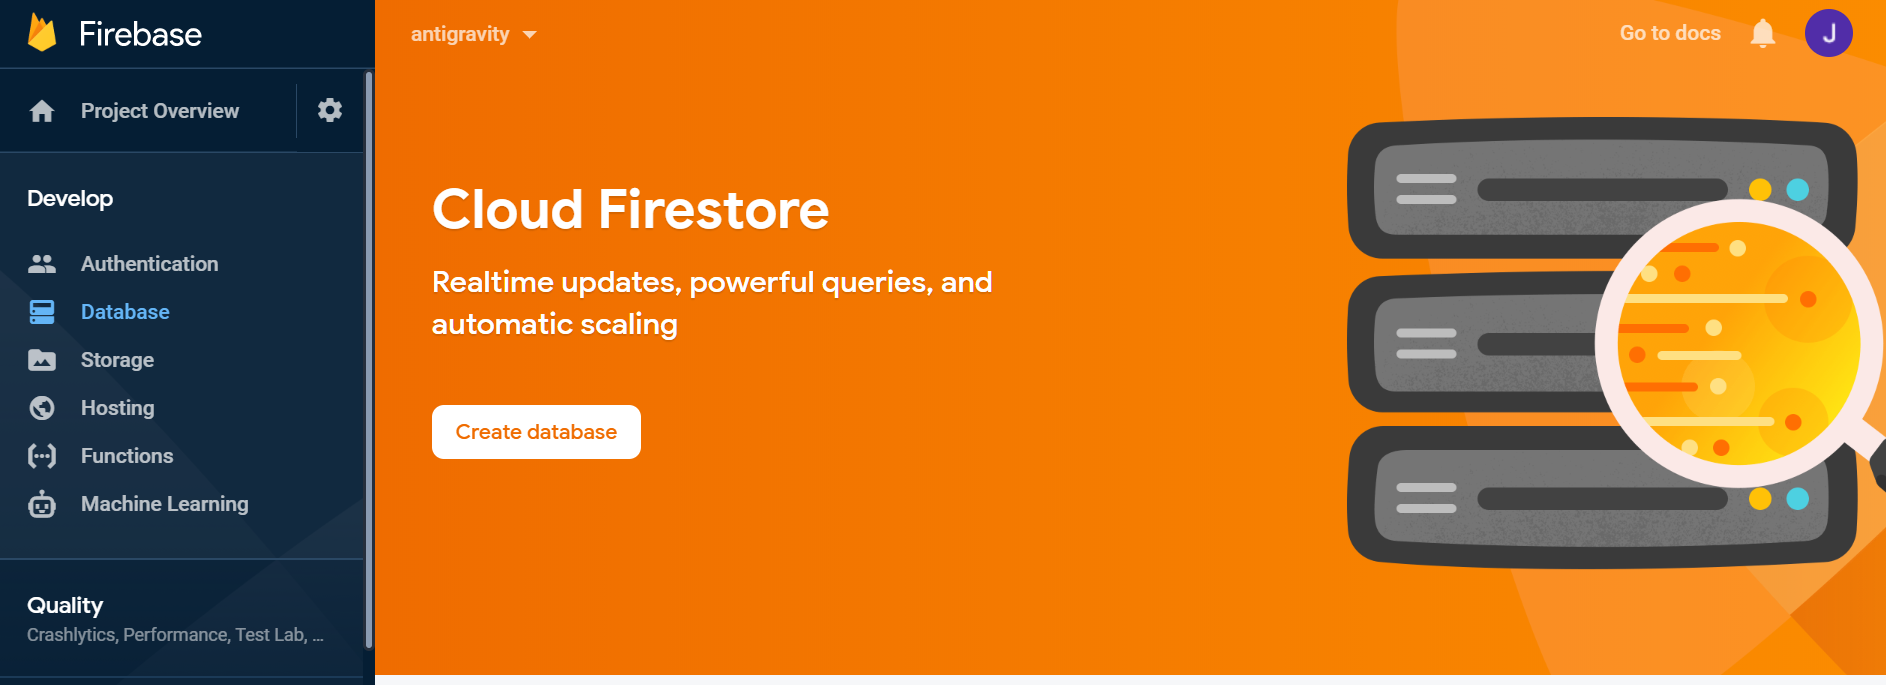
To initialize our Firestore database, we navigate to the sidebar and click Develop > Database. Here we will see the ‘Cloud Firestore’ page above — click Create database.
Here we will be asked whether to start in production or test mode. We will be using test mode.
Next, you select your location — this is where you or your users will requesting data from, so choose the nearest option!

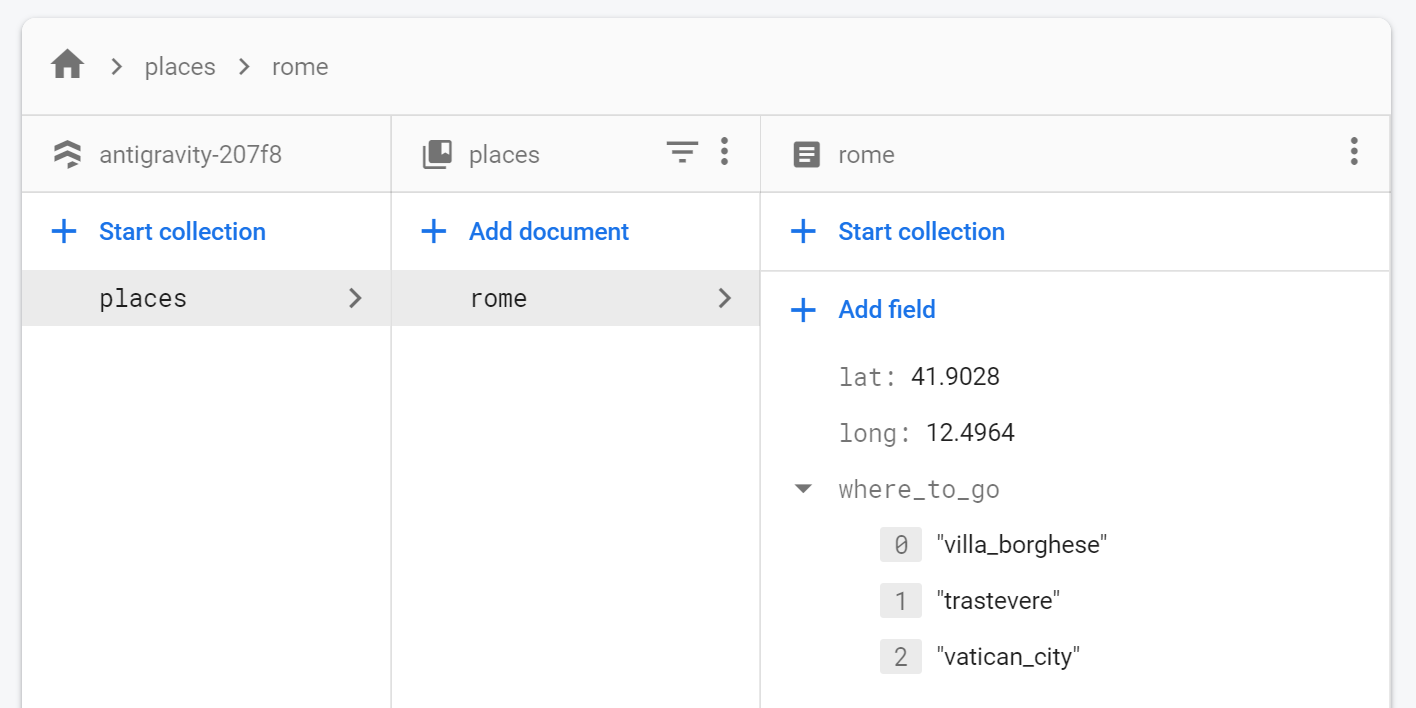
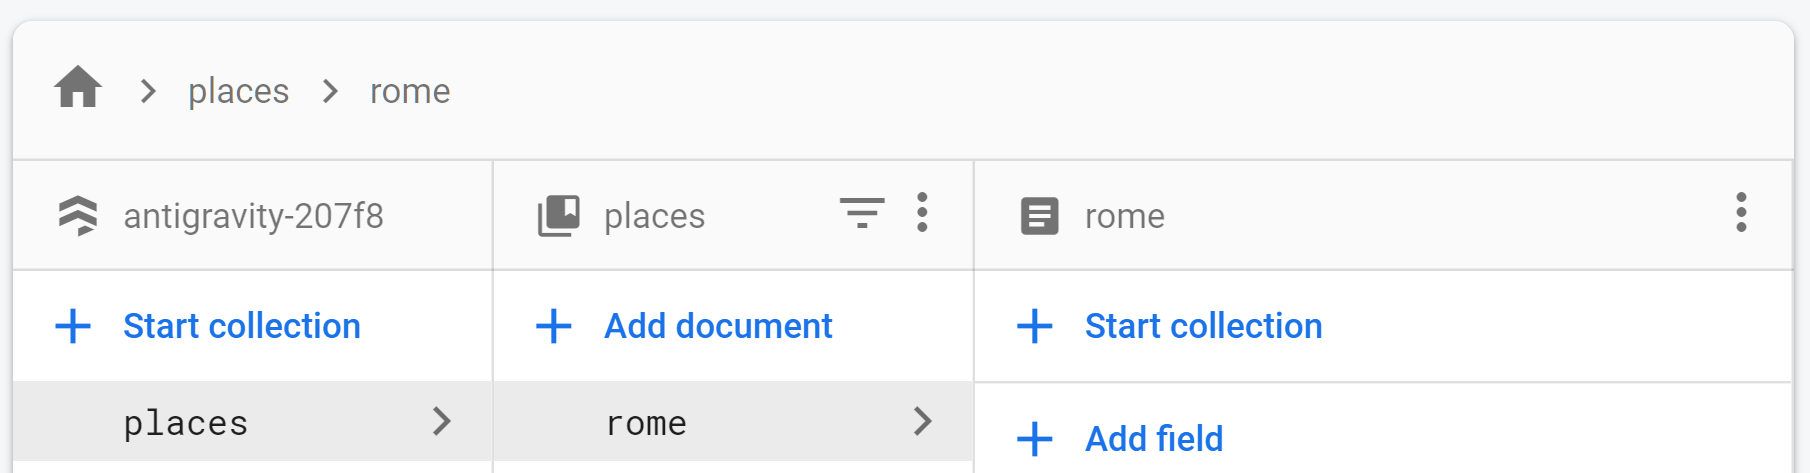
Finally, we have access to our Database. For this tutorial we will need a collection called ‘places’ and a document called ‘rome’ like above — simply click Start collection to add these (where_to_go is an array).
Over to Python
Installing Dependencies
We need to pip install the firebase_admin package:
pip install firebase-adminWith any version of Python beyond 3.6, we will receive a SyntaxError when importing firebase_admin to our scripts:

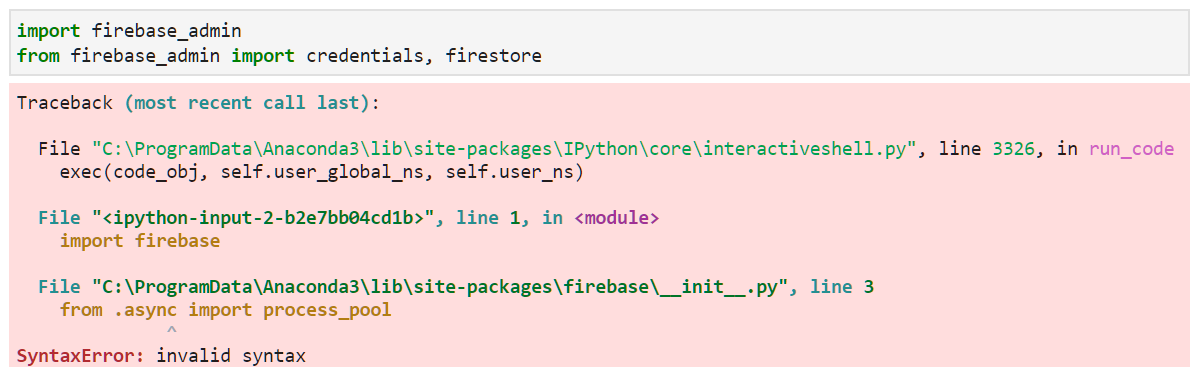
The async identifier was added in Python 3.7 — breaking the firebase_admin module. We have two options here:
- Modify
firebase_adminand replace every instance ofasyncwith_async(or any keyword of your choice). - Use Python 3.6 via a virtual environment (venv).
Option (1) is probably a bad idea. So let’s quickly cover a venv setup using Anaconda (ask Google or me for how on other environments).
Open Anaconda prompt and create a new venv (we will call it fire36):
conda create --name fire36 pythonActivate the venv and install the firebase_admin package:
conda activate fire36
pip install firebase_admin
If you’re using Jupyter or Spyder, simply type jupyter|jupyter lab|spyder to write code using this venv. Both PyCharm and VSCode can use this venv too.
Authenticate
To access Firestore, we need lots of credentials. Google again makes this easy.
Navigate to your project in the Firebase Console.

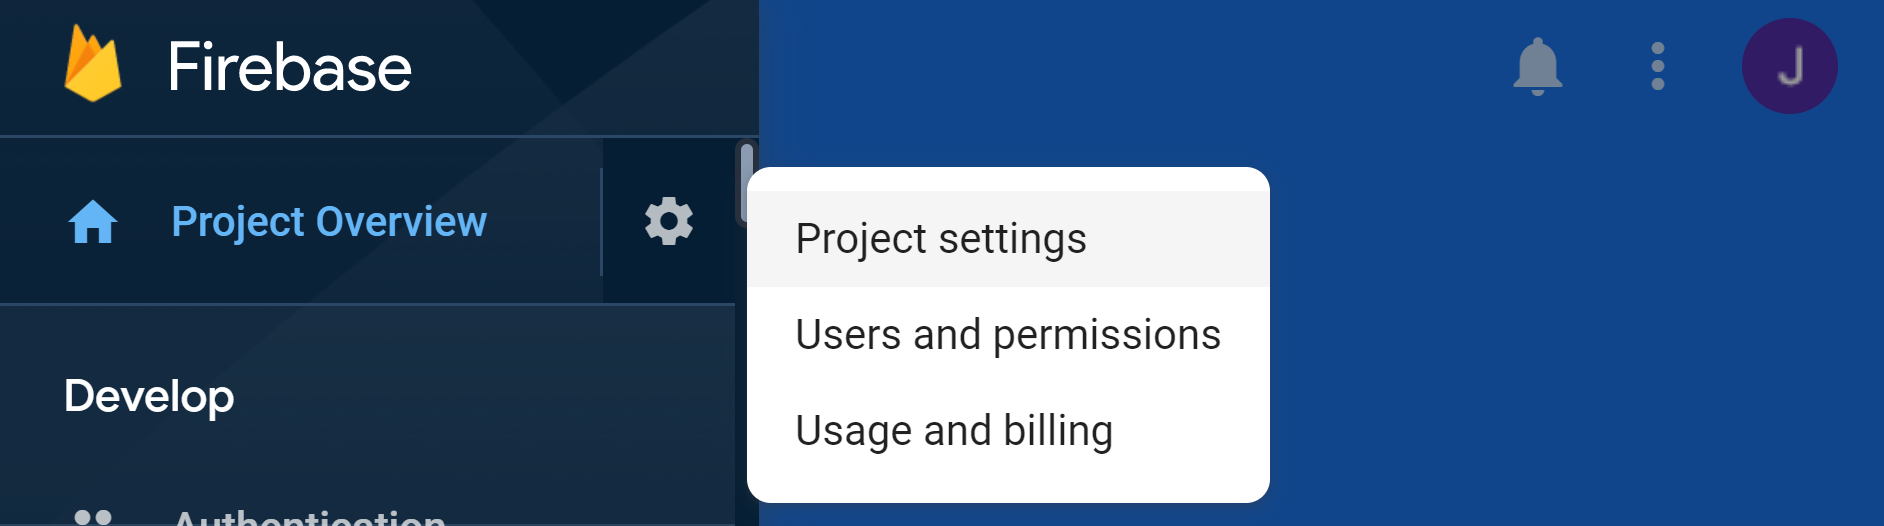
Next to ‘Project Overview’ in the top-left, click the gear icon and select Project Settings.
Now we click the Service accounts tab where we will find instructions on authentication with the Firebase Admin SDK.

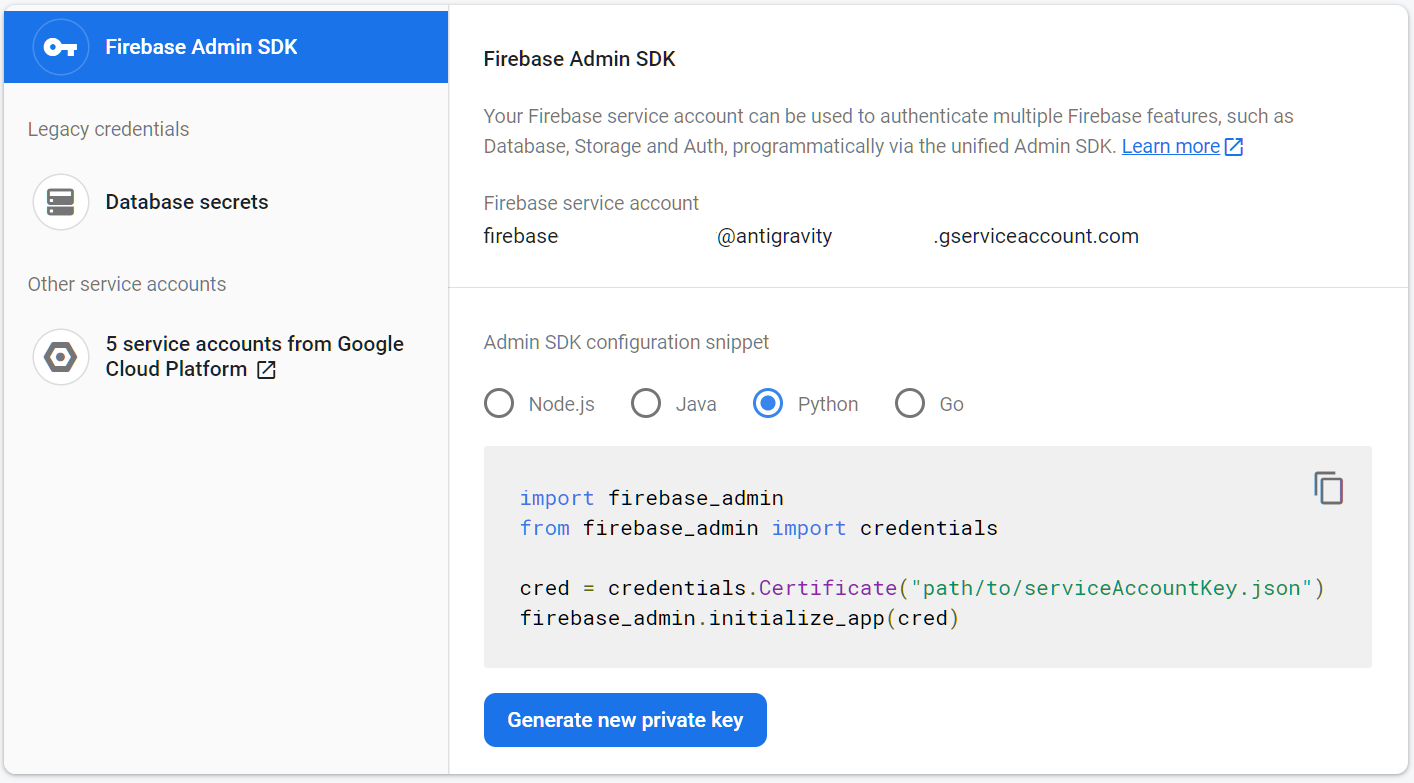
Now, we need to click Generate new private key. We download the file, rename it to serviceAccountKey.json (or anything else) and store it in an accessible location for our Python scripts.
Storing serviceAccountKey.json in the same directory for testing is okay — but keep the contents of the JSON private. Public GitHub repos are a terrible place for credentials.
On the same Firebase Admin SDK page, we can copy and paste the Python code into the top of our script. All we need to do is update the path to serviceAccountKey.json and add firestore to our imports — our script should look like this:
import firebase_admin
from firebase_admin import credentials, firestorecred = credentials.Certificate("path/to/serviceAccountKey.json")
firebase_admin.initialize_app(cred)
That is all we need for authentication. Now we (finally) move onto writing some code!
Connect to Firestore
There are three layers to our connection:
Database > Collection > Document
db = firestore.client()  # this connects to our Firestore database
collection = db.collection('places')  # opens 'places' collection
doc = collection.document('rome')  # specifies the 'rome' document
Each layer comes with its own set of methods that allow us to perform different operations at the database, collection, or document level.
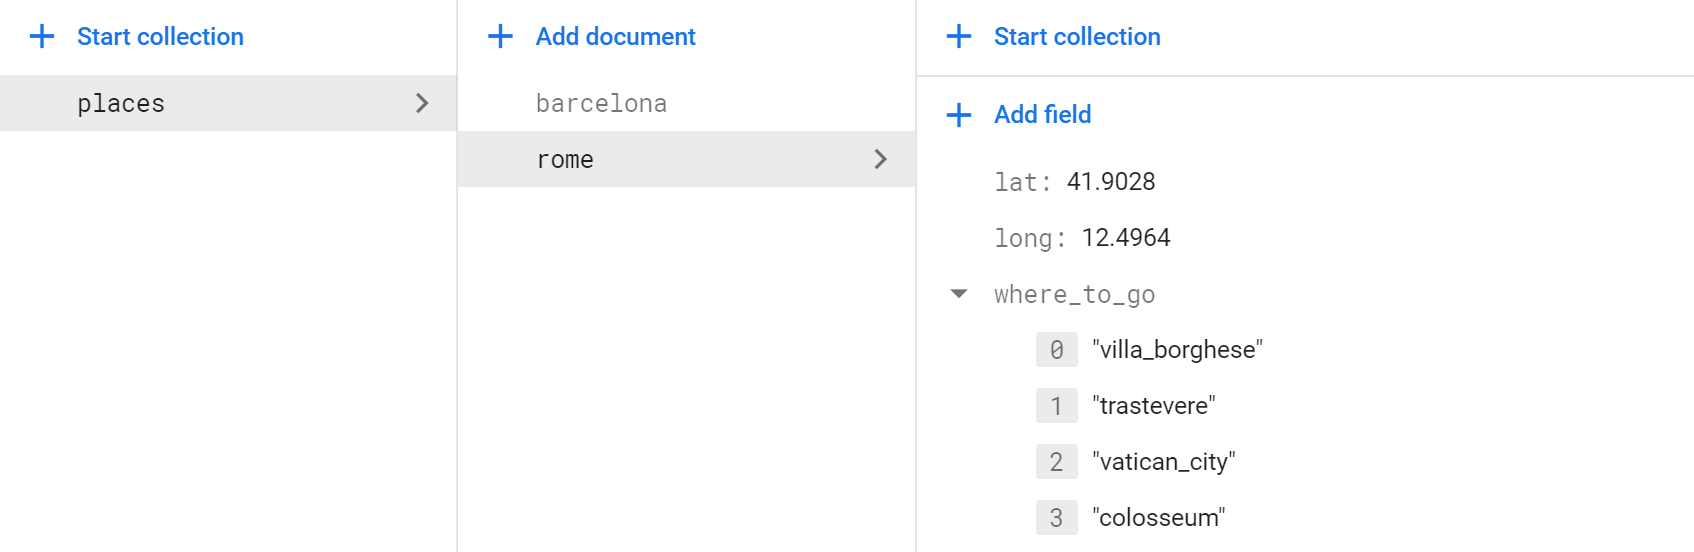
Get
We use the get method to retrieve data. Let’s use this method to get our rome document:
doc = collection.document('rome')
res = doc.get().to_dict()
print(res)[Out]: {
    'lat': 41.9028, 'long': 12.4964,
    'where_to_go': [
        'villa_borghese',
        'trastevere',
        'vatican_city'
    ]
}
We can also perform a .get() operation on collection to return an array of all documents contained within it. If we had two documents, it would look like this:
docs = collection.get()
print(docs)[Out]: [
  <google.cloud.firestore_v1.document.DocumentSnapshot object ...>,
  <google.cloud.firestore_v1.document.DocumentSnapshot object ...>
]
These documents are stored as DocumentSnapshot objects — the same object types we receive when using the .document(<doc-id>).get() method above. As with the first get example — we can use .to_dict() to convert these objects to dictionaries.
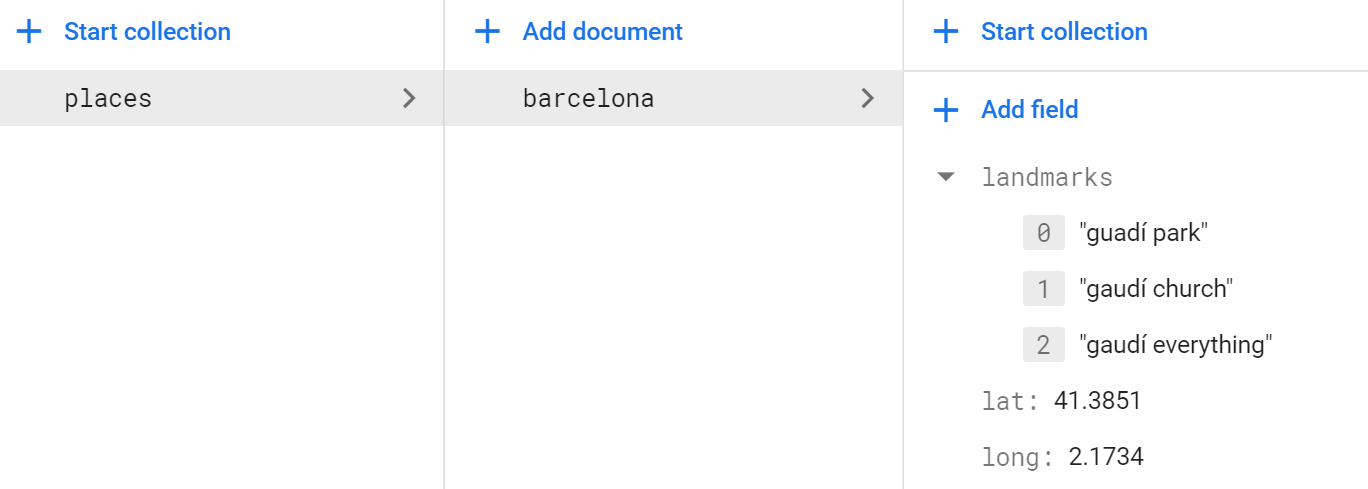
Create
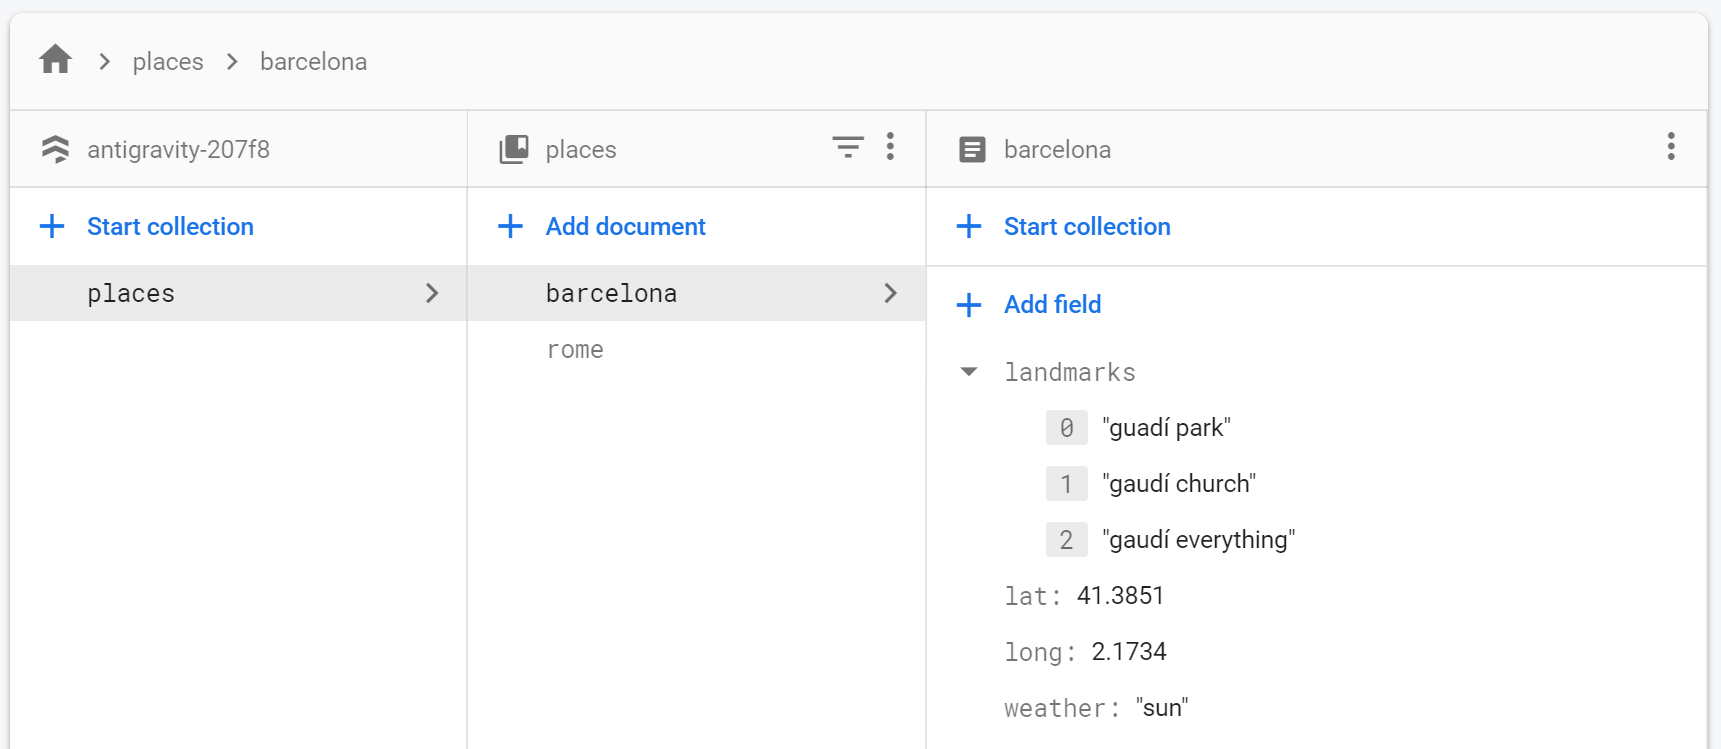
We create documents using both the .document(<doc-id>) and the .set() method on collection. The .set() method takes a dictionary containing all of the data we would like to store within our new <doc-id>, like so:
res = collection.document('barcelona').set({
    'lat': 41.3851, 'long': 2.1734,
    'weather': 'great',
    'landmarks': [
        'guadí park',
        'gaudí church',
        'gaudí everything'
    ]
})
print(res)[Out]: update_time {
    seconds: 1596532394
    nanos: 630200000
}
If the operation is successful, we will receive the update_time in our response.


By navigating back to the Firestore interface, we can see our new document data as above.
Modify
Sometimes, rather than creating a whole new document, we will need to modify an existing one. There are several ways of doing this, depending on what it is we want to change.
To update a full key-value pair, we use update:
res = collection.document('barcelona').update({
    'weather': 'sun'
})
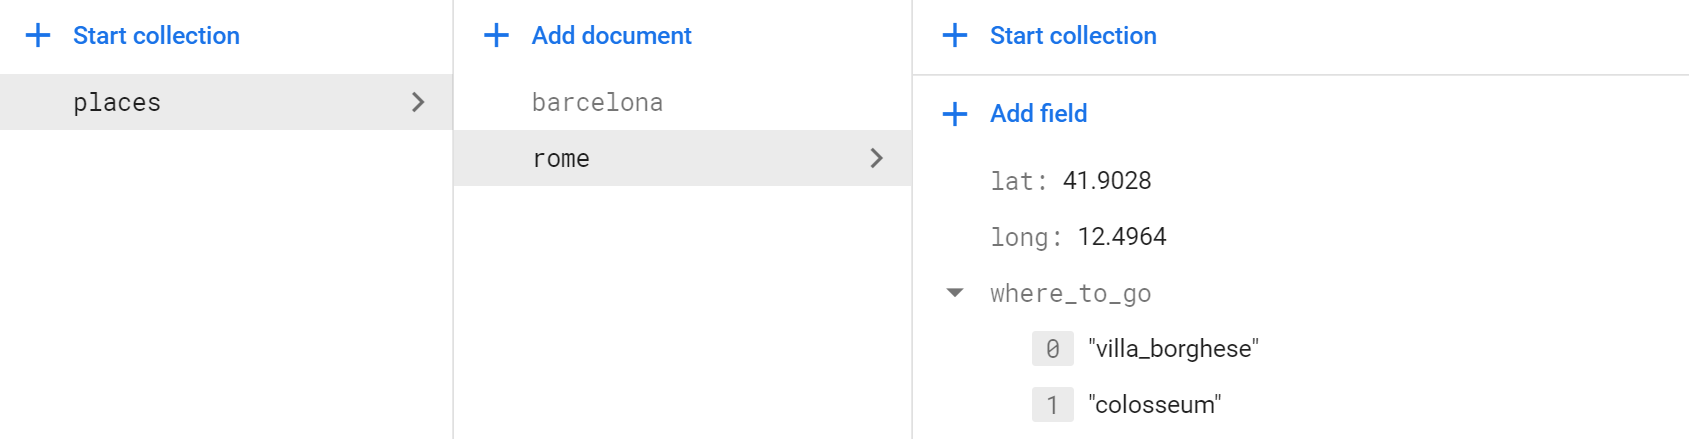
The update method works for most values, but when we simply want to add or remove a single entry in an array, it is less useful. Here we use the firestore.ArrayUnion and firestore.ArrayRemove methods for adding and removing individual array values respectively, like so:
collection.document('rome').update({
    'where_to_go': firestore.ArrayUnion(['colosseum'])
})
And to remove vatican_city and trastevere:
collection.document('rome').update({
    'where_to_go': firestore.ArrayRemove(
        ['vatican_city', 'trastevere']
)})
Delete
Other times, we may need to delete documents in their entirety. We do this with the delete method:
collection.document('rome').delete()

If we wanted to delete a single field within a document, we could use firestore.DELETE_FIELD like so:
collection.document('barcelona').update({
    'weather': firestore.DELETE_FIELD})
Query
Taking things to the next level, we can specify what exactly it is we want.

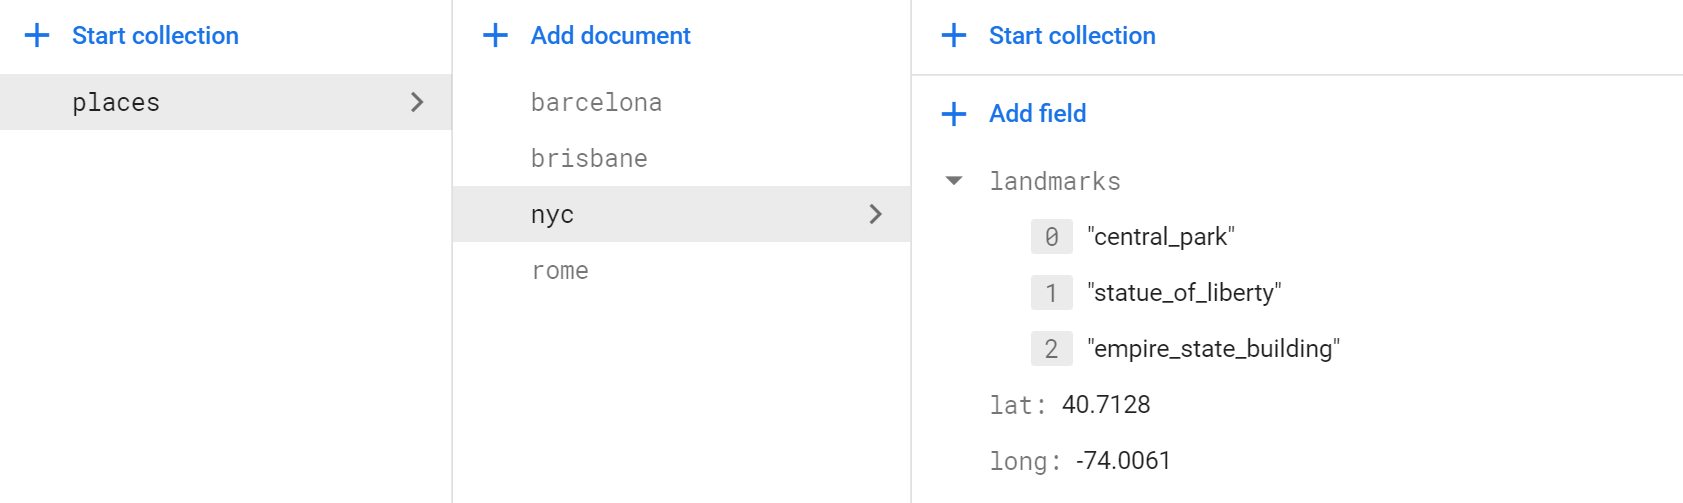
For this example, we have added several global cities (code for adding them is here) to Firestore.
We will query for all cities within Europe — which we are defining as having a longitude of more than -9.4989° (west) and less than 33.4299° (east). We will ignore latitude for the sake of simplicity.
To query our Firestore, we use the where method on our collection object. The method has three arguments, where(fieldPath, opStr, value):
fieldPath— the field we are targeting, in this case'long'opStr— comparison operation string,'=='checks equalityvalue— the value we are comparing to
Anything true for our query will be returned. For our example, we will find documents where long > 9.4989 — which we write as:
collection.where('long', '>', 9.4989).get()

With this query, we return barcelona, rome, and brisbane — but we need to exclude anything East of Europe too. We can do this by adding another where method like so:
collection.where('long', '>', -9.4989) \
          .where('long', '<', 33.4299).get()

That’s all for this introduction to Google’s Firestore. For easy, secure, and robust cloud-based databases Firestore truly is fantastic.
Of course, there’s a lot more to the cloud than data storage alone. AWS and Azure are both great too, but the ease of use with GCP’s Firebase configuration is simply unmatched to anything else out there.
With very little time, it is effortless to learn everything we need to build a full application from the front-end UI to our data storage setup.
If the cloud is somewhat new to you, don’t hesitate to jump in — it is simply too valuable a skill to miss.
If you have any suggestions or would like to talk with me about Firestore — or getting started with the cloud — feel free to reach out to me on Twitter or in the comments below.
Thanks for reading!
Interested in learning more about the other side of this? Feel free to read my introduction to Angular — a fantastic and surprisingly simple front-end framework:


No comments:
Post a Comment