Why a Python package?
Python is an intuitive general-purpose language with an easy-to-understand syntax. It makes prototyping, web development, data science and more, much easier than in any other programming languages. This is due to its large and supportive community and its numerous software libraries.
You have ever found yourself writing mutliple times the same lines of code in different projects? Or perhaps, you have already written some useful library that you would like to make available to others? Or maybe, you are just interested in Python Packaging or in contributing to the Python community?
In this article we will create a small package and then upload it to Python Package Index (PyPi) so that anyone can download and use your code as a software library using pip install .
When I built my first package in Python, I found the process somewhat tedious. That motivated me to write this article which will put you through the basics of how to build a Python package and share it with the rest of the world.
Requirements
If you have a GitHub account and Python installed you can jump ahead to the Project Overview.
Git Repository
To be part of the open-source community, you must publicly host a project on a version control hosting service. The most common choice is to use a Git repository host which holds a virtual storage of your project. It allows you to coordinate work among programmers and save versions of your code, which you can access when needed. The most used hosting service is GitHub. If you don’t have an account yet, the first step is to create one right here.
Python
We will use Python 3. Any version from Python 3.5 can be used for the project. If you don’t have Python, you can download it from python.org’s download page. I will be using Python 3.7 on Windows, yet it doesn’t matter what version or OS you have for this project. If you are new to Python, I could suggest you to go through some exercises of this tutorial.
IDE
An Integrated Development Environment (IDE) is a source code editor that provides you with debugging and automation tools. It doesn’t matter what code editor or IDE you use as long as you like it. I will personnaly use a light yet powerful code editor called Visual Studio Code.
Project Overview
Let’s now build a simple package dealing with prime numbers. If you already have some code you would like to use instead, feel free to skip this part after structuring your code to resemble the project.
The first thing you have to do is find a suitable name for your library. Since our library deals with prime numbers, I went for primelib .
Below is how the project structure will look like. You can either create the files alongside me or directly download the whole repository on GitHub.
primelib/
    primelib/
        __init__.py
        prime_numbers.py
    tests/
        test_prime.py
    .gitignore
    LICENSE
    README.md
    setup.py
This may look like a lot of files but don’t worry, we are going to make and explain them one after the other.
Build The Project Step by Step
Initiate and Clone the GitHub Repository
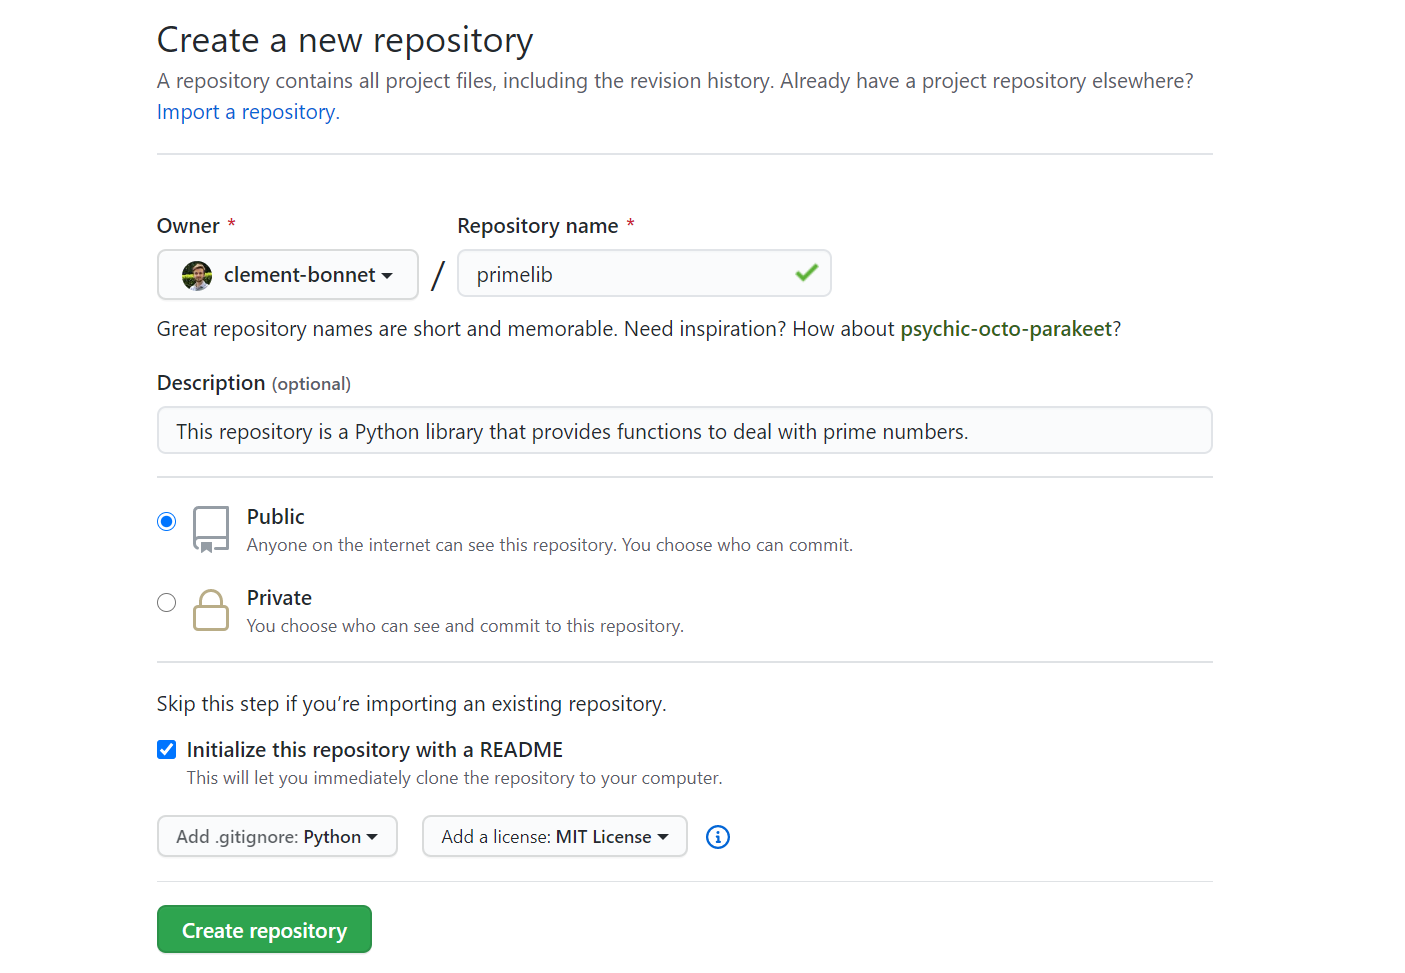
The first thing to do is to initiate a repository in GitHub. Sign in on GitHub and click the green “New” button. You should come upon a page whose title is “Create a new repository”. Fill in the blanks like below while opting for a README file, a Python .gitignore file, and an MIT License. When you are ready, click “Create repository”.

Once you have your repository created on GitHub, you must clone it locally on your computer. For this you should have Git installed as well as a terminal on your machine. In Windows I recommend to use the new Windows Terminal although you can definitely go for the Command Prompt. Open a terminal and make sure git is correctly installed by running git --version . Then go wherever you would like to store your project locally using cd . Finally you can run the git clone https://github.com/YOUR-USERNAME/primelib.git . The link is provided when clicking on the green “Code” button.
You should now have your project copied on your computer. Feel free to open the primelib folder in your favorite code editor. You should have the following structure.
.gitignore
LICENSE
README.md- The .gitignore file enables you to ignore some files while tracking and uploading your code to the repository.
- The LICENSE file is just a .txt file containing the license for the project. You can find your needs here, although the MIT license is a good default choice for several projects.
- The README.md file is a Markdown-formatted file containing a description of the project. You can write documentation for the modules and functions that your library will provide.
Python Code
In the primelib/ folder, you can now add a new folder also called primelib that will contain all your code. In this new folder, create 2 Python files called prime_numbers.py and __init__.py (with two leading and two trailing underscores).
primelib/
    __init__.py
    prime_numbers.py
.gitignore
LICENSE
README.md
Let’s start with prime_numbers.py which contains the Python code we will be using. You can just copy and paste this code into your prime_numbers.py file.
The Python code contains two functions:
_dividesis a private function therefore starting with a leading underscore. It is used by the next functionis_primeand returnsTrueif and only ifdivdividesn.is_primechecks whether a numbernhas a divisor different than 1 and itself, it returnsTrueif so.
The __init__.py file is necessary to turn primelib into a package. It will be the file executed by your Python interpreter when running import primelib or from primelib import ... . To make your functionis_prime directly accessible from your library with the command: primelib.is_prime(n) , you must write the following in your __init__.py file:
Tests
Alright now is time to create some tests to make sure our functions work as expected. You can now create a tests folder within your project directory and add a test_prime.py file in it.
primelib/
    __init__.py
    prime_numbers.py
tests/
    test_prime.py
.gitignore
LICENSE
README.md
You can simply copy the following tests.
Then you can use the Pytest library which is part of Python Standard Library, so it comes with Python, no need to install it. Pytest will automatically check your assert statements in any test_*.py file. In your terminal, you can just run the following command.
python -m pytestYou should now see your two tests passed with success. This means you are ready to build the package and share your library with the community.
Build the Library
We are going to use three libraries setuptools , wheel and twine . Make sure they are available in your environment.
pip install --upgrade setuptools wheel twineOne last file is required to build the package. You must add a setup.py file at the root of your directory. This tells setuptools how to actually build the package. Let’s add this last file to obtain the final tree structure.
primelib/
    primelib/
        __init__.py
        prime_numbers.py
    tests/
        test_prime.py
    .gitignore
    LICENSE
    README.md
    setup.py
Here is the setup.py file. You can copy and paste it while replacing YOUR-USERNAME with your name to make the library name unique.
The three mandatory parameters are name, version and packages. You can now build the library with the following.
python setup.py sdist bdist_wheelThis generates distribution archives in the dist/ directory. You can now install the library in your local environment doing python setup.py install . You can try to import primelib in a Python shell.
python
>>> import primelib
>>> primelib.is_prime(13)
True
Upload on PyPi
Now that you have a working library, you can upload it on Python Package Index (PyPi) to share it with the Python community. For the purpose of this tutorial we are going to use TestPyPi, it works exactly like PyPi but it is made for testing packages in order to keep the real servers as clean as possible.
First you have to register an account on TestPypi and verify your email. You can finally upload your package as archives using the following line.
python -m twine upload --repository-url https://test.pypi.org/legacy/ dist/*That’s done! Your package is now available for the community. If it was uploaded on PyPi you would directly be able to install the package with pip install primelib , but since it’s on TestPyPi for now, you can install your package using the following:
pip install --index-url https://test.pypi.org/simple/ primelib-YOUR-USERNAMEIf you encounter any issues with packaging, please refer to the Python Packaging tutorial.
Your library is now available within your Python environment. I strongly recommend to use virtualenv to manage different environments.
Conclusion
Congrats! You have learnt how to create a Python package to wrap some code of yours and then how to share your library with the community so that anyone can use your work.
I hope you now feel ready to contribute to the Python community and share your great code with the rest of the world!
If you’re interested in going further, I would recommend these important, yet much more advanced topics:
- Use virtual environments (virtualenv)
- Use a continuous integration tool (Travis CI)
- Versions management tools (SemVer)
- Automate testings with nox (nox)
- Automate HTML documentation (Sphinx)


No comments:
Post a Comment