This post assumes that you have some basic understanding of Docker, Docker Compose, and the key terms used in the ecosystem. Should you need to get up to speed, the “Get Started” section of Docker Docs is a great place to start. It is also the first post of a 2-part series on our experience experimenting with Docker to containerize applications at Rate.
In part 1 (this post), we will talk about the steps we took to turn Docker containers into development machines, and the lessons we learnt along the way. In part 2, we will talk about how we use Docker containers to run a distributed application and improve our testing workflow.
Our Motivations
Developers usually have to download a number of tools to set up a dev environment. For a simple web server, this means downloading and installing the language library, a database client, external CLI tools to perform database migrations, a GUI code editor, a GUI database client. To further complicate things, developers may also be using different machines with different OSes. This has a high chance of causing cross-platform compatibility issues that may arise during initial setup or daily workflows.
A migration script that executes fine in the Terminal of a MacBook is likely to give problems when being run in Windows Powershell or Command Prompt. We have personally experienced issues like this, which are often not straightforward to solve. The causes range from the unobvious, such as differences in character encoding between Terminal and Powershell, to more salient causes like CRLF/LF conversions.
We also wanted to simplify the initial setup process for all our applications across the board. This will speed up the onboarding process for new engineers who join our team.
Lastly, we wanted multiple developers to be able to run integration tests locally without having to rely on a single shared remote staging instance. This will allow different developers to perform integration tests on different versions/branches of an application without them having to take turns hosting it on our staging instance. Of course, some tests require testing on a remote instance to best replicate the production environment. But for simpler tests, developers shouldn’t need to rely on the staging instance.
These points can be summarised into the following requirements:
Alleviate cross-platform compatibility issues.
Simplify the setup of dev environments.
Allow developers to conduct independent integration tests.
The Idea
In looking for a solution, we realised that Docker might fit the bill. From the way we saw it, using containers as development machines will allow developers to get started with minimal setup. In principle, the development environment would be abstracted from the host OS by having it run in a container.
This allows developers to work on a common container configuration that runs on the same OS and toolset, thereby eliminating cross-platform compatibility issues almost completely. This meets our 1st requirement.
In theory, developers would only need to download Docker and a text editor of their choice, and not have to install external tools and dependencies. Code edits will be done from the editor as per normal and the changes will be tracked and propagated from host to the container. This simplifies initial setup, which meets our 2nd requirement.
In fact, using a running container for development is optional. Developers may just use some containers to develop on the service that he/she is working on, while the other containers will just be used to host and run the applications. This gives developers the ability to conduct on-demand integration testsby spinning up containers for the required services, satisfying our 3rd requirement.
However, in practice, it was not as seamless and straightforward as we thought it would be, as we will see in the following text.
The Exploration
Our sample application
To provide a context for the following problems, let’s assume we are containerizing a simple Go web server. We will run it as a multi-container app and orchestrate it using Docker Compose. This app will consist of 2 services, 1 for our server & 1 for our database.
Compose file
Dockerfile
Achieving bidirectional file sync
The first order of business is to ensure that any code edits we do on the host machine are automatically propagated to the container. This makes the development experience feel more natural.
This is only possible through bind mounting, which works similar to a Linux mount. When we mount a path in the host to a path in the container, the contents of the host directory will completely overwrite whatever is in the container directory, regardless of whether the container directory has files which were not present in the host directory at mount time. The result is that the container directory will be an exact snapshot of the host directory.
Problem: No dependencies/Outdated dependencies
Herein lies our first issue. Up to this point, the new developer has only cloned the project and has not installed any dependencies. Because of our initial requirement of not requiring the user to download tools, the developer is not able to run glide install . Hence, the host directory will either not have dependency folders, or they will be outdated. This erroneous state of dependencies is then replicated to the container.
Even if we install dependencies during the image build step as an instruction in our Dockerfile , they will have no effect as the folders will be overwritten by bind mount. This means we are not able to compile and run the server once a container is created as it does not have the full set of dependencies. This would defeat our purpose of using these containers in the first place.
Therefore, we need to prevent dependency folders which have been installed during image build from being overwritten by bind mounting, which can be done in multiple ways.
Possible solution: Bind dependencies to named volumes
Doing this will make these folders immune to the effect of bind mounting. They will instead pull and push from the data stored in the attached named volumes. The drawback is that these folders will be transparent to the bind mounting, so they will not be synced from the container to host either.
In fact, this is not what we want. We need dependencies folder to exist on the host so that our code editor will not show linting errors on our existing import statements for external libraries.
Import linting errors
Of course, if you don’t find that this hinders your development experience, then you are good to go, as the dependencies already exist in the container anyway and the server would be compilable there. But if you wish to solve this, that means we need to find a way to fulfil the following 3 criteria:
Bind mount a host directory that has no dependencies.
Dependencies must be installed in the container generated from the image.
Dependencies must then be synced back to the host directory.
Which means we need to try another approach.
Realistic solution: Install container dependencies to a cache folder
This is done by installing container dependencies to a directory that is outside the mounting destination. This has the same effect as the previous solution where dependency folders are unaffected by bind mounting. For example, if you are mounting to /app_workdir , then install to /dependencies .
After that, copy over all contents of /dependencies to /app_workdir . Thanks to the bind mount, our dependencies will now appear on the host too. But… there’s a caveat. The copy operation from /cache to /app_workdir is done by SSH-ing into the container and running cp SOURCE DEST. For big projects with many dependencies, copying can take as long as ~10 mins. This may vary depending on the performance of your host machine, but in essence, you have to be mindful of this drawback.
Alternative solution: Install dependencies on container start
Since container creation takes place after volume mounting, we can install dependencies at this step without them being overwritten after. It keeps the dependency installation process in the container yet makes them available on the host side thanks to the bind mount. However, doing this also lengthens the time it takes for a container to start.
Install on entrypoint
Now, keep in mind that the time it takes to copy in solution 1 and to install in solution 2 both increase with the number of dependencies you have.
QoL improvement: Live reload
Now that we’ve solved the dependency problem, we are ready to develop on Docker. In fact, we can further improve the development experience by enabling live reload in our container.
For a Go application, you can use realize to do this. Running realize start in the app root will cause it to build and run the application entry point and track any changes to .go files (Note: remember to use polling mode. See here). Now we can write code on the host and be sure that the container will detect the change and automatically restart the server.
Conclusion
Cons
In order for containers to achieve the same level of productivity as native development environments, we need to perform 1 of the 2 available workarounds mentioned above to solve dependency problems. The amount of time it takes for us to install/copy dependencies in both solutions will increase as our project gets larger. This means that we have introduced a slowdown in the development process even though the initial environment setup is simplified.
Another tradeoff is that now every command you run on the traditional non-docker environment will need to be run inside the container by SSH-ing into it. These commands are also likely to run slower in the container than on the host machine.
Pros
The experience you get from setting up Docker will be a good preamble to using it as a deployment tool. You will also have a decent understanding of the nuances and limitations of Docker. This brings us to the question: Where does Docker really shine?
What we have realized after all the trial and error is that Docker containers are best suited for developers to run self-hosted applications quickly and easily. Developers can then test their code by connecting to these local instances instead of connecting to remotely hosted instances.
In Part 2, we will explore how we can use Docker containers to run a distributed application with ease.
At this point, we realised that Docker containers shouldn’t be used as dev machines but should instead be used as hosting machines. We still saw benefits in containerization, primarily as a way for developers to self-host applications easily. This allows developers to conduct integration tests independently, which we feel is a significant boost in productivity.
Hence, we proceeded to configure our applications as Compose services. The following text details the steps we took to build the Compose configuration.
Format
TheDocker Compose Docsalready does a great job of giving you a full run-through of how to set up multiple services in Compose. Instead of repeating what they have done, this post aims to be a concise instructional for any developer seeking to build a Compose config. We will focus on the key components you need to take note of.
The Building Blocks
Building a Compose config can be divided into the 6 main steps:
Split your app into services
Pull or build images
Configure environment variables
Configure networking
Set up volumes
Build & Run
1. Split your app into services
The first order of business is to think about how you’re gonna split the services into different services. Building on from our simple web server example from part 1, we can introduce a simple client application that acts as the view layer. Together with the server and the database, it will run a simple web application which is composed of 3 different services:client,server,database.
Both theclientandserverservices are built from instructions (i.e. Dockerfiles) while thedatabaseservice is built off a public image (i.e.postgres). This means you need 1 Dockerfile for theclientand 1 Dockerfile for theserver.
Assuming we have a sampleclientapplication written in React, the following could be a simple Dockerfile for it:
I have already included the Dockerfile for our Go server inpart 1.
2. Pull or build images
For some of your services, you may not need to build from a custom Dockerfile and a public image on DockerHub will suffice. You can instruct Compose to pull from DockerHub by declaring: image: "<repository_name>:<tag>"
For example, our database service pulls the public image of Postgres running on Alpine Linuxby having this declared: image: "postgres:alpine"
However, in most cases, you would likely have custom Dockerfiles to build an image from and this will require specifying a build context. This defines the path which thecompose filewill look at to build the service image. This path must contain the Dockerfile. Here are some common ways to define build contexts:
Tip 1: Building from a remote location is undoubtedly slower than building from a location on disk, so if your developers have already cloned the repo beforehand, then its better to build from a path. However, using a Git URL is especially useful for CI build scripts!
Tip 2:You can achieve lean images by minimising the number of build layers. You can useDiveto help you do this. It analyzes a Docker image by studying how its contents are being changed over the build process with every addition of an image layer.
3. Configure environment variables
Most applications use environment variables for initialisation and startup. For example, we can supply the environment variablesPOSTGRES_USERandPOSTGRES_DBto define the default superuser and database of thedatabaseservice. These variables can be defined in thecompose filelike so:
Other than that, you can also define environment variables in a.envfile and place it in the same directory as thecompose file. It will be read automatically by Compose when it starts.
You can then pass these variables into the container by including their names without specifying the values.
4. Configure networking
Containers communicate with each other through their own internal network that is created by Compose. Containers refer to each other through their service name. So if the web server is running on port 5000in the container, the client application can connect to the server over the internal Compose network throughweb-server:5000.
If you are trying to connect from the host machine, you will need to expose the service on a host port, in the format of<host port>:<container port>like so:4200:5000.
5. Set up volumes
In most cases, we would not want our database contents to be lost every time thedatabaseservice is brought down. A common way to persist our DB data is to mount a named Docker volume.
Tip:Any named volumes that we use must be declared in the top-levelvolumeskey.
6. Build & Run
Now, you are set to build the images for your services and generate containers from these images.
Build services:docker-compose build [SERVICE...] Generate and run containers:docker-compose up [SERVICE...] View running containers:docker-compose ps [SERVICE...]
Tip:The standard output ofdocker-compose upmay hang occasionally, leaving you to think that the application is not responding. Hence, you can run containers detached with the-dflag and tail the container logs manually withdocker-compose logs --follow [SERVICE...]
Result
If you have followed all the steps mentioned above, you will end up with a simplecompose filethat looks something like this:
With this setup, any developer will be able to run these services without even cloning the repositories. They would only require Docker installed on their machine. The “build once, run everywhere” nature of Docker & Compose will bevery useful for development and testing, regardless of the type of engineer you are.
Moving forward, you can easily add more services to the Compose configuration and scale it up usingreplicasas your system grows. This will make it possible to deploy your system to production as a multi-container application.
The following section offers some examples of how Compose can be integrated into the different stages of your software development lifecycle.
LaraDock provides a pre-configured and easy-to-use PHP development environment, similar to the one discussed inPart 1. The highly customisable nature of LaraDock is possible through the heavy use of Compose services to represent a “layer” in the LaraDock tech stack. For example, if you use LaraDock to run a LAMP stack (i.e.Linux, Apache, MySQL, PHP), each of the 4 components will be run as a Compose service.
Have a look at theircompose fileto get a sense of how big Compose applications can get!
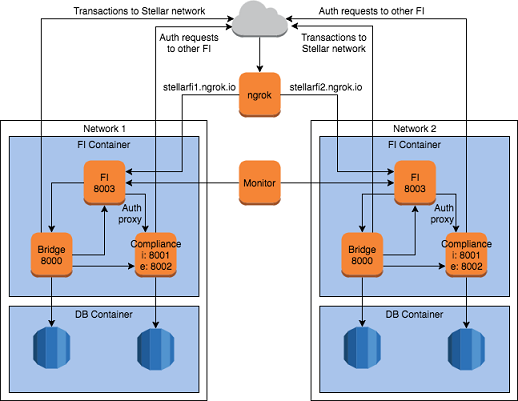
The Stellar team utilises Compose to perform integration tests on Travis CI. Conducting integration tests for the Stellar blockchain network requires its different components (i.e. financial institution (FI) server, compliance server, DBs etc.) to be up and running simultaneously. For this to be possible, different components are encapsulated in different containers which are then brought up by Compose.
Once all components are up, Travis CI executesscript.shto run the integration tests. Check out theircompose filehere.
Blue-green deployment is an important technique to minimise service downtime when deploying codebase changes to production. With this technique, a software will be deployed to two different production environments with identical configurations (i.e. “blue” and “green”). At any time, at least one of them will be alive and servicing requests in production while the other is idle and used as a failover. Let’s assume the active environment is blue and the idle environment is green.
When you wish to release a new version of the software, you can deploy it to the idle green environment first. Once the software is ensured to be working properly in green, you can switch your routing to point to green instead of blue. This act of hot-swapping environments after deployment can cause much shorter downtime as compared to simply deploying new versions to a single shared environment.
To hot-swap between green and blue environments, one would need a service discovery mechanism. This mechanism will automatically pick up the environment that is alive and uses it to serve content to incoming HTTP requests. The developer can then choose which codebase version to run in production by keeping the appropriate environment alive. Of course, you may also have both green and blue running concurrently as a failover system. You can then specify to the discovery tool which environment should take priority in the event that both are alive.
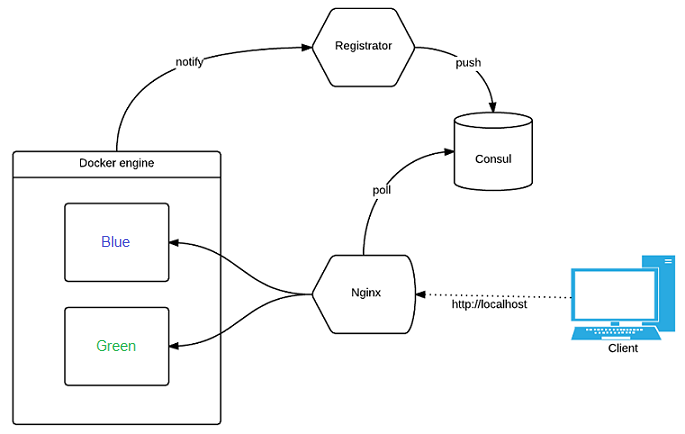
This proof of concept project on GitHub implements blue-green deployment using Compose. The sample application being used is an Nginx web server. It implements service discovery through Registratorand Consul. Registrator is a tool that tracks the availability of Compose services by checking if its containers are online. It will then register/deregister these services to a service registry it is connected to, which is Consul in this case.


No comments:
Post a Comment