Why Machine Learning Pipelines?
A lot of attention is being given now to the idea of Machine Learning Pipelines, which are meant to automate and orchestrate the various steps involved in training a machine learning model; however, it’s not always made clear what the benefits are of modeling machine learning workflows as automated pipelines.
When tasked with training a new ML model, most Data Scientists and ML Engineers will probably start by developing some new Python scripts or interactive notebooks that perform the data extraction and preprocessing necessary to construct a clean set of data on which to train the model. Then, they might create several additional scripts or notebooks to try out different types of models or different machine learning frameworks. And finally, they’ll gather and explore metrics to evaluate how each model performed on a test dataset, and then determine which model to deploy to production.

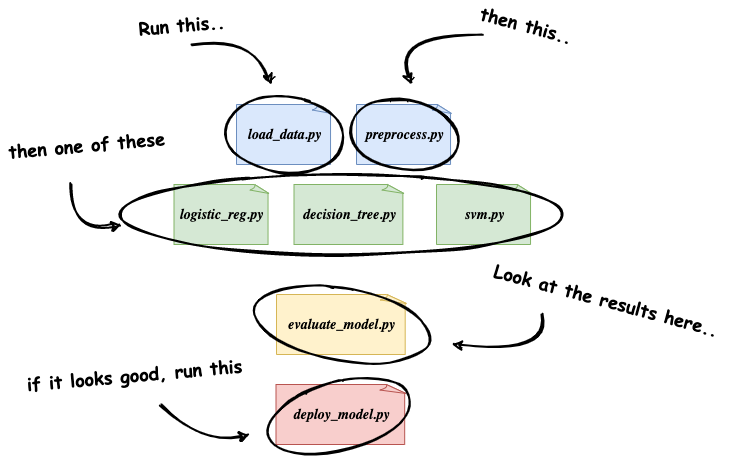
This is obviously an over-simplification of a true machine learning workflow, but the key point is that this general approach requires a lot of manual involvement, and is not reusable or easily repeatable by anyone but the engineer(s) that initially developed it.
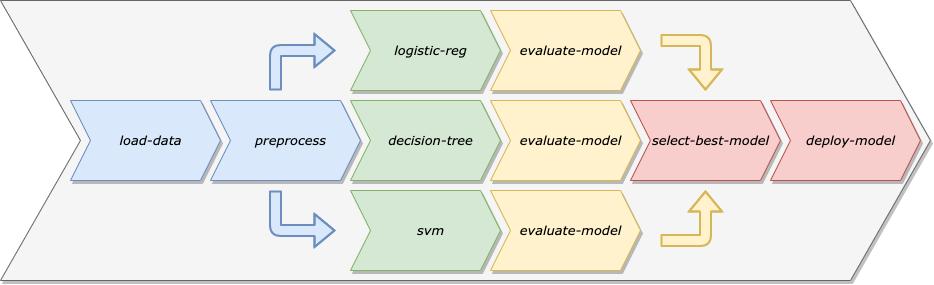
We can use Machine Learning Pipelines to address these concerns. Rather than treating the data preparation, model training, model validation, and model deployment as a single codebase meant for the specific model that we’re working on, we can treat this workflow as a sequence of separate, modular steps that each focus on a specific task.

There are a number of benefits of modeling our machine learning workflows as Machine Learning Pipelines:
- Automation: By removing the need for manual intervention, we can schedule our pipeline to retrain the model on a specific cadence, making sure our model adapts to drift in the training data over time.
- Reuse: Since the steps of a pipeline are separate from the pipeline itself, we can easily reuse a single step in multiple pipelines.
- Repeatability: Any Data Scientist or Engineer can rerun a pipeline, whereas, with the manual workflow, it might now always be clear what order different scripts or notebooks need to be run in.
- Decoupling of Environment: By keeping the steps of a Machine Learning Pipeline decoupled, we can run different steps in different types of environments. For example, some of the data preparation steps might need to run on a large cluster of machines, whereas the model deployment step could probably run on a single machine.
If you’re interested in a deeper dive into Machine Learning pipelines and their benefits, Google Cloud has a great article that describes a natural progression toward better, more automated practices (including ML Pipelines) that teams can adopt to mature their ML workflows: MLOps: Continuous delivery and automation pipelines in machine learning
What is Kubeflow?
Kubeflow is an open-source platform, built on Kubernetes, that aims to simplify the development and deployment of machine learning systems. Described in the official documentation as the ML toolkit for Kubernetes, Kubeflow consists of several components that span the various steps of the machine learning development lifecycle. These components include notebook development environments, hyperparameter tuning, feature management, model serving, and, of course, machine learning pipelines.

In this article, we’ll just be focused on the Pipelines component of Kubeflow.
Environment
To run the example pipeline, I used a Kubernetes cluster running on bare metal, but you can run the example code on any Kubernetes cluster where Kubeflow is installed.
The only dependency needed locally is the Kubeflow Pipelines SDK. You can install the SDK using pip:
pip install kfpKubeflow Pipelines
Pipelines in Kubeflow are made up of one or more components, which represent individual steps in a pipeline. Each component is executed in its own Docker container, which means that each step in the pipeline can have its own set of dependencies, independent of the other components.
For each component we develop, we’ll create a separate Docker image that accepts some inputs, performs an operation, then exposes some outputs. We’ll also have a separate python script, pipeline.py that creates pipeline components out of each Docker image, then constructs a pipeline using the components.
We’ll create four components in all:
- preprocess-data: this component will load the Boston Housing dataset from
sklearn.datasetsand then split the dataset into training and test sets. - train-model: this component will train a model to predict the median value of homes in Boston using the Boston Housing dataset.
- test-model: this component will compute and output the mean squared error of the model on the test dataset
- deploy-model: we won’t be focusing on model deployment or serving in this article, so this component will just log a message saying that it’s deploying the model. In a real-world scenario, this could be a generic component for deploying any model to a QA or Production environment.

If all this talk of components and Docker images sounds confusing: don’t worry, it should all start to make more sense when we get into the code.
Component: Preprocess Data
The first component in our pipeline will use sklearn.datasets to load in the Boston Housing dataset. We’ll split this dataset into train and test sets using Sci-kit learn’s train_test_split function, then we’ll use np.save to save our dataset to disk so that it can be reused by later components.
So far this is just a simple Python script. Now we need to create a Docker image that executes this script. We’ll write a Dockerfile to build the image:
Starting from the python:3.7-slim base image, we’ll install the necessary packages using pip , copy the preprocess Python script from our local machine to the container, and then specify the preprocess.py script as the container entrypoint, which means that when the container starts, it will execute our script.
Building the Pipeline
Now we’ll get started on the pipeline. First, you’ll need to make sure that the Docker image that we defined above is accessible from your Kubernetes cluster. For the purpose of this example, I used GitHub Actions to build the image and push it to Docker Hub.


Now let’s define a component. Each component is defined as a function that returns an object of type ContainerOp . This type comes from the kfp SDK that we installed earlier. Here is a component definition for the first component in our pipeline:
Notice that for the image argument, we’re passing the name of the Docker image defined by the Dockerfile above, and for the file_outputs argument, we’re specifying the file paths of the four .npy files that are saved to disk by our component Python script.
By specifying these four files as File Outputs, we make them available for other components in the pipeline.
Note: It’s not a very good practice to hard-code file paths in our components, because, as you can see from the code above, this requires that the person creating the component definition knows specific details about the component implementation (that is, the implementation contained in the Docker image). It would be much cleaner to have our component accept the file paths as command-line arguments. This way the person defining the component has full control over where to expect the output files. I’ve left it hard-coded this way to hopefully make it easier to see how all of these pieces fit together.
With our first component defined, we can create a pipeline that uses the preprocess-data component.
The pipeline definition is a Python function decorated with the @dsl.pipeline annotation. Within the function, we can use the component like we would any other function.
To execute the pipeline, we create a kfp.Client object and invoke the create_run_from_pipeline_func function, passing in the function that defines our pipeline.
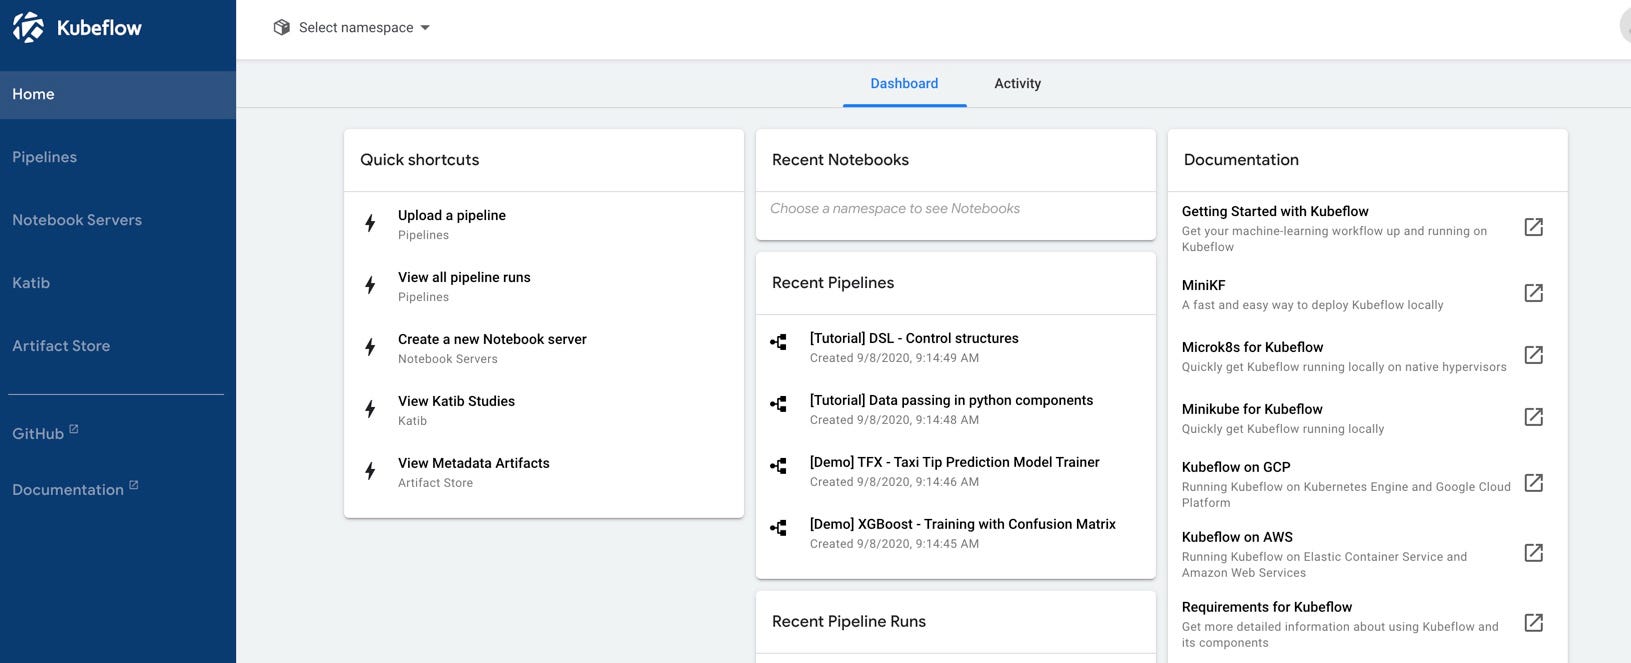
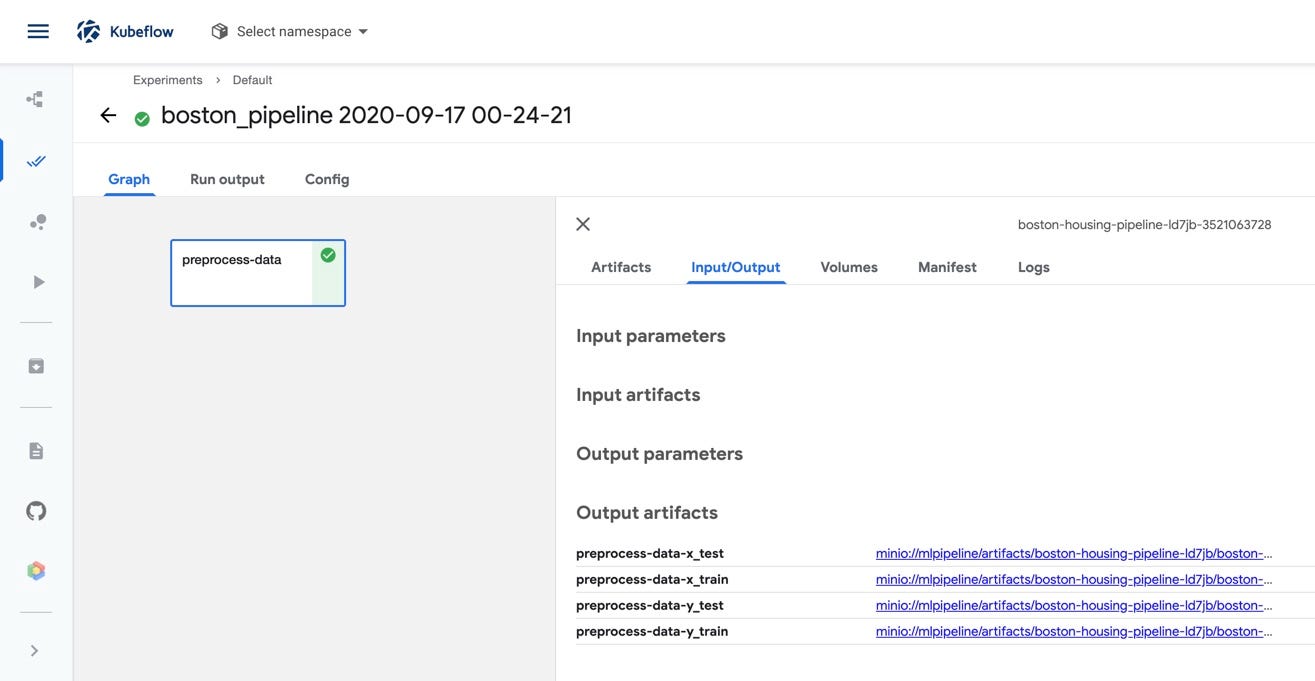
If we execute this script, then navigate to the Experiments view in the Pipelines section of the Kubeflow central dashboard, we’ll see the execution of our pipeline. We can also see the four file outputs from the preprocess-data component by clicking on the component in the graph view of the pipeline.

So we can execute our pipeline and visualize it in the GUI, but a pipeline with a single step isn’t all that exciting. Let’s create the remaining components.
Remaining Components
For the train-model component, we’ll create a simple python script that trains a regression model using Sci-kit learn. This should look similar to the python script for the preprocessor component. The big difference is that here we’re using argparse to accept the file paths to the training data as command-line arguments.
The Dockerfile, likewise, is very similar to the one we used for the first component. We start with the base image, install the necessary packages, copy the python script into the container, then execute the script.
The two other components, test-model and deploy-model, follow this same pattern. In fact, they’re so similar to the two components we’ve already implemented, that for the sake of brevity I won’t show them here. If you’re interested, you can find all of the code for the pipeline in this GitHub repository: https://github.com/gnovack/kubeflow-pipelines
Just like with the preprocess-data component from earlier, we’ll build Docker images out of these three components and push them to Docker Hub:
- train-model: gnovack/boston_pipeline_train
- test-model: gnovack/boston_pipeline_test
- deploy-model: gnovack/boston_pipeline_deploy
The Complete Pipeline
Now it’s time to create the full machine learning pipeline.
First, we’ll create component definitions for the train-model, test-model, and deploy-model components.
The only major difference between the definition of the train-model component and that of the preprocess-data component from earlier is that train-model accepts two arguments, x_train and y_train which will be passed to the container as command-line arguments, and will be parsed out in the component implementation using the argparse module.
Now the definitions for the test-model and deploy-model components:
With the four pipeline components defined, we’ll now revisit the boston_pipeline function from earlier and use all of our components together.
Let’s break this down:
- Notice on line 6, when we invoke the
preprocess_op()function, we store the output of the function in a variable called_preprocess_op. To access the outputs of the preprocess-data component, we call_preprocess_op.outputs['NAME_OF_OUTPUT']. - By default, when we access the
file_outputsfrom a component, we get the contents of the file rather than the file path. In our case, since these aren’t plain text files, we can’t just pass the file contents into the component Docker containers as command-line arguments. To access the file path, we usedsl.InputArgumentPath()and pass in the component output.
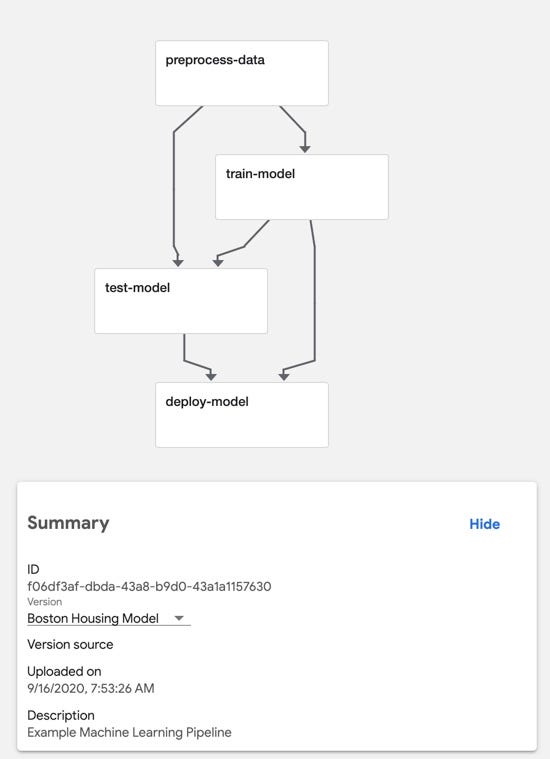
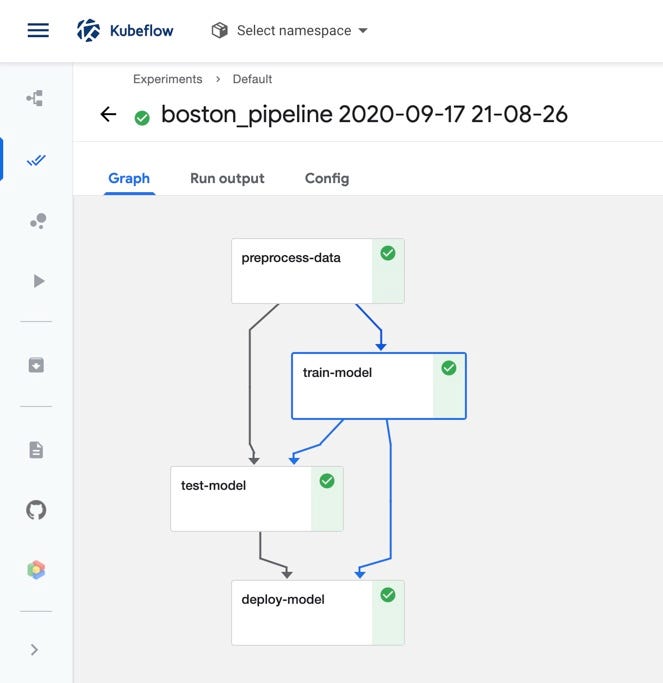
Now if we create a run from the pipeline and navigate to the Pipelines UI in the Kubeflow central dashboard, we should see all four components displayed in the pipeline graph.

Conclusion
In this article, we created a very simple machine learning pipeline that loads in some data, trains a model, evaluates it on a holdout dataset, and then “deploys” it. By using Kubeflow Pipelines, we were able to encapsulate each step in this workflow into Pipeline Components that each run in their very own, isolated Docker container environments.
This encapsulation promotes loose coupling between the steps in our machine learning workflow and opens up the possibility of reusing components in future pipelines. For example, there wasn’t anything in our training component specific to the Boston Housing dataset. We might be able to reuse this component any time we want to train a regression model using Sci-kit learn.
We just scratched the surface of what’s possible with Kubeflow Pipelines, but hopefully, this article helped you understand the basics of components, and how we can use them together to create and execute pipelines.
If you’re interested in exploring the whole codebase used in this article, you can find it all in this GitHub repo: https://github.com/gnovack/kubeflow-pipelines
References
- https://kubeflow-pipelines.readthedocs.io/en/latest/index.html
- https://www.kubeflow.org/docs/pipelines/sdk/build-component/
- MLOps: Continuous delivery and automation pipelines in machine learning
Thanks for reading! Feel free to reach out with any questions or comments.


No comments:
Post a Comment