fter getting a lot of traction on my previous blog on full stack data science: The Next Gen of Data Scientists Cohort, I have decided to start a blog series on Data Science in production. This series will go over the basics of the tech-stack and techniques that you can get familiarized with to face the real data science industry for specializations such as Machine Learning, Data Engineering, and ML Infrastructure. It will be a walkthrough of how you can take your academic projects to the next level by deploying your models and creating ml pipelines with best practices used in the industry.
Data Science in Production
As simple as it may sound, but It’s very different from practicing data science for your side projects or academic projects than how they do in the industry. It requires a lot more in terms of code complexity, code organization, and data science project management. In this first part of the series, I will be taking you guys through how to serve your ML models by building APIs so that your internal teams could use it or any other folks outside your organization could use it.
In classrooms, we generally do take a dataset from Kaggle, do preprocessing on it, do exploratory analysis and build models to predict some or the other thing. Now, Let’s take it to the next level by packaging that model that you built and the preprocessing on the data that you did into a REST API. Huh, what is a REST API? Wait, I am going to go over everything in detail soon. Let’s start by defining what we will be using and the technology behind it.
REST APIs
API is Application Programming Interface which basically means that it is a computing interface that helps you interact with multiple software intermediaries. What is REST? REST is Representational State Transfer and it is an software architecture style. Let me just show you in a simple diagram what I am talking about:

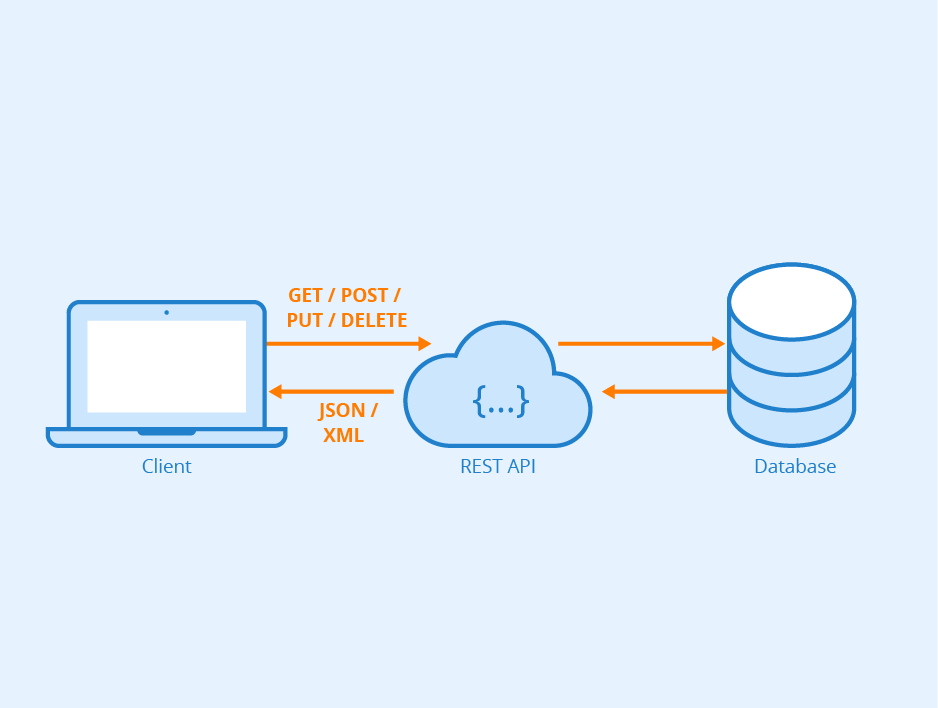
So, the Client can interact with your system in our case to get predictions by using our built models, and they don’t need to have any of the libraries or models that we built. It’s just become easier to showcase your projects if you are appearing for interviews or applying to higher education. It’s something that they can see working rather than three lines of shit written on your resume blah blah blah.
Here we will be building our API that will serve our machine learning model, and we will be doing all that in FLASK. Flask is again a web framework for python. You must have heard about two substantial names in the industry which is Flask and Django. Flask and Django are both amazing web frameworks for python, but when It comes to building APIs, Flask is super fast due to it’s less complicated and minimal design. Wohoo! So, we will be again going through something which is prevalently used in the industry. Without wasting more of your time, let’s start grinding some code and build our API for serving the ML model.
Setting up your environment
First step always would be to setup your own project environment so that you can isolate your project libraries and their versions from interacting the local python environment. There are two ways in which you can setup your python environment for your project specifically: Virtualenv and Conda. Just to be on the same page I will be using Python 3.8.3 for this entire project but you can use any version and that should be fine.
After any of the above commands in your terminal. you will be in your project’s own virtual environment. if you want to install anything in the virtual environment than its as simple as the normal pip install. It’s always a standard practice in the industry to create virtual environments while you are working on any of the projects.
Once you are in the virtual environment, use the requirements.txt from the github repo: https://github.com/jkachhadia/ML-API
make sure you copy the requirements.txt file from the repo to your project folder as we will be using it later and I will also show you how you can create your own requirements.txt file. After copying the file to your project folder and making sure that you are in the environment that you just created, run the following commands in your terminal to install all the dependencies you need for the project.
Now, you are all set.
Building your ML model and saving it
For this project, our main aim is to package and deploy our built ML model in the form of an API. So, we will be using the Kaggle’s starter Titanic dataset and a basic logistic regression model with feature engineering to build our model. If you want to know how I built the basic model. The code can be found on this Github repo. You can find the code in the model_prep.ipynb ipython notebook(assuming you are familiar with ipython notebooks). The code is inspired by one of the kaggle kernels that I found as that’s not the main goal over here.
We will be using the pickle library to save the model. Your model, in turn, is a python object with all the equations and hyper-parameters in place, which can be serialized/converted into a byte stream with pickle.
The above code will be found in the model_prep notebook as well.
Fun Part — Flask API creation and folder management
We will now create a Flask API with best practices. what best practices man? like how to create a clean code that can be shipped to production and easy to debug if any issues occur.
So, first, we will create a helper_functions python script which has all the preprocessing modules we will need. Again, this is the same preprocessing code that you will find in the model_prep notebook but we are creating functions out of it to be reused anywhere else.
Now, we will not hard-code the variables or names that we will be using in our final API script. So, we can create a separate python file named configs.py which will basically store all our variables for security purposes.
Let's start building our API. we will start with a simple one: just a new version of hello world. Create a new file named app.py and let's import all the libraries we will need for getting our API up and running.
we have imported all the libraries in the above code as well as all the helper functions and configs with variables. let's initialize a flask application instance now.
To start with, Let's write a simple flask type hello world and create a new route for our flask application. Routes are generally the urls which will be supported by functions.
Congrats! you wrote your first flask route. Now let's get this running by running the app object that we initiated with Flask.
yes! we are kinda done with our first mini gig. Let's run this on our local. Open your terminal and run app.py (make sure you are in the project folder where app.py is there and you are in the virtual environment which we created before)
woohoo! our Flask app should be running on http://127.0.0.1:5000. If you go to that url using your browser. we should get the message that we added in the first route: “hello from ML API of Titanic data!”. Super Cool!
Let's start building our new route which will be our way of exposing our ML model.
In our new route above with added predictions/, what happens is if someone sends a get request to this URL of our flask application along with raw data in the form of JSON, we will preprocess the data the same way we did for creating the model, get predictions and send back the prediction results.
request.get_json() will basically give us the JSON data that was sent with the get request. We convert that data into a dataframe, use our helper function preprocess() to preprocess the dataframe, use the model_name and column names from the config file to basically load the model with pickle and make predictions on the sliced dataframe.
After making the predictions, we will create a response dictionary that contains predictions and prediction label metadata and finally convert that to JSON using jsonify and return the JSON back. Remember that 200 is sent as it was a success. Once you save app.py after editing, the flask application, which is still running, will automatically update its backend to incorporate a new route.
Testing our API on local
To test our API on local we will just write a small ipython notebook or you can use one in the github repo as well named testapi.ipynb
If you run the above code in your python terminal or ipython notebook, you will see that your API is working like magic. Hurray! You have successfully exposed your model but locally :(
Deploying the ML API on Heroku
Heroku is a cloud platform that helps you deploy backend applications on their cloud. Yes, we will be deploying our ML model API now in the cloud.
Let's get started. Create your account on heroku.com. Once you do that and go to the dashboard you will have to create a new app.


You click on create new app and name it accordingly as I named mine ‘mlapititanic’


Awesome! Now, you can click on your app, go to settings and add python to your buildpack section.


You can do this the other way as well by installing the Heroku CLI which we would have to eventually do to deploy our application.
After installing the CLI you can also create an app from the command line as shown below:
I love the CLI way as I have been an Ubuntu/Mac person since 5 years now.
Now we will add two files which is the Procfile and runtime.txt to the folder.
Procfile will basically run your app with gunicorn. make sure you have that installed in your virtual environment. Now, As I told you we will go through how you can create your own requirements.txt file.
This will basically dump all your app/virtual environment’s dependencies into a requirements.txt file.
Now, If you go to the deploy section of heroku, they have super clear instructions written there about how to deploy but I will put them below.
These commands will push your code to the heroku cloud and build your flask application with dependencies. Congratulations! you have deployed your ML API into cloud/production.
Now you can go to https://<your-app-name>.herokuapp.com/ and you will see a hello from the app as we saw on the local.
Now we will test the deployed API!
If it’s running. You are all set! Woohoo!
Conclusion
Thus, we built our very own ML model API with best practices used in the industry and this could be used in your other projects or you could showcase it on your resume rather than just putting in what you did like you use to. This is something live and someone can play with and proof of something that you have really built.
Shoot your questions on [myLastName][myFirstName] at gmail dot com or let’s connect on LinkedIn.


No comments:
Post a Comment