Introduction
No matter how efficient your Machine Learning model is, it will only be useful when it creates value for the Business. This can not happen when it’s stored in a folder on your computer. In this fast-growing environment, speed and good deployment strategies are required to get your AI solution to the market!
This article explains how Fast APIcan help on that matter. We will start by having a global overview of Fast API and its illustration by creating an API.
FastAPI — What and why?
You might already be familiar with different frameworks such as Flask, Django, etc. However, Fast API stands out when it comes to high performance and development for RESTful microservices. This can be highlighted by the following extract of the benchmarking analysis from techempower.

Implementation for our Use Case
The goal here is to serve a sentiment classification model, which aims to predict if a given text message is spam or ham. We will not go deeper into the whole Data Science process (data analysis, data preprocessing, model training, etc.), since the objective of this article is centered around creating the API, which requires that the model is already trained. If you are interested in knowing more about that, please refer to this article.
Let’s start by understanding the workflow highlighting the main components of what we are trying to achieve.

Step 1: Building the API
- the user/client sends a request to the uvicorn server which interacts with the API to trigger the prediction model.
- The model returns the polarity (spam or ham), and the result is shown to the user in a JSON format.
Step 2: Deploying into Docker
- After creating the API, we will create a Docker Image in which the app will the running.
Structure of the project
The following image shows the main folders and their contents for our project.
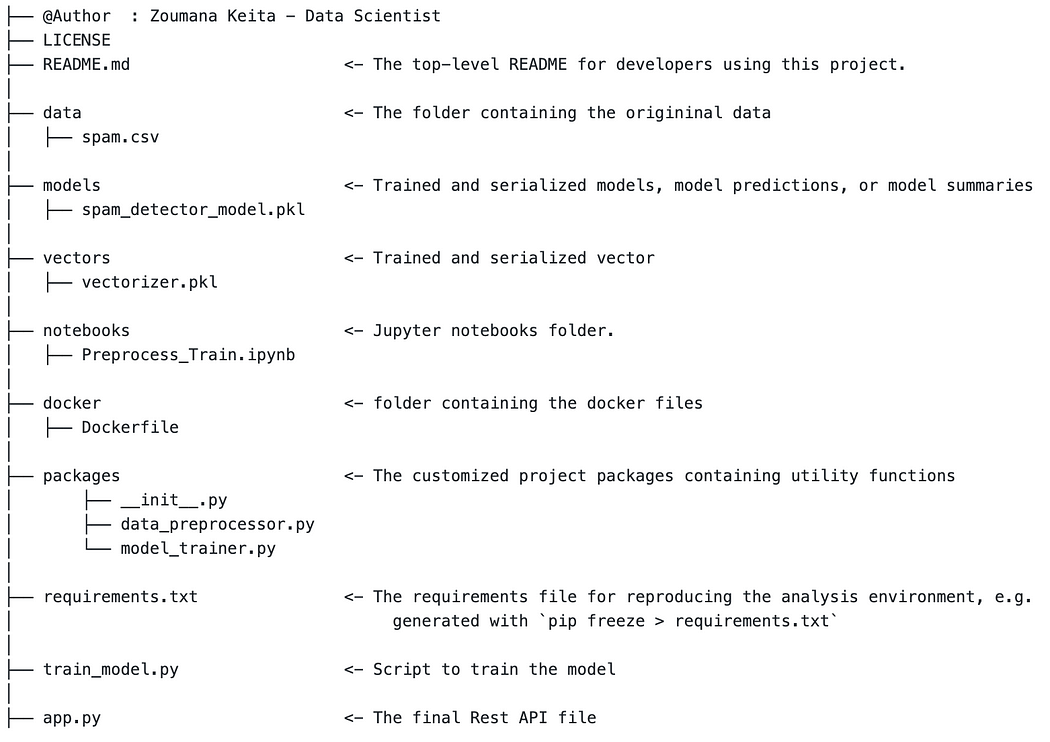
Our focus will be more on the following ones:
app.pycontaining all the instructions on the server-sidedockercontaining the Dockerfile to create the container.
Steps to Build the API
The API implementation in the python fileapp.pyis split into the following three main sections.
- Import all the libraries required for the API (lines 2 to 3). The step before that is to install those libraries, which can be done by running the
pip install -r requirements.txtcommand. - Load the serialized model and the vectors (lines 6 and 9) and instantiate the Fast API (line 12)
3. Define the endpoints of the API. In our case, it will have two routes as shown below.
- default route
"/”: which simply returns the following JSON format “message”: “Welcome to Your Sentiment Classification FastAPI” through the root() function which does not take a parameter.
- the prediction route
"/predict_sentiment": this one triggers thepredict_sentiment()function, which takes as a parameter, the user’s message, and returns the JSON response at the format defined from lines 19 to 22. The sentiment polarity is the prediction of the model.
We can finally run it (the API) with the following instruction from our command line, from the location of the app.y file.
uvicorn app:app --reloaduvicornstarts the unicorn server.app: corresponds to the python fileapp.pyIt is the one on the left of the “:” sign.app: corresponds to the object created inside ofapp.pywith the instructionapp = FastAPI(). If the name of the file was main.py the instruction would beuvicorn main:app --reload--reload: an option used to restart the server after any code changes. Keep in mind that this is to be used only when we are in the development stage, not during the deployment stage.
Here is the result we get from running the previous command
Line 1 shows that the unicorn server is running on the localhost (http://127.0.0.1) port 8000.
Accessing the default route is straightforward. Just type the following URL on our favorite browser.
This is the result we get.

Here is an interesting part. The URL http://127.0.0.1:8000/docs provides a complete dashboard for interacting with our API. Below is the result.

From the previous Image, when we select the /predict_sentiment in the green box, we get the complete guide to interact with our API as shown below.
Just select the Try it out tab and provide the message you want the prediction for in the text_message zone.

I zoomed out on the message I typed in the text_message box so that you can see it properly. We finally get the following result after selecting the Execute button.

By looking at the API Response body section, we can see its result as follow
{
  "text_message": "Congratulations!!! You won today’s lottery.          Please provide your bank information to transfer the total amount on your account",
  "sentiment_polarity": "Spam"
}
Congrats! You made it through the first step which was to create your API.
Deployment into Docker Container
Our API is ready, now it is time to deploy it into a Docker container. The idea behind containerization is that it will make our API portable and able to run uniformly and consistently across any platform (including the cloud), in a more secured way. Also, using Kubernetes can make the scaling of the API easier. But Kubernetes' part will be for another time.
Below is the content of theDockerfile for our app.
Let's understand the Dockerfile 🧐
The Dockerfile file contains five main instructions as shown below.
FROMpulls an official python image from docker hub, then our files will be built from that image.WORKDIR: create /app as the working directory for the application.COPY: copy file(s) from the source folder to the destination folder.RUN: runs the requirements.txt file in order to install the project dependencies.CMD: create an entry point in order to finally make the image executable.
Build the Docker Image
The following command builds the image called fastapiapp tagged with the latest version. This image is built from the previous docker file.
docker build -t fastapiapp:latest -f docker/Dockerfile .Running the command creates the image with the following success message
Successfully built 9ecdd7e21323
Successfully tagged fastapiapp:latest
Run the container
The image is built, all we need now is to run it into a container with the following command.
docker run -p 80:80 fastapiapp:latestAfter that, you should get a message similar to this one containing the URL to your API.
INFO:     Started server process [1]
INFO:     Waiting for application startup.
INFO:     Application startup complete.
INFO:     Uvicorn running on http://0.0.0.0:80(Press CTRL+C toquit)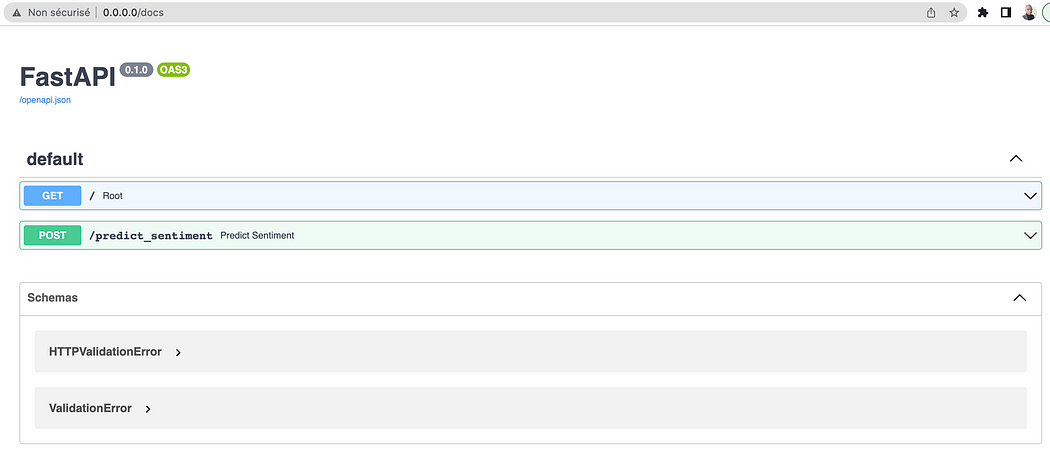
You deployed your Fast API application on docker 🎉🎉🎉 !
Conclusion
Congratulations! 🎉 🍾 You have just learned how to create your API using Fast API. I hope you have enjoyed reading this article, and that it gave you the required skills. Please find below additional resources to further your learning.
Feel free to follow me on Medium, Twitter, or say Hi on LinkedIn. It is always a pleasure to discuss AI, ML, Data Science, NLP, and MLOps stuff!
Bye for now 🏃


No comments:
Post a Comment