Introduction
This article aims to show readers how to write their own scripts for AWS Glue Jobs using Python. Glue provides default automation scripts to automate many different types of tasks on it, but we will write our own script today using the Gradient Boosting Tree Regression to train a model to predict the demand for items in a shop.
What is AWS glue?
1. AWS Glue is a fully managed Extract-Transform-Load pipeline (ETL) service. This service makes it simple and cost-effective to categorize your data, clean it, enrich it, and move it swiftly and reliably between various data stores.
2. It comprises of components such as a central metadata repository known as the AWS Glue Data Catalog, an ETL engine that automatically generates Python or Scala code, and a flexible scheduler that handles dependency resolution, job monitoring, and retries.
3. AWS Glue is serverless, which means that there’s no infrastructure to set up or manage.
When to use AWS Glue?
1. When you want to automate your ETL processes.
2. When you want to easily integrate with other data sources and targets such as Amazon Kinesis, Amazon Redshift, Amazon S3, etc.
3. When you want your pipeline to be cost-effective; it can be cheaper because users only pay for the consumed resources. If your ETL jobs require more computing power from time to time but generally consume fewer resources, you don’t need to pay for usage hours without any actual usage.
Let us start the practical work on writing the custom script for the Glue Job.
S3 Bucket
S3 is one of the most user-friendly services in the AWS arsenal. We have multiple options available to upload data to S3, which include:
1. Manually upload data using the Management Console.
2. Uploading programmatically via S3 APIs, SDKs, and AWS CLI…
3. et cetera
1. Create an S3 bucket:
Go to AWS console and search for S3 Bucket.
Create a new S3 bucket, Bucket name should be unique. (We created a bucket named glue-job-customscript)
After creating the bucket, create two directories inside the bucket.
1. Input
2. Output

AWS S3 Bucket
Note:
Please change the bucket policy to grant read and write access to the user.
{"Version": "2022-03-05",
"Statement": [{"Sid": "ListObjectsInBucket",
"Effect": "Allow","Principal": "*",
"Action": "s3:*",
"Resource": "arn:aws:s3:::glue-job-customscript/*"
}]}
Crawlers
A Crawler reads data at the source location and creates tables in the Data Catalog. A table is the metadata definition that represents your data.
The Crawler creates the metadata that allows GLUE and services such as ATHENA to view the information stored in the S3 bucket as a database with tables.
2. Create a Crawlers
Now we are going to create a Crawler
Go to the AWS console and search for AWS Glue.
You will be able to see Crawlers on the right side, click on Crawler.
Click on Add Crawler
1. Give a name to the crawler then click Next.
2. In Crawler source type, we do not need to change anything. Just click Next.
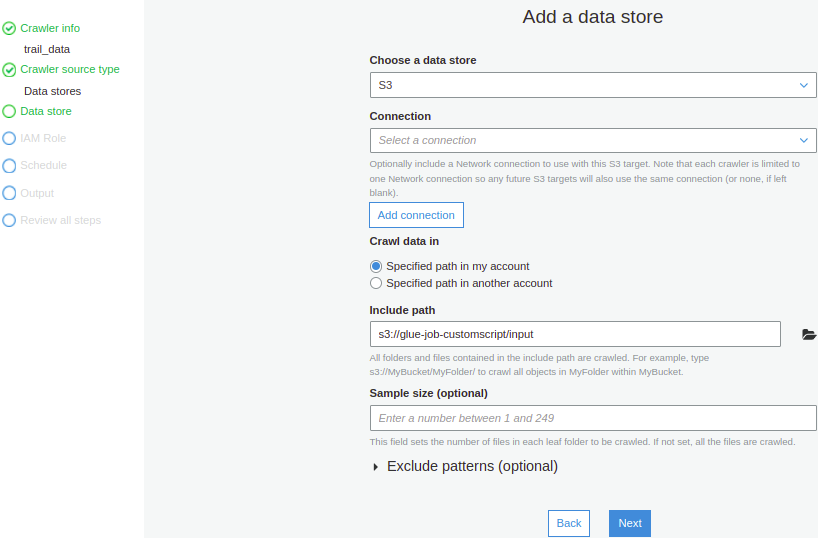
3. Data Store
Choose a data store S3 (I stored the file in the S3 bucket)
In Include path, provide the path of the file (s3://glue-job-customscript/input/) and click Next.

4. In Add another data source, select No and click Next.
5. IAM Role creates a new IAM role. Choose to create an IAM role and provide a name to the role (we created a role named Glue-Script).
6. Schedule: choose the appropriate option and click Next(we chose Run on-demand))
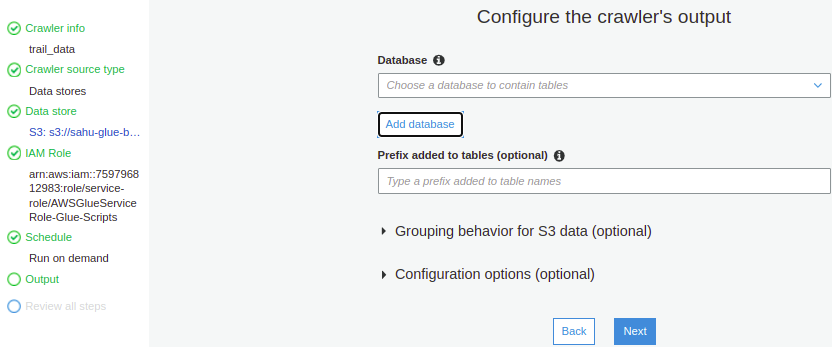
7. In Output select an existing database if there are, any otherwise create a new database (by clicking Add Database) and click Next.

8. Review all steps and click finish.

9. Select the created crawler and click Run Crawler.
10. After running the crawler, you will see a table generated in Tables added column, signified by a ‘1’ replacing the ‘0’ in the added column (initially, there were none).

You can verify the database that you created by clicking on Databases on the left side of the AWS Glue page.
You will see the database that you created while executing the crawler. Click the database that you created, you will be able to see the table that you created.
Job
An AWS Glue job encapsulates a script that connects to your source data, processes it, and then writes it out to your data target.
3. Create a Job
- Go to the AWS Glue page and on the left side, click on Jobs (legacy).

Glue Job
Click Add Job.
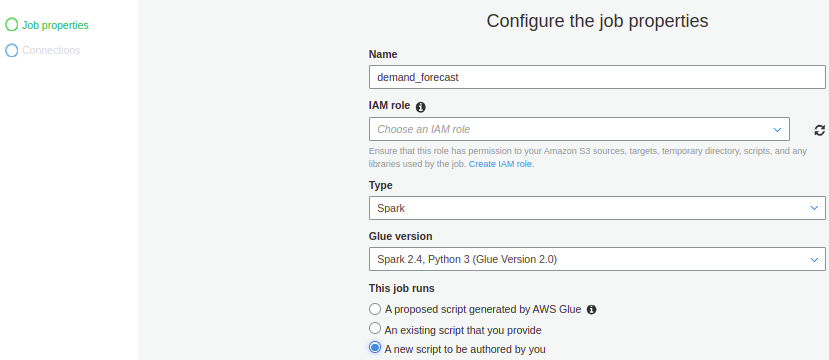
- Give a name to the job.
- Select IAM role
- Type: spark
- version: spark 2.4, Python 3(Glue Version 2.0)
This job runs:- Select a radio button
- Choose A new script to be authored by you

GLue Job
- A blank script will be generated.
- In the script, write the code for your ETL process.
We wrote a script for Demand forecasting, using Python for Glue Job.
Reference
https://docs.aws.amazon.com/glue/latest/dg/custom-scripts.html
https://spark.apache.org/docs/latest/api/python/
https://spark.apache.org/docs/latest/api/python/pyspark.ml.html
No comments:
Post a Comment