For a Data Driven company, the time needed to deliver a Machine Learning algorithm, trained on near real-time data, must be shortened as much as possible by adopting an architecture that can be turned easily into a service for making predictions or classifications.
As I previously talked about in “Machine Learning on Autonomous Database: A Practical Example," Oracle Autonomous Database offers a Machine Learning collaboration environment on which is possible to train one of the algorithms available out-of-the-box using PL/SQL Apache Zeppelin Notebooks. Recently have been added several tools like Oracle Application Express (APEX), Oracle SQL Developer Web and Oracle REST Data Services (ORDS), traditionally available for Oracle Database on-premise, so that developers can quickly develop and deploy new data-driven applications.
In this article, I’ll show step-by-step how to expose a machine learning model trained on a notebook as a REST service, in order to use it potentially without moving from the DB on which it has been trained. Sending features related to a case as a Json document, we’ll get the scoring.
Let me say thanks to my colleague Luca Postacchini for helping me in writing this tutorial.
For machine learning development, I will choose a user created in the “Manage Oracle ML Users” page, named MLUSER.
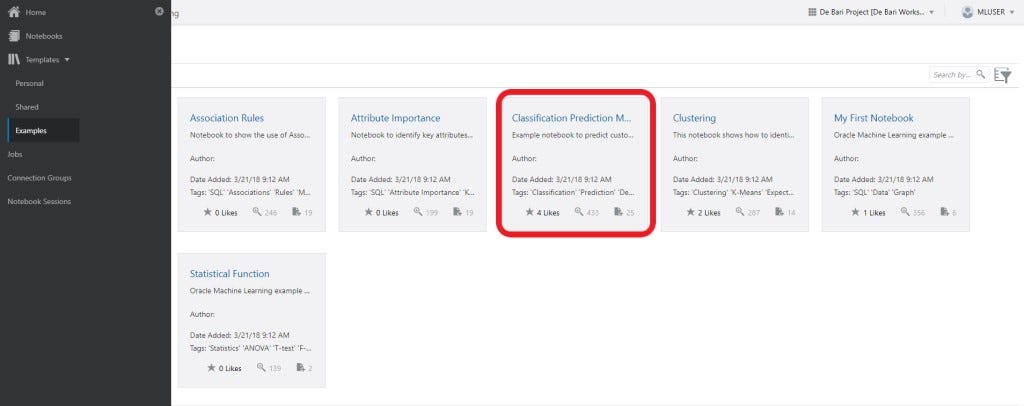
As an example, we’ll use one of the notebook templates available in the Autonomous Database, the “Classification Prediction Model." This notebook predict customers most likely to be positive responders to an Affinity Card loyalty program. Select the template and click on the “Create Notebook” button, enabled after template selection.
To execute the notebook just created, we need to enable in terms of interpreter bindings, since by default only %md is selected. To do this, follow the indication in this figure:

Execute all the paragraphs included into the notebook; everything is well-documented. Let’s focus on the dataset used to train the model: SUPPLEMENTARY_DEMOGRAPHICS2 table, on which a 70% subset is used to train a simple Decision Tree algorithm. The model is stored as “N1_CLASS_MODEL."
At the end of the notebook, append a paragraph to register the model trained as a stored procedure:
%script
CREATE OR REPLACE PROCEDURE post_prediction (
  p_CUST_ID IN  n1_test_data.CUST_ID%TYPE,
  p_EDUCATION IN  n1_test_data.EDUCATION%TYPE,
  p_OCCUPATION IN  n1_test_data.OCCUPATION%TYPE,
  p_HOUSEHOLD_SIZE IN  n1_test_data.HOUSEHOLD_SIZE%TYPE,
  p_YRS_RESIDENCE IN  n1_test_data.YRS_RESIDENCE%TYPE,
  p_BULK_PACK_DISKETTES IN  n1_test_data.BULK_PACK_DISKETTES%TYPE,
  p_FLAT_PANEL_MONITOR IN  n1_test_data.FLAT_PANEL_MONITOR%TYPE,
  p_HOME_THEATER_PACKAGE IN n1_test_data.HOME_THEATER_PACKAGE%TYPE,
  p_BOOKKEEPING_APPLICATION IN
n1_test_data.BOOKKEEPING_APPLICATION%TYPE,
  p_PRINTER_SUPPLIES IN  n1_test_data.PRINTER_SUPPLIES%TYPE,
  p_OS_DOC_SET_KANJI IN  n1_test_data.OS_DOC_SET_KANJI%TYPE,
  p_Y_BOX_GAMES IN n1_test_data.Y_BOX_GAMES%TYPE,
  y_pred OUT number
) AS y_temp NUMBER;

BEGIN

SELECT PREDICTION (
 N1_CLASS_MODEL USING
   p_CUST_ID AS CUST_ID,
   p_EDUCATION AS EDUCATION,
   p_OCCUPATION AS OCCUPATION,
   p_HOUSEHOLD_SIZE AS HOUSEHOLD_SIZE,
   p_YRS_RESIDENCE AS YRS_RESIDENCE,
   p_BULK_PACK_DISKETTES AS BULK_PACK_DISKETTES,
   p_FLAT_PANEL_MONITOR as FLAT_PANEL_MONITOR,
   p_HOME_THEATER_PACKAGE AS HOME_THEATER_PACKAGE,
   p_BOOKKEEPING_APPLICATION AS BOOKKEEPING_APPLICATION ,
   p_PRINTER_SUPPLIES AS PRINTER_SUPPLIES,
   p_OS_DOC_SET_KANJI AS OS_DOC_SET_KANJI,
  p_Y_BOX_GAMES AS Y_BOX_GAMES
) INTO y_temp
FROM DUAL;

y_pred := y_temp;

END post_prediction;
Just some notes about this code:
- n1_test_data.CUST_ID%TYPE: use %TYPE to define parameter type in a decoupled way;
- y_pred OUT number: define an output variable to set the prediction result.
Running in the notebook you will get this message: “Procedure POST_PREDICTION compiled." In the development phase, it is better to test the procedure in the Oracle SQL Developer Web, as it will be shown further on.
Now let’s move on to the new modules included into the Autonomous Database that we’ll leverage to create the REST service.
From the “Autonomous Database Details” of your DB instance, click on “Service Console”:
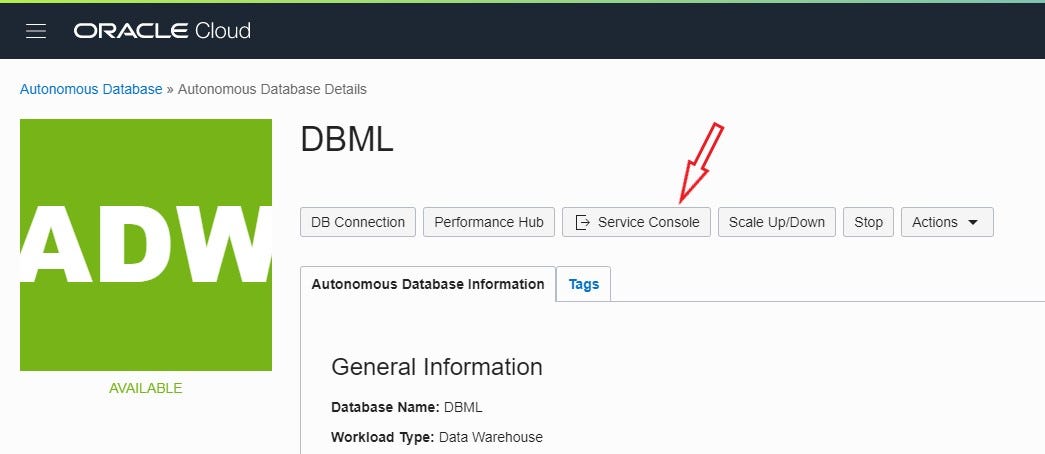
In this way you’ll arrive in the area where you normally find the Machine Learning environment. Now you’ll find to new services: “SQL Developer Web”and “APEX."

First, we have to enable APEX for the machine learning user, in my case MLUSER. As ADMIN, you can run SQL Developer Web to run configuration sql statements. Run this code in the worksheet:
BEGIN

ords_admin.enable_schema(
  p_enabled => TRUE,
  p_schema => ‘MLUSER’,
  p_url_mapping_type => ‘BASE_PATH’,
  p_url_mapping_pattern => ‘mluser’,
  p_auto_rest_auth => NULL
);

commit;

END;
The p_url_mapping_pattern will determine the first part of REST URI.
I also suggest to use SQL Developer Web with the MLUSER user to test the stored procedure “post_prediction” before including it in your notebook. In this way, you will see the compile errors that could happen.
If you need access for this reason or any other to SQL Developer Web, save the ADMIN url, for example:
and change “admin” in “mluser." In this way, you will prompt for the user’s credentials and you will login.
Now, let’s access to APEX still as ADMIN, but select “Administration Services”:

and then click on the “Create Workspace” button:

Choose the user and provide a name for the Workspace:

Now let’s return to the console and access APEX as user MLUSER in its workspace:
In the APEX environment, you can create a REST Data Service on top of the stored procedure that wraps the machine learning model.

If you see the following message:
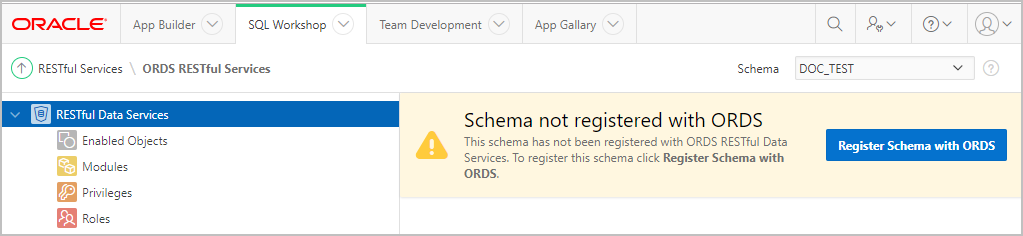
something went wrong in the previous step of ORDS registration for the user MLUSER. No problem -- you can do the same clicking on “Register Schema with ORDS” button
Then we can create a Module to collect all the services related to the machine learning algorithms:

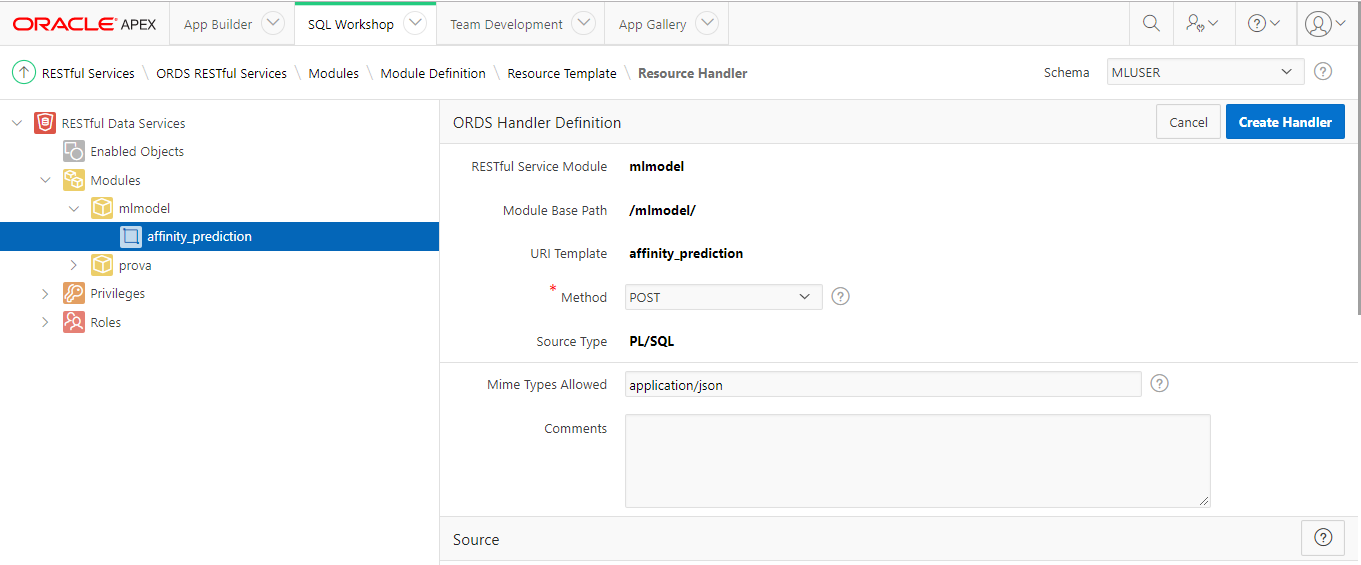
Under this model, we define the entry point for the classification algorithm trained, named “affinity_prediction”:

Set to None in “Http Entity Tag Type” and 0 to “Priority.” It’s time to define the POST request to handle the stored procedure call. Click on “Create Handler” in the right bottom corner of APEX console.
Choose POST as “Method” and set “application/json” in “Mime Type Allowed” order to post a Json file as body.
In the source, insert the code to pass the parameters coming from the Json file sent in the Post to the stored procedure:
begin MLUSER.post_prediction
(
 :p_CUST_ID ,
 :p_EDUCATION ,
 :p_OCCUPATION ,
 :p_HOUSEHOLD_SIZE,
 :p_YRS_RESIDENCE ,
 :p_BULK_PACK_DISKETTES ,
 :p_FLAT_PANEL_MONITOR ,
 :p_HOME_THEATER_PACKAGE,
 :p_BOOKKEEPING_APPLICATION,
 :p_PRINTER_SUPPLIES ,
 :p_OS_DOC_SET_KANJI ,
 :p_Y_BOX_GAMES,
 :y_pred
);
end;
The final variable “y_pred” must be declared in the configuration in order to fill the response as a Json file, clicking the “Add Row” button and setting parameters as shown in the figure:

In this way, you bind the output to the “RESPONSE." The prediction is a NUMBER type, so choose “DOUBLE” for the response type. Take care of this part to avoid headaches during configuration.
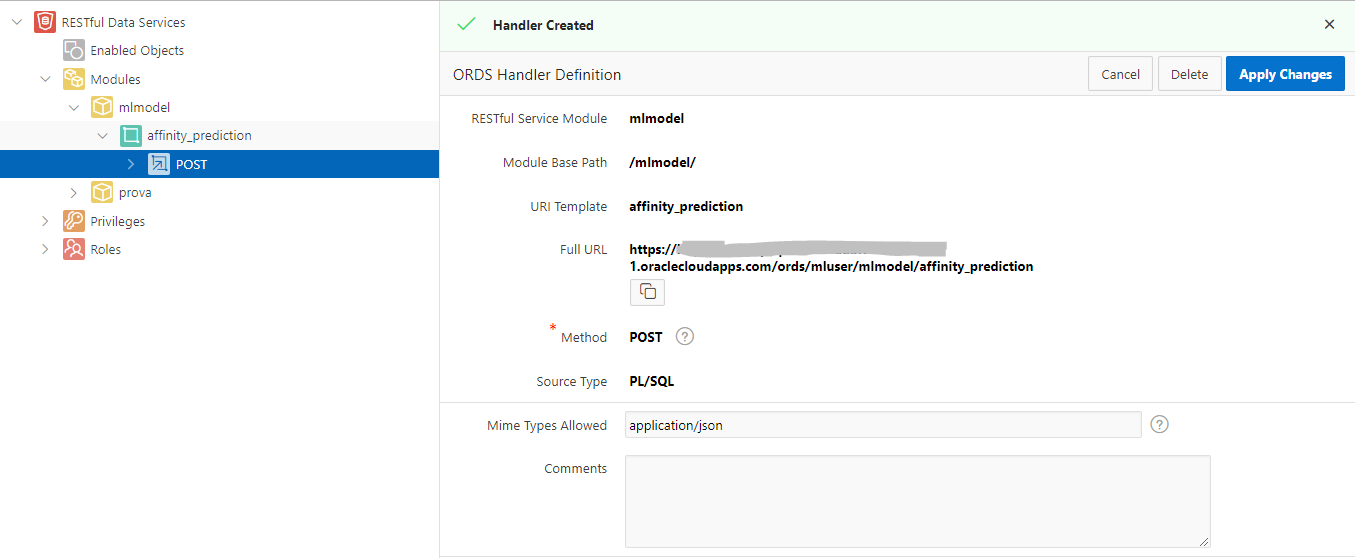
Now you have the “Full URL” to use in your REST client:

With any REST client, like Postman, we can test the services, setting in the body a JSON like this:
{
  "p_CUST_ID": 103657,
  "p_EDUCATION”: "Bach.",
  "p_OCCUPATION”:"Prof.",
  "p_HOUSEHOLD_SIZE":"3",
  "p_YRS_RESIDENCE": 6,
  "p_BULK_PACK_DISKETTES": 0,
  "p_FLAT_PANEL_MONITOR": 0,
  "p_HOME_THEATER_PACKAGE":1,
  "p_BOOKKEEPING_APPLICATION":1,
  "p_PRINTER_SUPPLIES":1,
  "p_OS_DOC_SET_KANJI":0,
  "p_Y_BOX_GAMES":0
}
taking care about the types used in the fields, otherwise auto-conversion could produce wrong results.
In “Content-Type” set “application/json."
If everything goes fine, you’ll have a response like this:
{
 "y_pred": 1.0
}
This service is open, and you can use it without any authorization. In order to protect it, authorizing MLUSER only, create a new Privileges, for example “affinity_priv”:

Set as follow the properties:

Add the Pattern related to the module to protect. In my case any endpoints “/mlmodel/*” :

After this step, you need a basic authentication with MLUSER user crendentials to access the REST service just released.
For any other information, please refer to the ORDS documentation.
To learn more about AI and machine learning, visit the Oracle AI page.


No comments:
Post a Comment