In my last post, we have seen how to deploy a machine learning model on the web using Python and Flask(Link below)
It was cool to make predictions via CLI, but then there were issues such as manually starting the server and the lack of a simple GUI(Graphical user interface).
In this post, we will try to address the above issues via deploying our model on the Heroku Server and therefore setting up a simple 24X7 running HTML website of our own for the end-users to make predictions.
Let’s start the journey from the very basics of creating a Deep Learning Model and then going step by step through the deployment process along with learning new concepts.


Creation of a Deep Learning Model
Step1. Creating a simple Keras Model for IRIS dataset
The Iris dataset was used in R.A. Fisher’s classic 1936 paper. It includes three iris species with 50 samples each as well as some properties about each flower.
The columns in this dataset are:
- Id
- SepalLengthCm
- SepalWidthCm
- PetalLengthCm
- PetalWidthCm
- Species
Let’s import the necessary libraries and then load the data from iris.csv into a pandas dataframe for better understanding.
import numpy as np
import pandas as pdiris = pd.read_csv(“../DATA/iris.csv”)iris.head()


Step 2. Defining X and y for training purposes
Now once we have loaded our data we can define our X and y for training purposes, our initial four columns will contribute X and species will be labeled as y which denotes our true labels from the dataset.
X = iris.drop(‘species’,axis=1)
y = iris[‘species’]
Step 3. Binarizing the labels of species
As we can see in our dataset “species” contains data which is in the String format and therefore we should encode the same into numbers, for doing the same we can use LabelBinarizer from sklearn.preprocessing library via below code
from sklearn.preprocessing import LabelBinarizer
encoder = LabelBinarizer()
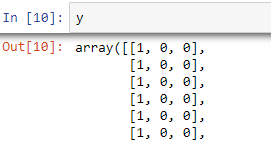
y = encoder.fit_transform(y)
Now if we’ll check our “y” it should be binarized as below, where [1,0,0] denotes the flower “Setosa”, [0,1,0] denotes “Virginica” and [0,0,1] denotes “Versicolor”.

Step 4. Scaling the data
It’s always important to scale our data before feeding the model to ensure we have the values of all the columns present in the same range, you can use any of the scalers present in scikit-learn such as StandardScaler or MinMaxScaler, we are using MinMax scaler below
from sklearn.preprocessing import MinMaxScaler
scaler = MinMaxScaler()
scaled_X = scaler.fit_transform(X)
Please note that we are scaling our whole X and the same will be used for training our deep learning model, you can incorporate more steps such as train_test_split as per your own modeling steps.
Step 5. Creating the Keras model


Let’s start creating a simple Keras model by importing below libraries and calling the Sequential API
from tensorflow.keras.models import Sequential
from tensorflow.keras.layers import Densemodel = Sequential()
model.add(Dense(units=4,activation=’relu’))
model.add(Dense(units=32,activation=’relu’))
model.add(Dense(units=16,activation=’relu’))
# Last layer for multi-class classification of 3 species
model.add(Dense(units=3,activation=’softmax’))model.compile(optimizer=’adam’,loss=’categorical_crossentropy’,metrics=[‘accuracy’])
In the above code, we have started with creating a Sequential Keras model with the first layer as dense having 4 inputs for the 4 columns in our X (Sepal Length, Sepal Width, Petal Length, Petal Width).
After this, we have added 2 hidden layers and using “relu” as the activation function for all the layers except the last one.
The last layer contains 3 units for 3 respective classes of flowers ( Setosa, Virginica, and Versicolor) with “softmax” activation function as we are dealing with Multi-Class classification problem, also while compiling the model we are using “adam” optimizer along with “accuracy” as metrics to maximize the same and minimizing our defined loss “categorical_crossentropy” with each epoch.
Step 6. Training and saving the model
Finally, let’s start training our Keras model on some 100+ epochs, you can add mechanism of callbacks such as EarlyStopping in case you want to reduce the runtime of training.
model.fit(scaled_X,y,epochs=150)Epoch 1/150
150/150 [==============================] - 0s 1ms/sample - loss: 1.1053 - accuracy: 0.3333
Epoch 2/150
150/150 [==============================] - 0s 93us/sample - loss: 1.0953 - accuracy: 0.3467
Epoch 3/150
150/150 [==============================] - 0s 86us/sample - loss: 1.0864 - accuracy: 0.5667
Epoch 4/150
150/150 [==============================] - 0s 100us/sample - loss: 1.0770 - accuracy: 0.6200
Epoch 5/150
150/150 [==============================] - 0s 86us/sample - loss: 1.0669 - accuracy: 0.4867
Post completion of training we’ll be reaching around 95% accuracy without overfitting the data. Now let’s save our model for using it later under the deployment process.
model.save(“final_iris_model.h5”)
This will save the model in your current working directory.
Step 7. Saving the scaler
We’ll also save the scaler in the present working directory so that we can scale user input data before passing it to our model and displaying the results on our website.
import joblib
joblib.dump(scaler,’iris_scaler.pkl’)
Deployment through Flask, Python on Heroku

It’s great to have our model saved along with scaler and let’s now dive into the steps of setting our own flask app and deploying it on Heroku Server.
Let’s start creating our app.py file which will be used later for deployment on Heroku Server.
Step 1. Importing the required libraries
from flask import Flask, render_template, session, redirect, url_for, session
from flask_wtf import FlaskForm
from wtforms import TextField,SubmitField
from wtforms.validators import NumberRange
import numpy as np
from tensorflow.keras.models import load_model
import joblib
Step 2. Defining a function for returning our model’s prediction
def return_prediction(model,scaler,sample_json):

 s_len = sample_json[‘sepal_length’]
 s_wid = sample_json[‘sepal_width’]
 p_len = sample_json[‘petal_length’]
 p_wid = sample_json[‘petal_width’]

 flower = [[s_len,s_wid,p_len,p_wid]]
 flower = scaler.transform(flower)

 classes = np.array([‘setosa’, ‘versicolor’, ‘virginica’])
 class_ind = model.predict_classes(flower)

 return classes[class_ind][0]
In the above function, we are passing three parameters, our model, scaler and sample_json for data input from the HTML page.
JSON (JavaScript Object Notation) is the most widely used data format for data interchange on the web. This data interchange can happen between two computer applications at different geographical locations or running within the same hardware machine.
Primarily, JSON is built on below structure like a python dictionary
- A collection of name/value pairs.
"employee": {
"id":           1,
"name":         "Admin",
"location":     "USA"
}
In a similar manner, we have captured the data of sepal_length/width, petal_length/width from the incoming request
s_len = sample_json[‘sepal_length’]
 s_wid = sample_json[‘sepal_width’]
 p_len = sample_json[‘petal_length’]
 p_wid = sample_json[‘petal_width’]
After completion of the above steps, we have scaled our flower list and we’ve used model.predict_classes() function to get the class labels corresponding to our flower data in the below code, see the link below for more details on this function.
flower = [[s_len,s_wid,p_len,p_wid]]
flower = scaler.transform(flower)
classes = np.array([‘setosa’, ‘versicolor’, ‘virginica’])
class_ind = model.predict_classes(flower)
return classes[class_ind][0]
Step 3. Defining the app routes and completing the app.py file
In the below code comments are defined above each code block for better understanding, also please visit my last post from the below link in case you need some more understanding towards the basic flask architecture.
app = Flask(__name__)
# Configure a secret SECRET_KEY
app.config[‘SECRET_KEY’] = ‘someRandomKey’# Loading the model and scaler
flower_model = load_model(“final_iris_model.h5”)
flower_scaler = joblib.load(“iris_scaler.pkl”)# Now create a WTForm Class
class FlowerForm(FlaskForm):
 sep_len = TextField(‘Sepal Length’)
 sep_wid = TextField(‘Sepal Width’)
 pet_len = TextField(‘Petal Length’)
 pet_wid = TextField(‘Petal Width’)
 submit = SubmitField(‘Analyze’)

@app.route(‘/’, methods=[‘GET’, ‘POST’])
 def index():
  # Create instance of the form.
  form = FlowerForm()
  # If the form is valid on submission
  if form.validate_on_submit():
  # Grab the data from the input on the form.
  session[‘sep_len’] = form.sep_len.data
  session[‘sep_wid’] = form.sep_wid.data
  session[‘pet_len’] = form.pet_len.data
  session[‘pet_wid’] = form.pet_wid.datareturn redirect(url_for(“prediction”))return render_template(‘home.html’, form=form)@app.route(‘/prediction’)
def prediction():
 #Defining content dictionary
 content = {}content[‘sepal_length’] = float(session[‘sep_len’])
 content[‘sepal_width’] = float(session[‘sep_wid’])
 content[‘petal_length’] = float(session[‘pet_len’])
 content[‘petal_width’] = float(session[‘pet_wid’])

 results = return_prediction(model=flower_model,scaler=flower_scaler,sample_json=content)return render_template(‘prediction.html’,results=results)if __name__ == ‘__main__’:
 app.run(debug=True)
Let’s understand the above code in pieces.
We are configuring a secret key. The secret key is needed to keep the client-side sessions secure in Flask. You can generate any random key of your choice.
We are using @app.route decorator for home and prediction page, refer my last post for details on these.
Also, we are creating WT Forms. Using Flask-WTF, we can define the form fields in our Python script and render them using an HTML template,
TextField Represents <input type = ‘text’> HTML form element
please install Flask-WTF via below script
pip install flask-wtf
Step 4. Defining our HTML forms for taking input from the end-user.
Now let’s proceed towards the last step to keep everything ready for the deployment.
We are going to create two basic HTML forms for end-user inputs namely home.html and prediction.html.


You can also view the code at Step 3 having both of them defined via @app.route decorator to connect Flask with the HTML templates.
home.html
<h1>Welcome to IRIS prediction</h1>
<h2>Please enter your flower measurements below:</h2>
<form method=”POST”>
 {# This hidden_tag is a CSRF security feature. #}
 {{ form.hidden_tag() }}
 {{ form.sep_len.label }} {{form.sep_len}}
 <br>
 {{ form.sep_wid.label}} {{form.sep_wid}}
 <br>
 {{form.pet_len.label}}{{form.pet_len}}
 <br>
 {{form.pet_wid.label}}{{form.pet_wid}}
 <br>
 {{ form.submit() }}
</form>
In the above form each given entry such as -
form.sep_len, form.sep_wid etc are TextFields defined by us in Step 3 within FlowerForm class, so that once users enter the data same gets passed to a FlaskSession.
Prediction.html
<h1>Thank You. Here is the Information You Gave:</h1>
<ul>
 <li>Sepal Length: {{session[‘sep_len’]}}</li>
 <li>Sepal Width : {{session[‘sep_wid’]}}</li>
 <li>Petal Length: {{session[‘pet_len’]}}</li>
 <li>Petal Width : {{session[‘pet_wid’]}}</li>
</ul>
<h2>Your Predicted Flower Class is: {{results}}</h2>
And then we are passing the same data to our content dictionary defined inside prediction function in Step 3, and further using the same data as input for our model. Finally, we are displaying the results variable from Step3. into our prediction.html page.
Wrapping up everything and Deploying on Heroku


Now we have reached the last step which is deploying everything on the Heroku.
Step 1. Please set up your Project working directory in the below manner, having a separate templates folder containing your home.html and prediction.html files.

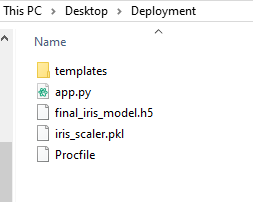
Also please add the Procfile(no extensions) with below code as a one-liner
web: gunicorn app:app
“Gunicorn”, is a Web Server Gateway Interface (WSGI) server implementation that is commonly used to run Python web applications, here app is our app.py file name.
Step 2. Create a conda virtual env for setting up all the libraries
Run below code on Anaconda Prompt after navigating to your project directory and then activate the environment.
Step1. conda create — name mydevenv python=3.7
Step2. activate mydevenv
Install below libraries for your newly created environment and generate requirements.txt for Heroku
Step1. pip install flask
Step2. pip install flask-wtf
Step3. pip install tensorflow2.0.0a0
Step4. pip install scikit-learn
Step5. pip install gunicorn
Step6. pip freeze > requirements.txt
Now your working directory should have requirements.txt created for Heroku deployment.
Step 3. Creating a Heroku account and install Heroku CLI for deployment
Signup for a new Heroku account https://www.heroku.com/
Install the Heroku CLI along with GIT as per your operating system
Please restart your system once completed, type heroku on command prompt and if there is no error of “Heroku not found” you are good to proceed to the next step.
Step 4. Deploying the app to Heroku Server
Login to Heroku by opening a new command prompt and typing below.
heroku login
press any key and once done you will be redirected to login page in your browser, complete the login process there.


Now go to the Heroku home page and click on create a new app as below


After completing the above follow few last steps for deployment to the server.
Open GitBash and navigate to your project directory
Initialize a git repository in the directory. Replace ml-deployment-app with your own app name.
$ cd my-project/
$ git init
$ heroku git:remote -a ml-deployment-app
Deploy your application


Commit your code to the repository and deploy it to Heroku using Git.
$ git add .
$ git commit -am "adding files"
$ git push heroku master
Finally, you should be able to see the success message on CLI as below along with the URL for your app.
Congratulations on your own live app hosted on the Web.


See the running app on the below web address.
In case you have missed something or facing issues all the code files are present on the below link of Github.
In this post, we learned about Flask with Web, how to integrate it with the HTML website, and most importantly how to apply this knowledge to deploy the same on a WebServer, so that end-users can interact with our ML model anytime without any external dependency.


1 comment:
Excellent idea. Thank you for sharing the useful information. Share more updates.
Deep Learning with Tensorflow Online Course
Pytest Online Training
Post a Comment