Step-by-step Guide to connect with Dockerized MySQL Database from a local machine
If you are working in Software Engineering or if you are planning to work in Software Engineering, probably you have heard about Docker.
In 2013, Docker introduced the concept of Container and changed the Software Engineering landscape forever.
Containers are a standardized unit of software that allows developers to isolate their app from its environment, solving the “it works on my machine” headache. Docker is still the “de facto” standard for containerization.
Another vital use of Docker is that a developer can download and run any containerized application without directly installing it. As there is a Dockerized version of almost all great apps, Docker helps to try and run applications while keeping your OS lean and clean.
MySQL is one of the most popular open-source Databases and one of the “Big Four” relational Databases. It is widely used by industry, academia, and the community alike.
Here I will show how to run a Dockerized MySQL Database and then connect with it from your local machine.
Install Docker
You can install Docker in almost all primary OS, be it Linux, Windows, or macOS. Please follow the instruction given in the official docker site to install Docker in your local machine: https://docs.docker.com/engine/install/
Install and Start Dockerized MySQL
Docker containers are stateless. So, if you use a Containerized MySQL, then you will lose all your saved Data once you restart the container. One way to avoid the issue is to create a docker volume and attach it to your MySQL container. Here are the commands to create a MySQL container including attached volume in your local machine:
The following command will create the volume in your local machine which you can connect with MySQL container later:
λ docker volume create mysql-volume
mysql-volume
The following command will pull the MySQL server version 8.0.20 from the Docker registry and then instantiate a Docker container with the name “mk-mysql.” It will also attach the previously created volume “mysql-volume” with the Database and will expose the port 3306 so that you can reach the MySQL database outside the container:
λ docker run --name=mk-mysql -p3306:3306 -v mysql-volume:/var/lib/mysql -e MYSQL_ROOT_PASSWORD=my-secret-pw -d mysql/mysql-server:8.0.20
Unable to find image ‘mysql/mysql-server:8.0.20’ locally
8.0.20: Pulling from mysql/mysql-server
You can check whether the container is running by listing the running containers:
λ docker ps
CONTAINER ID IMAGE COMMAND CREATED STATUS PORTS NAMES
d54e7992094b mysql/mysql-server:8.0.20 "/entrypoint.sh mysq…" Less than a second ago Up 4 seconds (health: starting) 0.0.0.0:3306->3306/tcp, 33060/tcp mk-mysql
You can also check the log file of the running MySQL container with the following command:
λ docker logs mk-mysql
Now, you can connect to the container’s interactive bash shell with the following command:
λ docker exec -it mk-mysql bash
bash-4.2#
Once you are inside your container, you can connect to your MySQL server and create a new Database as follows:
bash-4.2# mysql -u root -p
Enter password:
...mysql> CREATE DATABASE MYSQLTEST;
Query OK, 1 row affected (0.00 sec)
Please note that you have to give the same password we have defined to run the container (my-secret-pw).
By default, MySQL restricts connection other than the local machine (here Docker container) for security reasons. So, to connect from the local machine, you have to change the connection restriction:
mysql> update mysql.user set host = ‘%’ where user=’root’;
Query OK, 1 row affected (0.02 sec)
Although for security reasons, it would be better to create a new non-admin user and grant access to that user only.
Install Dockerized phpMyAdmin
You can use any MySQL Client program to connect with MySQL Server. My personal favorite is phpMyAdmin, which is a simple yet powerful Web MySQL client. Also, instead of installing phpMyAdmin in my machine, I prefer to use the Dockerized phpMyAdmin.
You can pull the phpMyAdmin image from docker registry and run the container with the following command:
λ docker volume create phpmyadmin-volume
phpmyadmin-volume
λ docker run --name mk-phpmyadmin -v phpmyadmin-volume:/etc/phpmyadmin/config.user.inc.php --link mk-mysql:db -p 82:80 -d phpmyadmin/phpmyadmin
ef21905790dc42bc2e20d449b853d675d4922cb1249131513fdee885fc1088f8
You can check whether phpMyAdmin is running by either listing all running containers or by checking the log files:
λ docker ps -f "name=mk-phpmyadmin"
CONTAINER ID IMAGE COMMAND CREATED STATUS PORTS NAMES
ef21905790dc phpmyadmin/phpmyadmin "/docker-entrypoint.…" Less than a second ago   Up 10 minutes 0.0.0.0:82->80/tcp mk-phpmyadminλ docker logs mk-phpmyadmin
Note For Mac/Windows:
Based on your OS, your DOCKER_HOST is different. On Linux, it will be your localhost. For Mac/Windows, you can obtain DOCKER_HOST with the following command:
λ docker-machine ip default
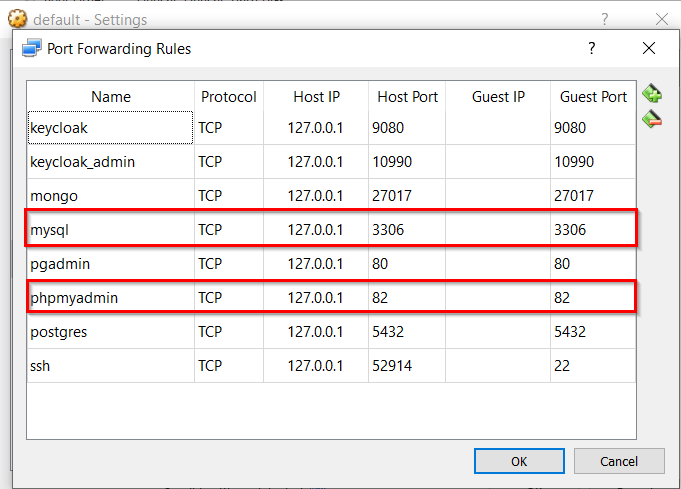
For Windows/Mac, you can either connect DOCKER_HOST IP address. The other option is Port forwarding. In Windows, a Docker Machine is a virtual machine running under VirtualBox in your host machine.
To enable Port forwarding for MySQL and phpMyAdmin, perform the following steps:
- Open “Oracle VM Virtual Box”
- Select your Docker Machine VirtualBox image (e.g., default)
- Open Settings -> Network -> Advanced -> Port Forwarding
- Add app name, desired host port, and guest port as follows:

Access MySQL via phpMyAdmin
Open your browser and visit http://localhost:82 to access phpMyAdmin UI:

Once you log-in with the previously configured password (my-secret-pw), you should be able to view the phpMyAdmin Admin view as follows:

In the left panel, you can see the previously create Database (MYSQLTEST). Now, you should be able to administrate your Database (create/drop table, run SQL queries, etc.).
If you have configured the Docker volume as mentioned, your Database changes will be persisted even if you restart your MySQL container. Otherwise, all the changes you made in your Database will be lost.


No comments:
Post a Comment