End-to-end tutorial to deploy a serverless, event-driven solution for object detection from scratch

Table of contents
- Introduction
- Implementation
2.1 S3 buckets
2.2 Role and policies
2.3 Lambda function
2.4 Let’s try it! - Conclusions
- References
1. Introduction
Object detection is a computer vision technique that allows to identify and locate objects in images or videos.
In this post, we will develop a serverless, event-driven object detection solution based on AWS, a popular cloud provider.
We can describe the solution as follows:
- A picture will be loaded to Amazon S3, an object storage service.
- The event of loading a picture to S3 will trigger the execution of a function made with AWS Lambda. AWS Lambda is a serverless, event-driven compute service. It enables to run our code without provisioning or managing the underlying infrastructure.
- The function will call Amazon Rekognition, an Artificial Intelligence (AI) service, to analyze images and return identified labels.
- Our code will write logs to Amazon CloudWatch for monitoring.
- The function will save the output of the analysis as JSON file back to S3 for future use.
The only prerequisite to this tutorial is an active AWS account. As AWS provides Free Tiers, we may follow this tutorial with zero costs.
2. Implementation
The next paragraphs share the detailed, step-by-step procedure to build the solution.
2.1 S3 buckets
A bucket is a container for objects stored in S3. For this tutorial, we want to create two distinct buckets, to store input images and the output of the analysis, respectively.
We create the input bucket as follows:
- Open the AWS Console.
- Type “S3” on the search bar on top of the page.
- Open “Amazon S3”, then click on “Create bucket”.
- In the bucket creation page, provide the bucket name and the AWS Region.
- For the input bucket, we choose the name
input-img-dev-032022.

We repeat the same steps to create the output bucket, naming it output-img-dev-032022.

We may choose other bucket names, given that they should be used consistently in the next steps.
2.2 Role and policies
We need our Lambda function to have permissions to:
- Read images from S3.
- Send images to Rekognition to detect labels.
- Write results back to S3.
- Write logs to CloudWatch.
In AWS, such permissions are called policies. We need to define the needed policies and attach them to an identity, such as a role. Later, we can grant the identity to a service, to define the permissions associated to that service.
In our case, we will create the policies and attach them to a role. Then, we will associate the role to the Lambda function.
Create the policy
- Click on the account name on top of the AWS Console.
- Select “Security credentials”.
- From the left menu, select “Policies”, then “Create Policies”.
- In the next page, click “JSON”.
- In the textbox, add the following code:
- Click on “Next: Tags”, then “Next: Review”.
- Finally, name the policy as
obj-detect-policy-dev-032022and click “Create policy”.
More on the policy
- Our policies are defined as JSON objects inside the
Statementproperty. - Each policy object is made of:
-Effect: specifies whether the statement results in anAlloworDeny.
-Action: list of needed permissions. For example,S3:GetObjectwill let us read objects from S3, whileS3:PutObjectwill allow us to save them to a bucket.
-Resource: the resource to which the policies apply. AWS requires to identify resources through their Amazon Resource Name (ARN). - When copying the code, we should replace:
-<REGION>with the AWS Region where the service is created.
-<AWS ACCOUNT ID>with the 12-digit number that uniquely identifies the AWS account. - For more information on ARN and policies, we should check the official documentation. For example, the resource
arn:aws:s3:::*does not specify a Region o an account ID. This is because in S3 bucket names are unique across accounts and regions. - The wildcard symbol
*is used to identify all resources. For example, the resource:arn:aws:s3:::*identifies all bucket/objects. - Although it is outside of the scope of this post, we should remember the Least Privilege Principle: any actor should have only the minimum amount of permissions needed to complete its tasks.
Create the role
- Click on the account name on top of the AWS Console.
- Select “Security credentials”.
- From the left menu, select “Roles”, then “Create Role”.
- In the “Select trusted entity” page:
- For “Trusted entity type”, click on “AWS Service”.
- For “Use case”, select “Lambda”. - Click “Next”.

- From the “Permissions Policies” menu, select the previously created policy
obj-detect-policy-dev-032022, and add it to the role. - Click “Next”.
- Give the role the name
obj-detect-role-dev-032022and click “Create role”.
We have defined the set of needed permissions (policies) and attached them to an identity (role). We can proceed to create the Lambda function.
2.3 Lambda function
- From the AWS Console, type “lambda” on the search bar on top of the page.
- Select the “Lambda” service.
- The AWS Region of the lambda function should be the same as the one of the S3 input bucket. It is possible to change the Region by the dropdown menu on the top right of the AWS Console.
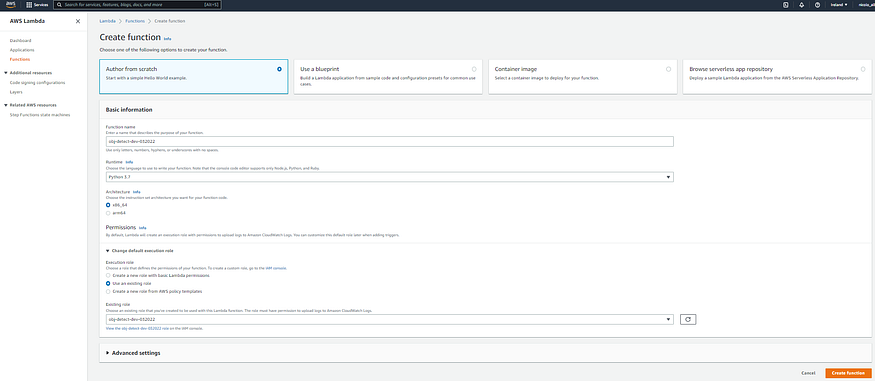
- Click on “Create function”, then:
- Select “Author from scratch”.
- For the function name, type:obj-detect-dev-032022.
- For “Runtime”, choose “Python 3.7”.
- For “Execution Role”, select “Use an existing role” and provide the name of the role previously created. - Click on “Create function”.
- In the function page, select the “+ Add trigger”. We want to configure the function to run in response to an Amazon S3 upload.

- In the “Add trigger” page:
- Select “S3” as input.
- Provide the bucket name:input-img-dev-032022. It is the bucket where images will be initially loaded.
- Event type: “PUT”. - Check the information box and click “Add”.

The function page now looks as follows:
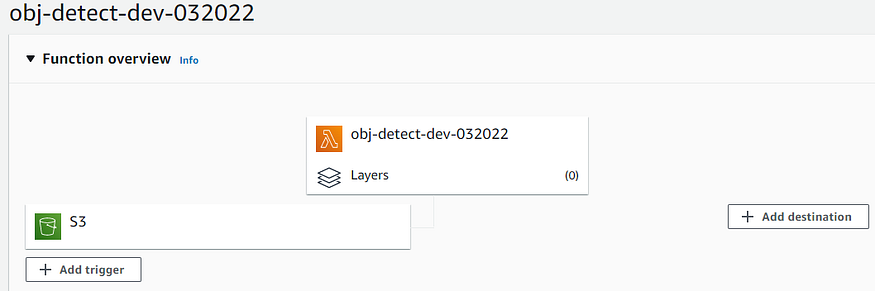
That’s it!
We can finally write the application logic in Python. Under the “Code” tab in the function page, let us paste this in the textbox:
About the code
- Boto3 is the AWS SDK for Python. We used it to interact with the other AWS services: S3 (
boto3.client("s3")) and Rekognition (boto3.client("rekognition")). - The
Labelclass stores the labels (names and confidence) detected by Rekognition. - The
Responseclass stores the analyzed object, complete of metadata and a list ofLabels. TheResponseclass implements the call to Rekognition through therekognition.detect_labels()method. - The
rekognition.detect_labels()method accepts, among others, the following parameters:
-MaxLabels: maximum number of labels we want Rekognition to return.
-MinConfidence: minimum confidence threshold. Rekognition does not return labels whose confidence falls under this value (default: 55%). - The
save_analysis()function takes an object as input and stores it on the output S3 bucket. It leverages thes3.put_object()method. - The
lambda_handler(event, context)method is run when the Lambda function is invoked. It passes the event object that triggered the execution.
2.4 Let’s try it!
We can add any picture to the input bucket (AWS Console > Amazon S3 > Buckets > input bucket > “Upload”). An example:

The labels detection process is triggered automatically by the upload. We can check it through the AWS CloudWatch logs. To inspect them, we should go to the Lamba function page, open the “Monitor” tab, then “View logs in CloudWatch”:

The identified labels well describe the picture: urban, outdoors, water, waterfront,architecture, and others.
The labels that Amazon Rekognition can return include objects, scenes, actions and concepts found in an image. Further information is available in the product documentation.
Let us check whether the analysis was also saved in the output bucket:

We may download and inspect the file:

3. Conclusions
In this post, we leveraged AWS to rapidly deploy a serverless and event-driven image analysis solution.
Nowadays, object storage services like S3 are the most popular storage target for unstructured data such as pictures. For this reason, a similar approach may easily extract useful information from a large number of image files. As the analysis is saved back to S3, it becomes available for further services. Search engines and business reporting tools may create appealing and digestible insights.
Among the non-functional key points, we remind:
- The adoption of managed services, so that we do not have to deal with complex and time-consuming infrastructure setup.
- Cost-effectiveness: with AWS Lambda, we pay only for what we effectively use. There is no charge when the code is not running. Also, using an AI service such as Amazon Rekognition eliminates the costs associated to the development of complex Machine Learning models.
- Automation and scalability by design: the process is event-driven and starts as soon as a new image becomes available. Moreover, AWS Lambda scales the code automatically.


No comments:
Post a Comment