In this workshop, we’ll use an XGBoost model for scoring data with Apache Spark (AWS EMR)
- Code for the workshop: https://github.com/alexeygrigorev/aws-emr-spark-model-deployment-workshop
Plan:
- Prepare docker images
- Set up an EMR cluster
- Connect to it with Jupyter
- Use spark-submit to submit spark jobs
Prerequisites
- Python 3.7 (or Python 3.8). The easiest way to install it — use Anaconda (https://www.anaconda.com/products/individual)
- XGBoost and pyarrow for generating data and training a model (install with pip)
- Docker
- AWS account and CLI installed and configured
Let’s start!
Create a bucket with data and model
- Create a bucket “spark-workshop-data”
- Upload the data there. E.g. to s3://spark-workshop-data/data-sessions/
- Upload the model to the root of the bucket, e.g. to s3://spark-workshop-data/model.pkl
- Script for generating the data and training the model: generate_data_model.ipynb
Preparing Docker images
Create a docker file pyspark-base.dockerfile:
FROM amazoncorretto:8
RUN yum -y update
RUN yum -y install yum-utils
RUN yum -y groupinstall development
RUN yum -y install python3 python3-dev python3-pip python3-virtualenv
ENV PYSPARK_DRIVER_PYTHON python3
ENV PYSPARK_PYTHON python3
RUN pip3 install --upgrade pip
RUN pip3 install numpy pandas boto3 --no-cache-dir
This will be our base image, which we will extend with other libraries. For our example, we want to use XGBoost, so let’s extend the image and install it. Let’s create another dockerfile pyspark-xgboost.dockerfile:
FROM pyspark-base
RUN pip3 install xgboost --no-cache-dir
Build them:
docker build -t pyspark-base -f pyspark-base.dockerfile .
docker build -t pyspark-xgboost -f pyspark-xgboost.dockerfile .
Create an ECR repo:
aws ecr create-repository --repository-name pyspark-images
The output:
{
"repository": {
"repositoryArn": "arn:aws:ecr:eu-west-1:XXXXXXXXXXXX:repository/pyspark-images",
"registryId": "XXXXXXXXXXXX",
"repositoryName": "pyspark-images",
"repositoryUri": "XXXXXXXXXXXX.dkr.ecr.eu-west-1.amazonaws.com/pyspark-images",
"createdAt": 1605303665.0,
"imageTagMutability": "MUTABLE",
"imageScanningConfiguration": {
"scanOnPush": false
},
"encryptionConfiguration": {
"encryptionType": "AES256"
}
}
}
Where “XXXXXXXXXXXX” is your AWS account number.
From this output, we’re interested in the repositoryUri.
Tag the images:
ACCOUNT=XXXXXXXXXXXX
docker tag pyspark-base ${ACCOUNT}.dkr.ecr.eu-west-1.amazonaws.com/pyspark-images:pyspark-base
docker tag pyspark-xgboost ${ACCOUNT}.dkr.ecr.eu-west-1.amazonaws.com/pyspark-images:pyspark-xgboost
Log in to ECR
$(aws ecr get-login --no-include-email)
And push the images to ECR
docker push ${ACCOUNT}.dkr.ecr.eu-west-1.amazonaws.com/pyspark-images:pyspark-base
docker push ${ACCOUNT}.dkr.ecr.eu-west-1.amazonaws.com/pyspark-images:pyspark-xgboost
Note: if you use a different region, be sure to replace “eu-west-1” with it.
Create key pair
Now we need to create a key pair to be able to SSH to the EC2 machines of the cluster.
- Go to services ⇒ “EC2”
- Select “Key Pairs” under “Network & Security”
- Click “Create new key pair”, call it “emr_deploy_workshop”

Put the key to “.aws” or any other location
Set permissions:
chmod 600 emr_deploy_workshop.pem
Create roles
We need to create an EC2 instance profile for the instances of the cluster.
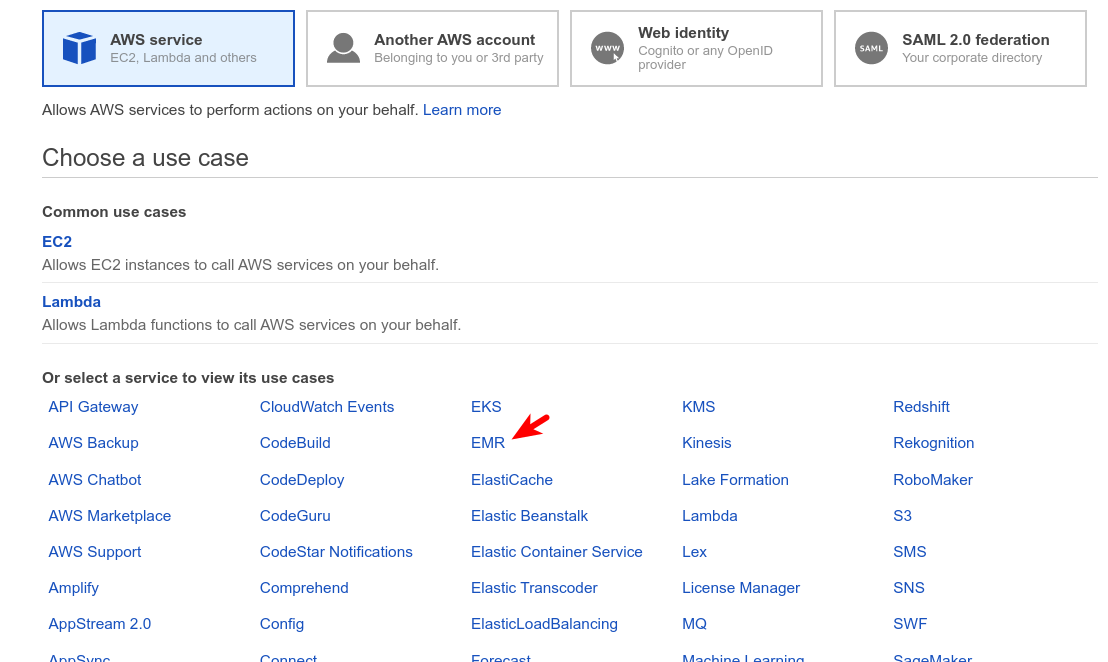
- Go to Services ⇒ IAM
- Select “roles”, click “Create role”
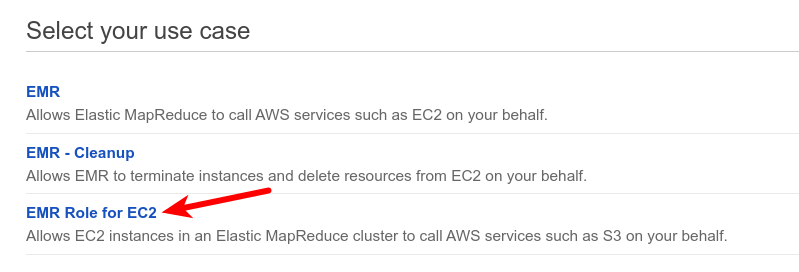
- Select “AWS service”, choose “EMR” from the list
- Select “EMR Role for EC2”
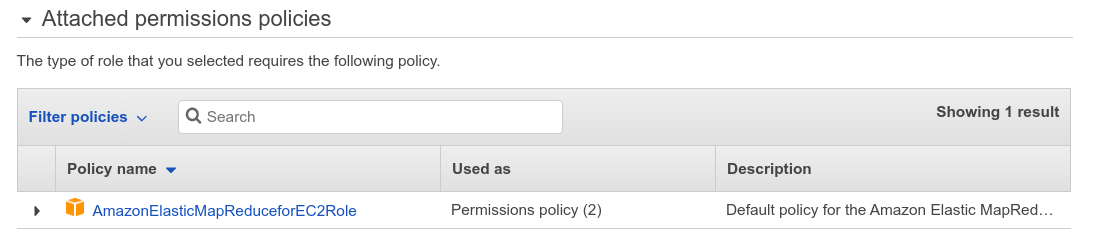
- Use the default list of attached policies — it should contain only one item “AmazonElasticMapReduceforEC2Role”
- Skip tags
- Name it “EMR_workshop_ec2_profile”
- Click “Create role”
The role should look like that:

Prepare configuration
Now we need to prepare a config for the EMR cluster.
- We need to add our ECR to the list of trusted repositories
- We also need to set the base image as the default docker image for all spark jobs
[
{
"Classification": "container-executor",
"Properties": {},
"Configurations": [
{
"Classification": "docker",
"Properties": {
"docker.privileged-containers.registries": "local,centos,<ACCOUNT_NUMBER>.dkr.ecr.<REGION>.amazonaws.com",
"docker.trusted.registries": "local,centos,<ACCOUNT_NUMBER>.dkr.ecr.<REGION>.amazonaws.com"
}
}
]
},
{
"Classification": "livy-conf",
"Properties": {
"livy.spark.master": "yarn",
"livy.spark.deploy-mode": "cluster",
"livy.server.session.timeout": "16h"
}
},
{
"Classification": "hive-site",
"Properties": {
"hive.execution.mode": "container"
}
},
{
"Classification": "spark-defaults",
"Properties": {
"spark.executorEnv.YARN_CONTAINER_RUNTIME_TYPE": "docker",
"spark.yarn.am.waitTime": "300s",
"spark.yarn.appMasterEnv.YARN_CONTAINER_RUNTIME_TYPE": "docker",
"spark.executorEnv.YARN_CONTAINER_RUNTIME_DOCKER_IMAGE": "<ACCOUNT_NUMBER>.dkr.ecr.eu-west-1.amazonaws.com/pyspark-images:pyspark-base",
"spark.executor.instances": "2",
"spark.yarn.appMasterEnv.YARN_CONTAINER_RUNTIME_DOCKER_IMAGE": "<ACCOUNT_NUMBER>.dkr.ecr.eu-west-1.amazonaws.com/pyspark-images:pyspark-base"
}
}
]
Upload the config to our bucket:
aws cp config.json s3://spark-workshop-data/config.json
Create EMR cluster
Now we’re ready to create an EMR cluster:
- Go to services ⇒ EMR

- Click “Create cluster”, select “Go to advanced options”

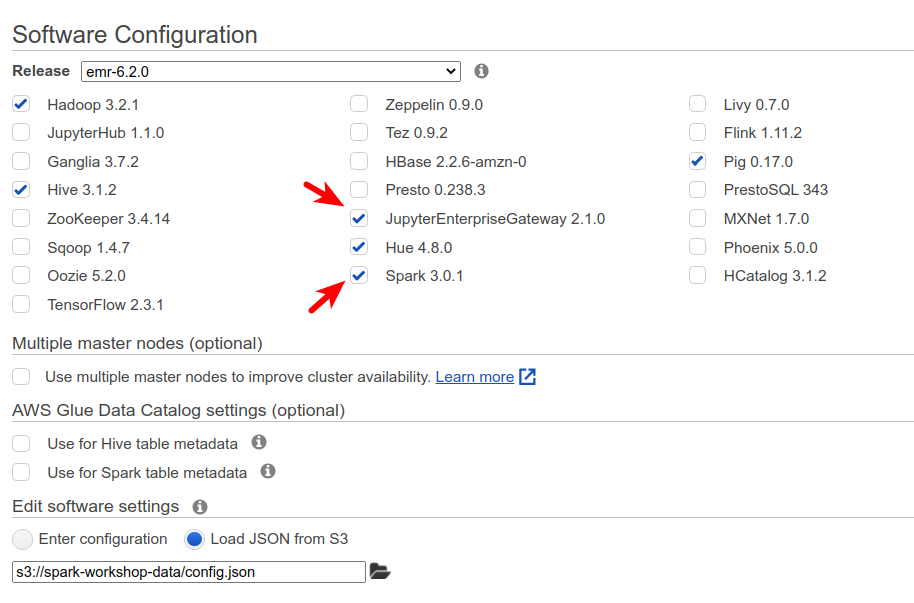
- Choose “emr-6.2.0” from the dropdown list of releases (or any EMR of 6+ version — older releases don’t support Docker)
- Add “Spark” and “JupyterEnterpriseGateway” there
- Load the config file from S3: Use “s3://spark-workshop-data/config.json”
- Click next, keep the default settings.
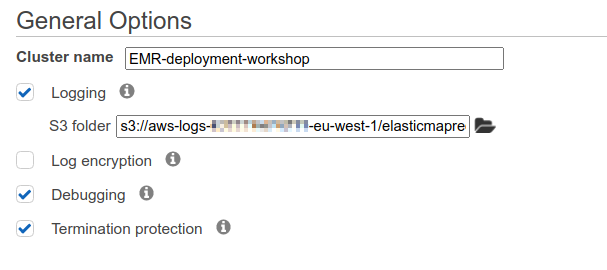
- Click next, put a name like “EMR-deployment-workshop”.
- Click next.
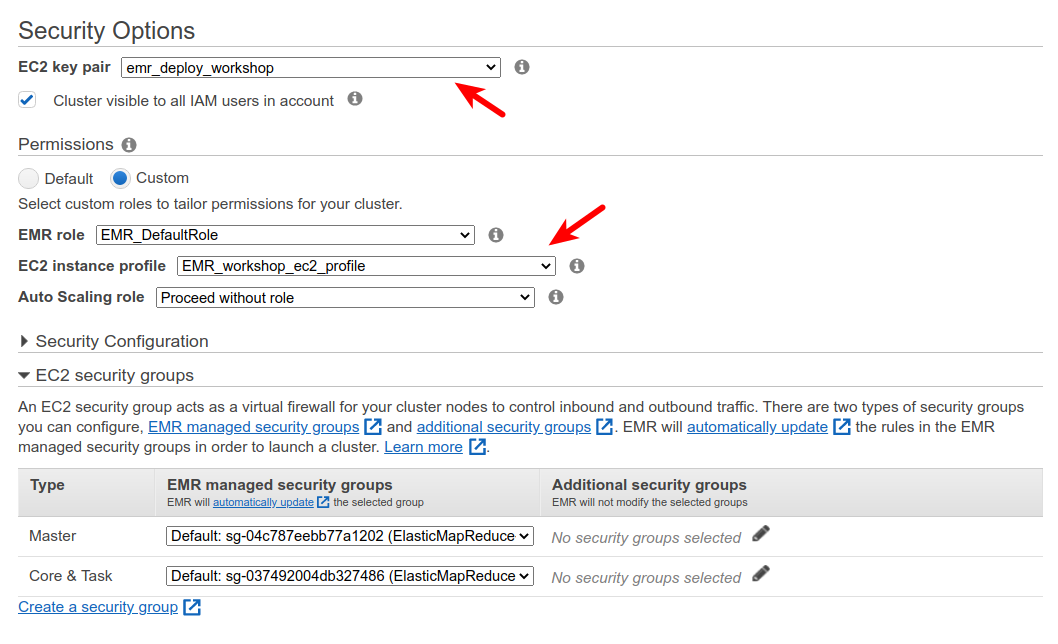
- For the EC2 key pair, select the key we created previously.
- Choose “Custom” permissions and select “EMR_workshop_ec2_profile” for EC2 instance profile — the instance profile we created earlier.
- Click “Create cluster”
- Wait till the cluster changes the status from “Starting” to “Waiting”
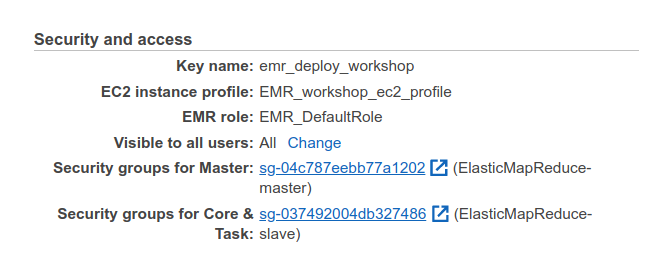
Note the cluster id — we’ll need it.
Jupyter notebook
You can use the cluster from a Jupyter notebook
- Go to notebooks, click “Create notebook”.
- Select the existing cluster, chose the default role (or select “Create default role” if you’re doing it for the first time)

- Then, wait till the notebook is ready
- Now you can open it in Jupyter (or JupyterHub)
In Jupyter:
Create a new notebook, select “PySpark” kernels.
First, let PySpark know that it shouldn’t use virtualenv — else it won’t use our Docker image. Run this in the first cell:
%%configure -f
{"conf": {"spark.pyspark.virtualenv.enabled": "false"}}
Then check that it uses the right image. The easiest way to do it is to check if the version of numpy matches what we have in Docker: the default one is older than what we have in the image.
Run that:
import numpy
numpy.__version__
In our case, it prints '1.19.4', which is the same version we have in Docker.
To use a different image, we need to specify it in the config. Restart the kernel and put this config in the first cell before running anything else.
%%configure -f
{
"conf": {
"spark.pyspark.virtualenv.enabled": "false",
"spark.executorEnv.YARN_CONTAINER_RUNTIME_DOCKER_IMAGE": "XXXXXXXXXXXX.dkr.ecr.eu-west-1.amazonaws.com/pyspark-images:pyspark-xgboost",
"spark.yarn.appMasterEnv.YARN_CONTAINER_RUNTIME_DOCKER_IMAGE": "XXXXXXXXXXXX.dkr.ecr.eu-west-1.amazonaws.com/pyspark-images:pyspark-xgboost"
}
}
To make sure the correct image is loaded, try to import xgboost (the default image doesn’t have it):
import xgboost as xgb
It should produce no errors.
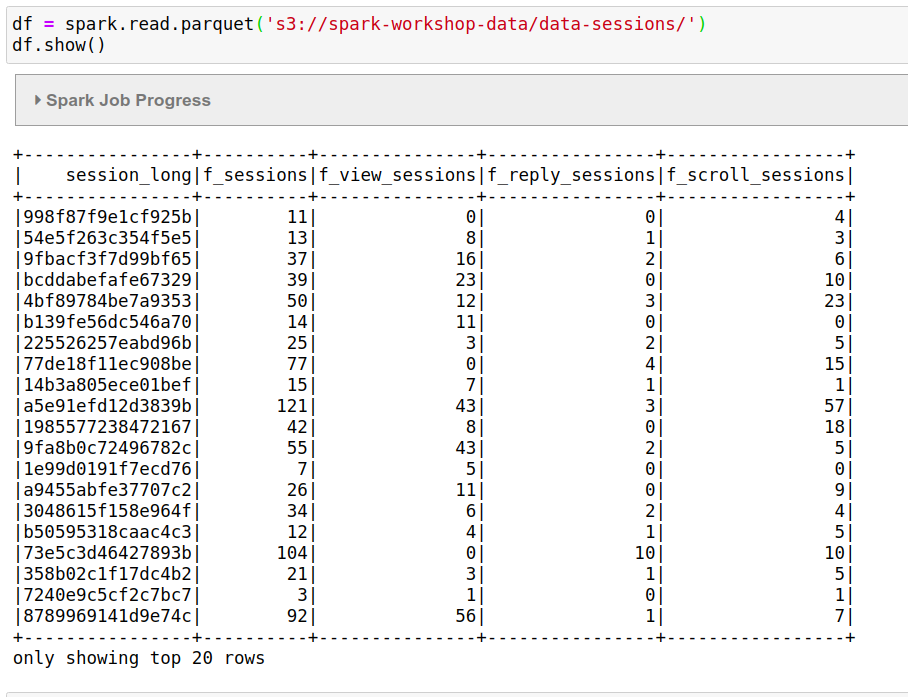
Now let’s read the data:
df = spark.read.parquet('s3://spark-workshop-data/data-sessions/')
And have a look:
df.show()
Code for applying the model
Let’s create a script with the code — entrypoint.py (you can also put this to Jupyter for experimenting).
First, let’s do the imports:
import pickle
import numpy as np
import pandas as pd
import xgboost as xgb
import pyspark
from pyspark.sql import SparkSession
from pyspark.sql import types
import boto3
Now we need to download the model and load it with pickle:
s3 = boto3.client('s3')
s3.download_file('spark-workshop-data', 'model.pkl', 'model.pkl')
with open('model.pkl', 'rb') as f_in:
model = pickle.load(f_in)
Next, we define the function for applying the model:
def apply_model(columns, model, batch):
df_batch = pd.DataFrame(batch, columns=columns)
X = df_batch[['f_views_fraction', 'f_replies_fraction', 'f_scrolls_fraction']].values
dm = xgb.DMatrix(X)
y_pred = model.predict(dm)
df_batch['prediction'] = y_pred
for _, row in df_batch[['session_long', 'prediction']].iterrows():
yield (row.session_long, float(row.prediction))
After that, create a spark session and load the data:
spark = SparkSession\
.builder\
.appName("spark test") \
.getOrCreate()
df = spark.read.parquet('s3://spark-workshop-data/data-sessions/')
Often, we need to do some data transformation before we can use it in the model. It’s also the case for our example:
df = df \
.withColumn('f_views_fraction', df.f_view_sessions / df.f_sessions) \
.withColumn('f_replies_fraction', df.f_reply_sessions / df.f_sessions) \
.withColumn('f_scrolls_fraction', df.f_scroll_sessions / df.f_sessions) \
.select('session_long', 'f_views_fraction', 'f_replies_fraction', 'f_scrolls_fraction')
Now let’s use the apply_model function in mapPartition:
columns = df.columns
output_schema = types.StructType([
types.StructField("session_long", types.StringType()),
types.StructField("predictions", types.FloatType()),
])
df_output = df.rdd \
.mapPartitions(lambda p: apply_model(columns, model, p)) \
.toDF(output_schema)
It’s ready, so we can write the results back to S3:
df_output.write.mode('overwrite').parquet('s3://spark-workshop-data/output/2020-10-09/')
Sometimes, when our partitions are too large, it makes sense to chunk each partition in smaller batches:
from itertools import islice
def split_into_batches(iterable, size):
while True:
batch = islice(iterable, size)
batch = list(batch)
if len(batch) == 0:
break
yield batch
def apply_model_batch(columns, model, partition):
for batch in split_into_batches(partition, 10000):
df_batch = pd.DataFrame(batch, columns=columns)
X = df_batch[['f_views_fraction', 'f_replies_fraction', 'f_scrolls_fraction']].values
dm = xgb.DMatrix(X)
y_pred = model.predict(dm)
df_batch['prediction'] = y_pred
for _, row in df_batch[['session_long', 'prediction']].iterrows():
yield (row.session_long, float(row.prediction))
You can see the entire file here: entrypoint.py
Spark-Submit
To submit it, ssh to the master, copy the entrypoint file and run spark-submit:
DOCKER_IMAGE_NAME=${ACCOUNT}.dkr.ecr.eu-west-1.amazonaws.com/pyspark-images:pyspark-xgboost
spark-submit \
--master yarn \
--deploy-mode cluster \
--conf spark.executorEnv.YARN_CONTAINER_RUNTIME_TYPE=docker \
--conf spark.executorEnv.YARN_CONTAINER_RUNTIME_DOCKER_IMAGE=${DOCKER_IMAGE_NAME} \
--conf spark.yarn.appMasterEnv.YARN_CONTAINER_RUNTIME_TYPE=docker \
--conf spark.yarn.appMasterEnv.YARN_CONTAINER_RUNTIME_DOCKER_IMAGE=${DOCKER_IMAGE_NAME} \
--num-executors 2 \
entrypoint.py
Of course, you don’t have to do it from the master, but it requires additional configuration.
You can also do it with AWS CLI — for that you don’t need to SSH to the master:
CLUSTER_ID="j-3FIB6N1RLNZZE"
DOCKER_IMAGE_NAME=${ACCOUNT}.dkr.ecr.eu-west-1.amazonaws.com/pyspark-images:pyspark-xgboost
aws emr add-steps \
--cluster-id ${CLUSTER_ID} \
--steps Type=spark,Name=spark-test,Args=[--master,yarn,--deploy-mode,cluster,--conf,spark.yarn.submit.waitAppCompletion=true,--num-executors,2,--conf,spark.executorEnv.YARN_CONTAINER_RUNTIME_TYPE=docker,--conf,spark.executorEnv.YARN_CONTAINER_RUNTIME_DOCKER_IMAGE=${DOCKER_IMAGE_NAME},--conf,spark.yarn.appMasterEnv.YARN_CONTAINER_RUNTIME_TYPE=docker,--conf,spark.yarn.appMasterEnv.YARN_CONTAINER_RUNTIME_DOCKER_IMAGE=${DOCKER_IMAGE_NAME},s3://spark-workshop-data/entrypoint.py],ActionOnFailure=CONTINUE
In yellow we have the same configuration we put to spark-submit. Note that entrypoint.py is uploaded to S3.
SSH
To make sure you can SSH to the master, select the security group for master:
- Click “edit inbound rules”
- Click “add rule”, select “SSH” from the dropdown list. In the source field, select “0.0.0.0/0” — this will let everyone see this port.
- Click “save rules”.
Now, connect:
Connect:
CLUSTER_ID="j-L5LEQNTOUF5Z"
aws emr ssh \
--cluster-id ${CLUSTER_ID} \
--key-pair-file ~/.aws/emr_deploy_workshop.pem
You will see something like that:
hadoop@ec2-18-202-33-134.eu-west-1.compute.amazonaws.com -t
Last login: Fri Nov 13 11:45:58 2020
__| __|_ )
_| ( / Amazon Linux 2 AMI
___|\___|___|
https://aws.amazon.com/amazon-linux-2/
EEEEEEEEEEEEEEEEEEEE MMMMMMMM MMMMMMMM RRRRRRRRRRRRRRR
E::::::::::::::::::E M:::::::M M:::::::M R::::::::::::::R
EE:::::EEEEEEEEE:::E M::::::::M M::::::::M R:::::RRRRRR:::::R
E::::E EEEEE M:::::::::M M:::::::::M RR::::R R::::R
E::::E M::::::M:::M M:::M::::::M R:::R R::::R
E:::::EEEEEEEEEE M:::::M M:::M M:::M M:::::M R:::RRRRRR:::::R
E::::::::::::::E M:::::M M:::M:::M M:::::M R:::::::::::RR
E:::::EEEEEEEEEE M:::::M M:::::M M:::::M R:::RRRRRR::::R
E::::E M:::::M M:::M M:::::M R:::R R::::R
E::::E EEEEE M:::::M MMM M:::::M R:::R R::::R
EE:::::EEEEEEEE::::E M:::::M M:::::M R:::R R::::R
E::::::::::::::::::E M:::::M M:::::M RR::::R R::::R
EEEEEEEEEEEEEEEEEEEE MMMMMMM MMMMMMM RRRRRRR RRRRRR
[hadoop@ip-172-31-4-226 ~]$
Download the model:
aws s3 cp s3://spark-workshop-data/model.pkl model.pkl
Run “pyspark” there. It’ll take a while for the first time (it’s downloading docker images from ECR)
Check that you can access the data:
>>> df = spark.read.parquet('s3://spark-workshop-data/data-sessions/')
>>> df.show()
+----------------+----------+---------------+----------------+-----------------+
| session_long|f_sessions|f_view_sessions|f_reply_sessions|f_scroll_sessions|
+----------------+----------+---------------+----------------+-----------------+
|998f87f9e1cf925b| 11| 0| 0| 4|
|54e5f263c354f5e5| 13| 8| 1| 3|
|9fbacf3f7d99bf65| 37| 16| 2| 6|
|bcddabefafe67329| 39| 23| 0| 10|
|4bf89784be7a9353| 50| 12| 3| 23|
|b139fe56dc546a70| 14| 11| 0| 0|
|225526257eabd96b| 25| 3| 2| 5|
|77de18f11ec908be| 77| 0| 4| 15|
|14b3a805ece01bef| 15| 7| 1| 1|
|a5e91efd12d3839b| 121| 43| 3| 57|
|1985577238472167| 42| 8| 0| 18|
|9fa8b0c72496782c| 55| 43| 2| 5|
|1e99d0191f7ecd76| 7| 5| 0| 0|
|a9455abfe37707c2| 26| 11| 0| 9|
|3048615f158e964f| 34| 6| 2| 4|
|b50595318caac4c3| 12| 4| 1| 5|
|73e5c3d46427893b| 104| 0| 10| 10|
|358b02c1f17dc4b2| 21| 3| 1| 5|
|7240e9c5cf2c7bc7| 3| 1| 0| 1|
|8789969141d9e74c| 92| 56| 1| 7|
+----------------+----------+---------------+----------------+-----------------+
only showing top 20 rows
Without AWS CLI, use the DNS of the master node:
ssh -i ~/.aws/emr_deploy_workshop.pem \
hadoop@ec2-3-249-198-217.eu-west-1.compute.amazonaws.com
Resources:


No comments:
Post a Comment