The complexity of the Web changes daily, and its capabilities are growing just as quickly, especially with 3D rendering. Who is just starting to get involved in the 3D theme - welcome under the cat.
Let's go from afar
WebGL is a JavaScript software library that allows you to create 3D graphics that run in browsers. This library is based on the architecture of the OpenGL library. WebGL uses the GLSL shader programming language , which has a C-like syntax. What's interesting about WebGL is that the code is modeled directly in the browser. To do this, WebGL uses the canvas object , which was introduced in HTML5.
Working with WebGL, and with shaders in particular, is a rather laborious process. During the development process, it is necessary to describe each point, line, face, and so on. To visualize all this, we need to write a rather voluminous piece of code. To increase the speed of development, the Three.js library was developed .
Three.js is a JavaScript library containing a set of pre-built classes for creating and displaying interactive 3D graphics in WebGL.
Three.js is to WebGL what jQuery is to JavaScript. The library offers a declarative syntax, and abstracts from the headaches associated with 3D in the browser. Let's take a quick overview and see how to get started if you're new to the 3D world.
More on Three.js
The Three.js library, as mentioned, makes it easy to work with WebGL. When using Three.js, there is no need to write shaders (but the opportunity remains), and it becomes possible to operate with familiar concepts.
A large number of developers are working on the library. The main ideologist and developer is Ricardo Cobello, known by his creative pen name Mr. Dob .
Modeling graphics using Three.js can be compared to a movie set, as we have the ability to operate with such concepts as scene, light, camera, objects and their materials.
The three so-called Three.js whales include:
- Scene is a kind of platform where all the objects that we create are located;
- Camera is essentially the “eye” that will be directed to the scene. The camera captures and displays objects that are located on the scene;
- Renderer is a renderer that allows you to display a scene captured by a camera.
There are several types of camera in Three.js:
- Perspective Camera
- Stereo Camera
- Orthographic Camera
- Cube camera
The most common ones are Perspective Camera and Orthographic Camera.
Perspective Camera
This is the most common projection mode used to render a 3D scene.
A perspective camera is designed to simulate what the human eye sees. The camera perceives all objects in perspective projection, that is: the further the object is from us, the smaller it seems.
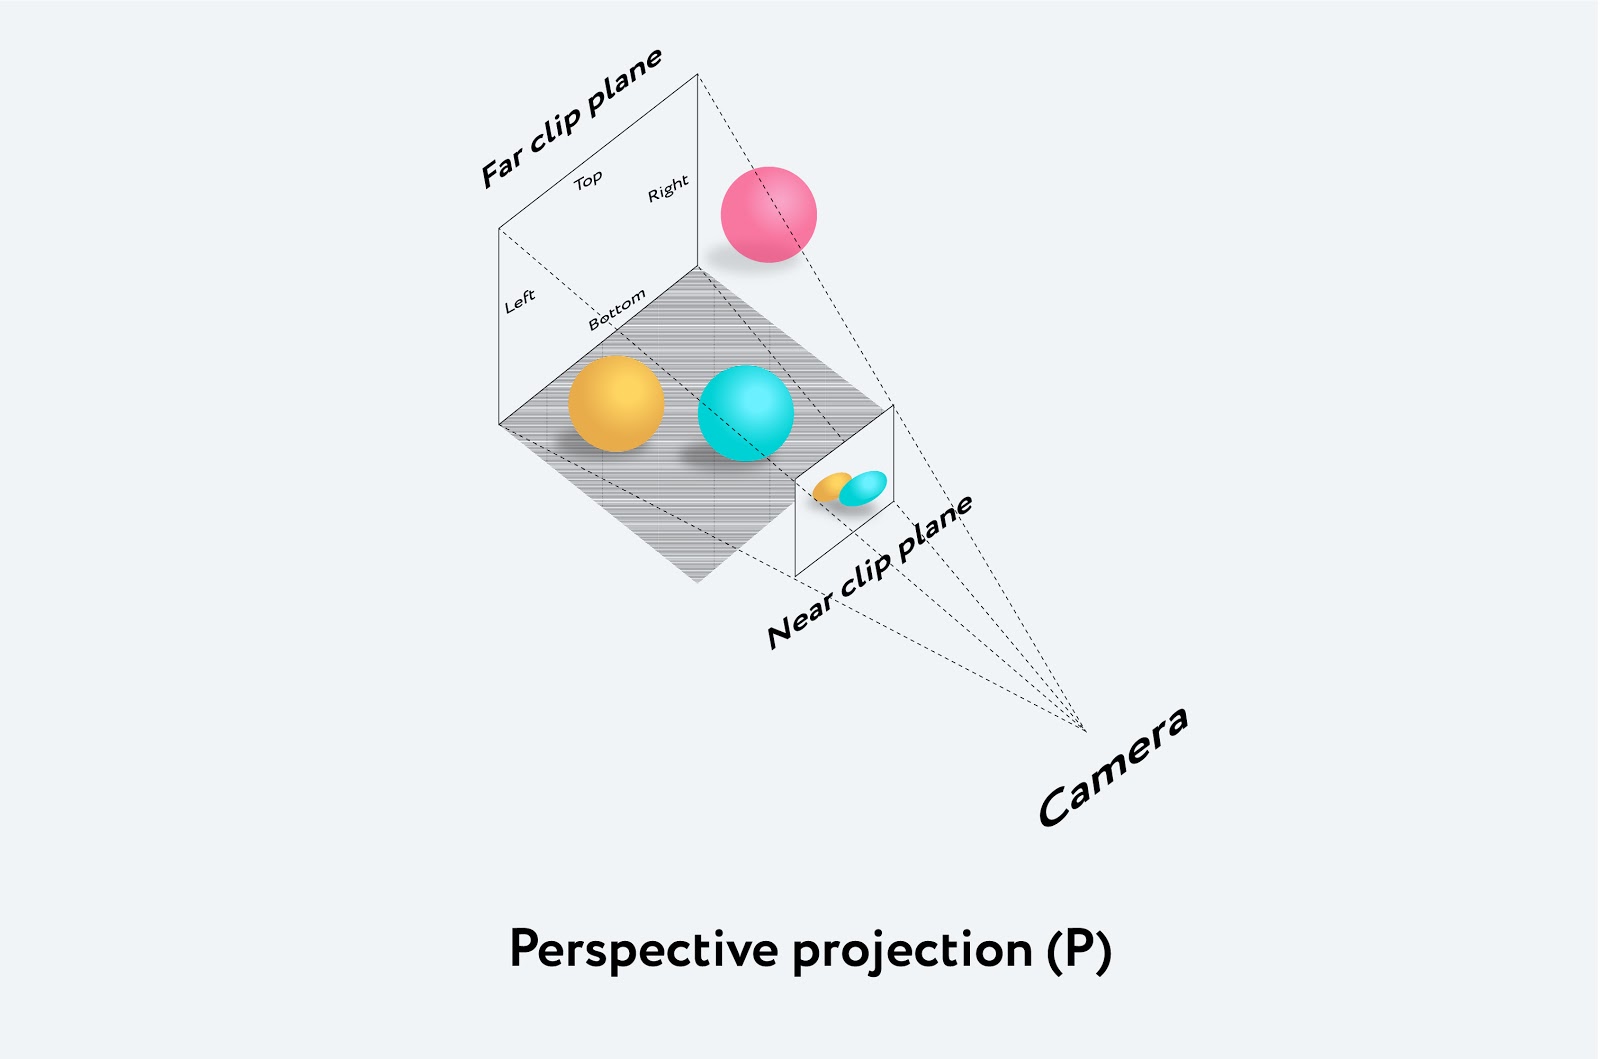
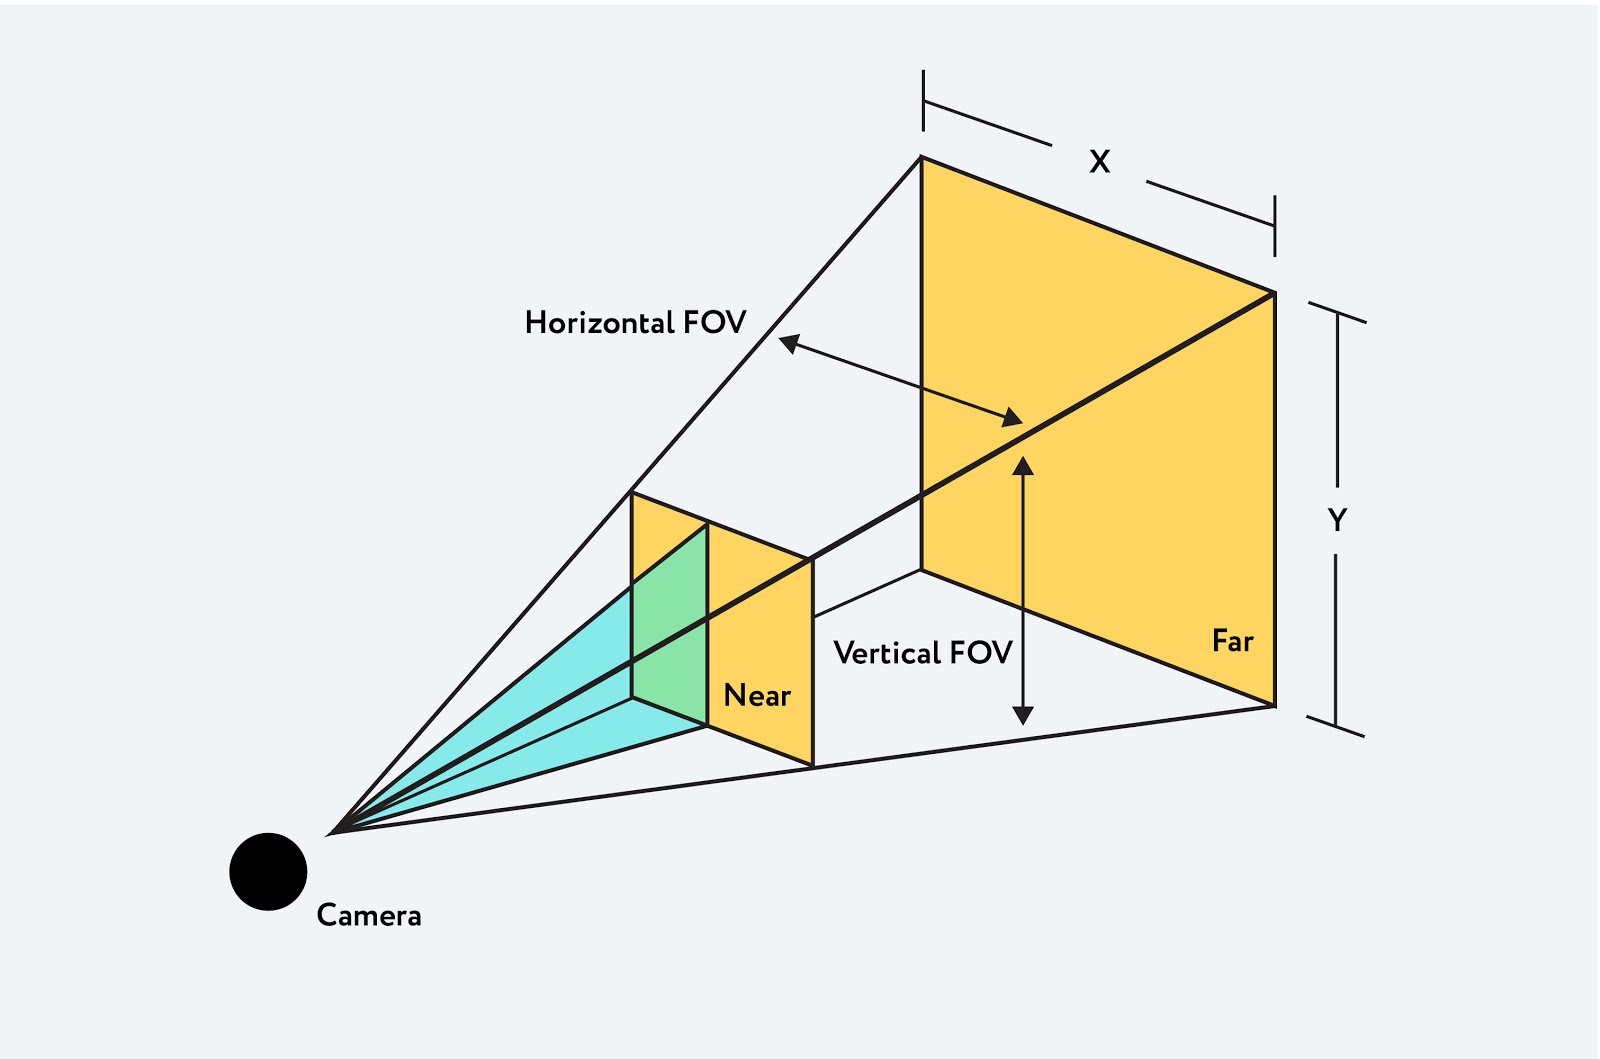
The perspective camera takes 4 arguments:
- FOV or Field Of View - Determines the angle you can see around the center of the camera.
- Aspect ratio - aspect ratio, or, the ratio of the width to the height of the screen. At large values of the field of view, the apparent size of objects decreases rapidly at a distance. On the other hand, at small values, the apparent size of objects is weakly dependent on distance.
- Near & Far - minimum and maximum distance from the camera that gets into rendering. So, very distant points will not be drawn at all, as well as points that are very close.
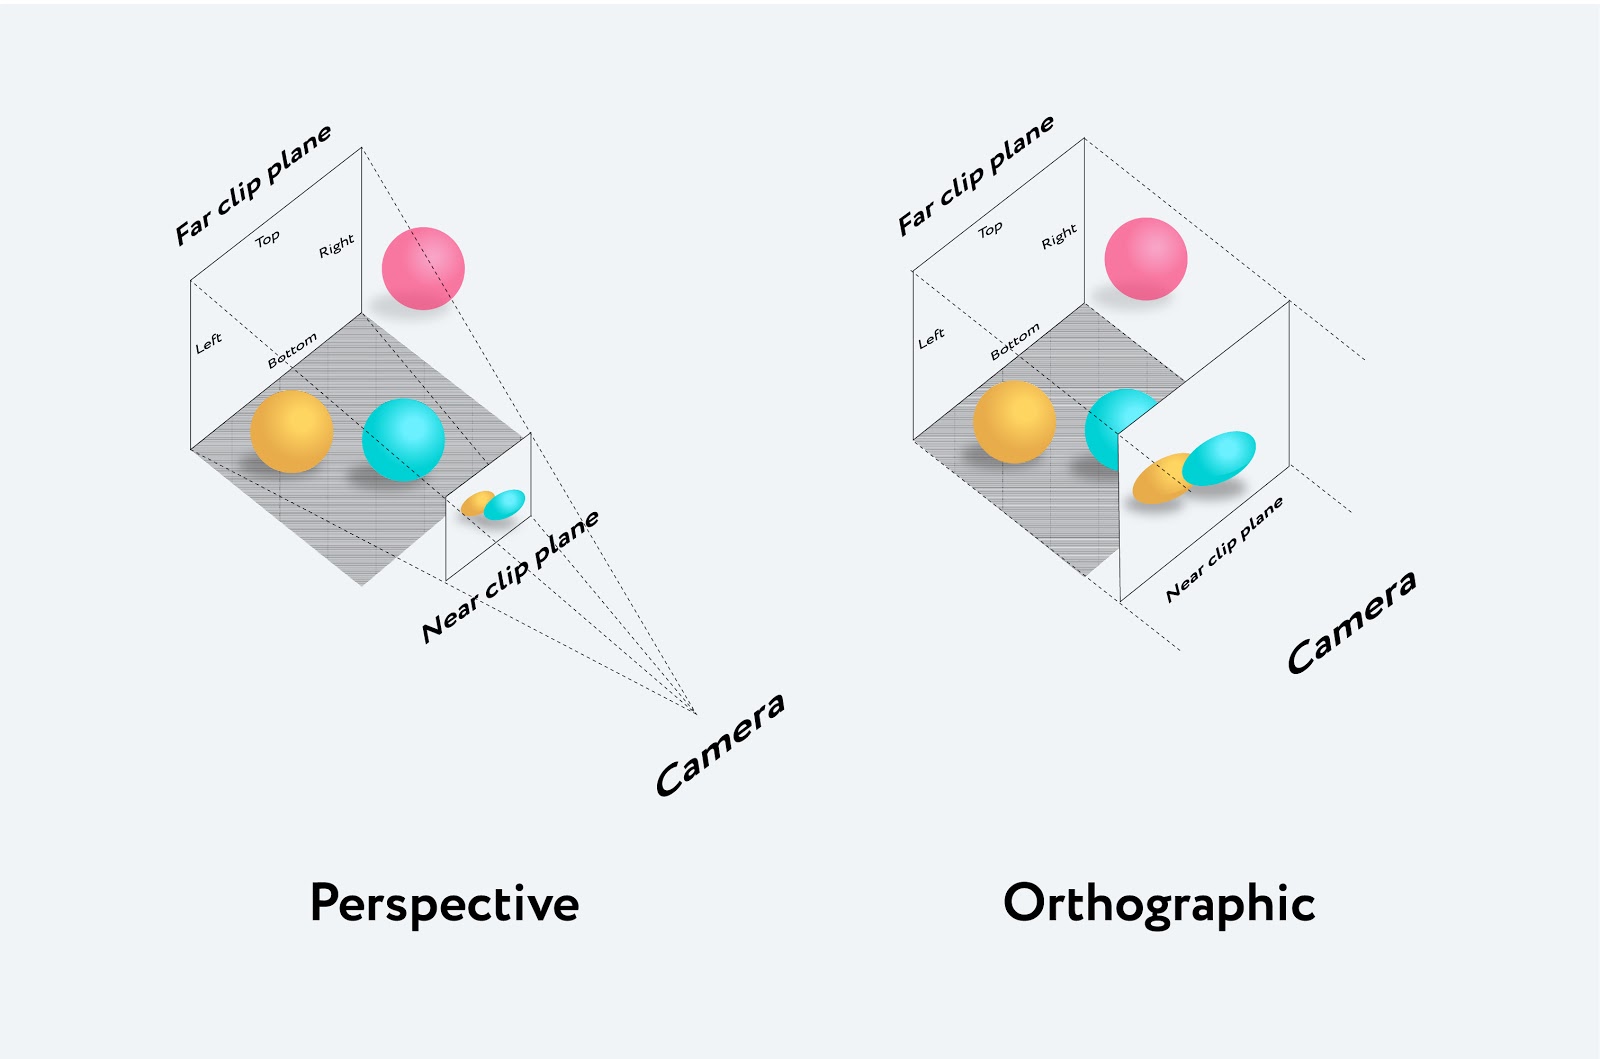
Orthographic Camera
In this projection mode, the size of the object in the displayed image remains constant regardless of its distance from the camera. That is, it is a camera located at an infinite distance from objects.
In this case, all perpendicular lines remain perpendicular, all parallel lines remain parallel. If we move the camera, lines and objects will not be distorted.
This can be useful when displaying 2D scenes and UI elements.
Lighting
Without lighting on stage, it will appear as if you are in a dark room. In addition, lighting can make the scene more realistic. Technically, each lighting can be given a color.
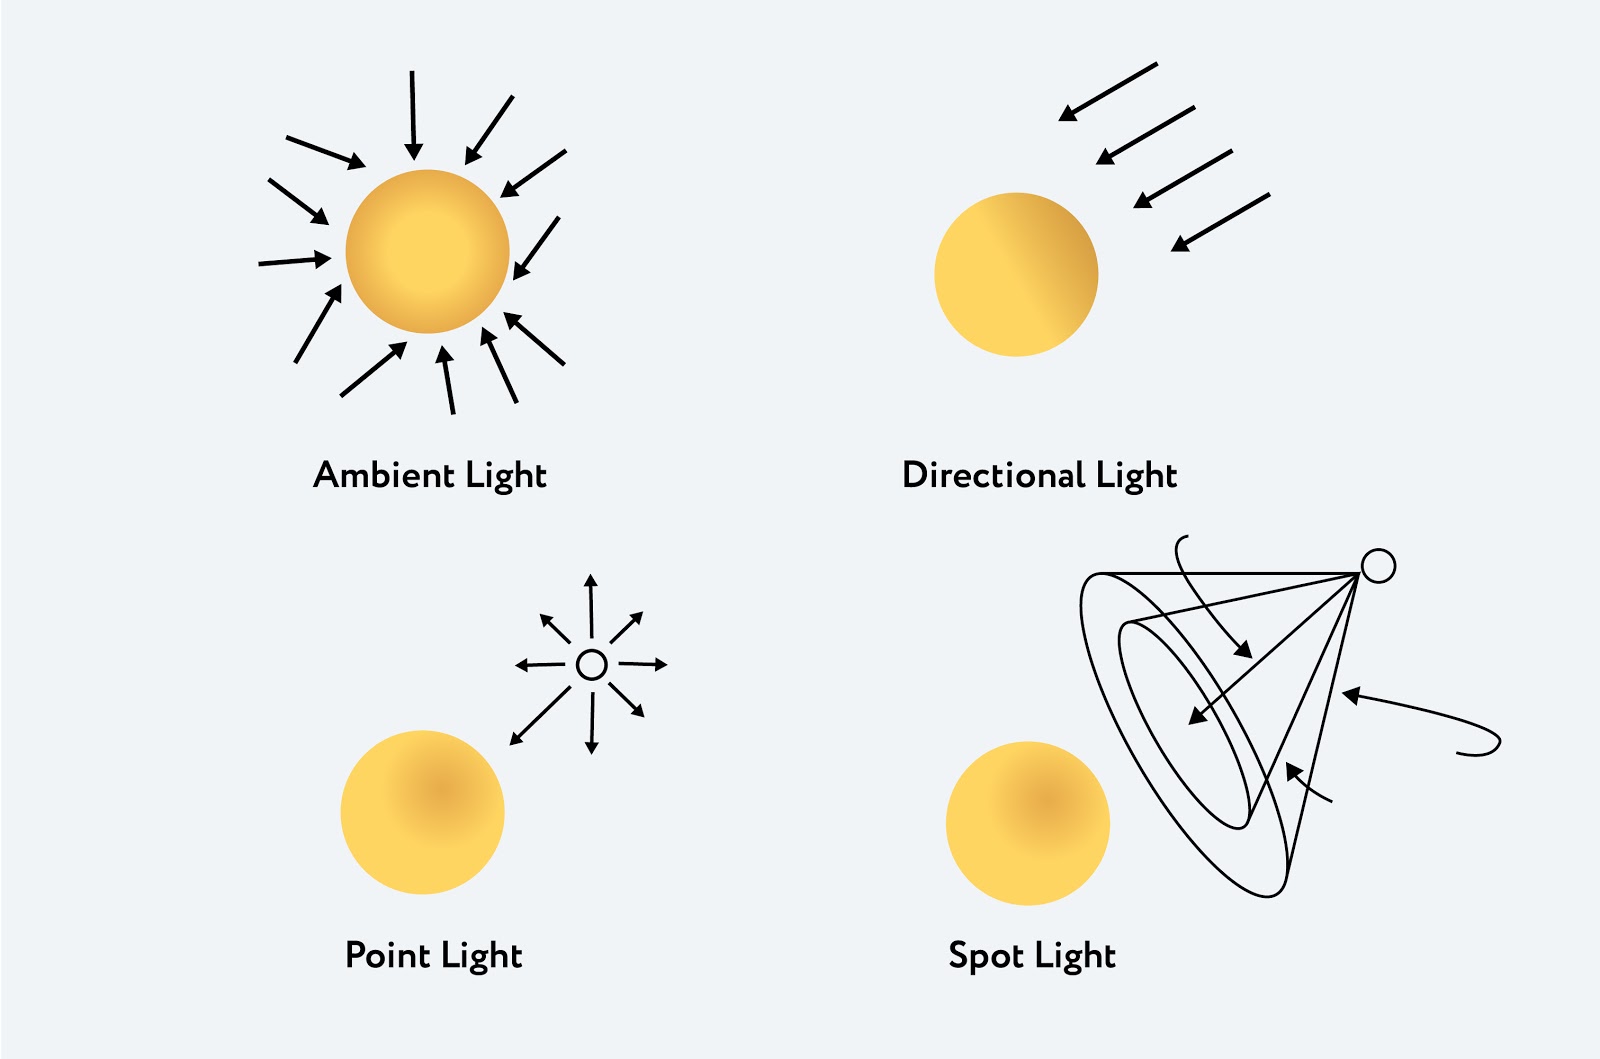
Lighting examples:
- Ambient Light - background lighting that is used to illuminate all objects in the scene in the same way; cannot be used to create shadows as it has no direction.
- Directional Light - light that is emitted in a specific direction. This light will behave as if it were infinitely far away, and the rays emitted from it were parallel; this lighting can cast shadows as it is directed at a specific object.
- P oint Light - light that is emitted from one point in all directions. A common use of this kind of lighting is to repeat lighting from a simple light bulb (no lamp).
- Spot Light - this light is emitted from one point in one direction, along a cone that expands with distance from the light source.
Creating objects on the scene
The object created in the scene is called a Mesh.
Mesh is a class that represents objects based on a triangular polygon mesh.
This class takes 2 arguments:
- Geometry - describes the shape (positions of vertices, faces, radius, etc.)
- Material - describes the appearance of objects (color, texture, transparency, etc.)
Let's try to create 2 simple shapes: a cube and a sphere.
First of all, go to the three.js website , download the latest version of the library. Then we include the library in the head section or at the beginning of the body section of our document, and you're done:
Next, so that we can display the created object, we need to create a scene, add a camera and set up a render.
Add a scene:
Add a perspective camera:
The camera takes on 4 parameters, which were mentioned above:
- angle of view or FOV, in our case this is the standard angle of 75;
- the second parameter is the aspect ratio or aspect ratio;
- the third and fourth parameters are the minimum and maximum distance from the camera that will be rendered.
Add and configure the render:
What we did: First we created a render object, then sized it to fit the viewport, and finally added it to the page to create an empty canvas element to work with.
After creating the render, we specify where to display the canvas tag . In our case, we added it to the body tag .
To create the cube itself, we first set the geometry:
The cube is created using the BoxGeometry class . This is a class that contains the vertices and faces of the cube. We transfer the dimensions:
- width : the width of the cube, the size of the sides along the X axis
- height : the height of the cube, i.e. the size of the sides along the Y axis
- depth : the depth of the cube, i.e. the size of the sides along the Z axis
To color the cube, we set the material:
In our case, the MeshBasicMaterial is set and the color parameter is 0x00ff00 , i.e. green color. This material is basically used to give a uniform color to a figure. The downside is that the figure loses its depth. But this material is quite useful when rendering wireframes using the {wireframe: true} parameter .
Now we need a Mesh object that takes geometry and applies a material to it:
Add a Mesh to the scene and move the camera away, since all objects after the scene.add () method are added with coordinates (0,0,0) by default, which will cause the camera and the cube to be at the same point.
In order to animate the cube, we need to render everything inside the render loop using requestAnimationFrame :
requestAnimationFrame is a request to the browser that you want to animate something. We pass it a function to call, that is, the render () function.
Here we set the parameters of the rotation speed. As a result, the loop renders our scene 60 times per second and makes the cube rotate.
Now let's draw a sphere:
To construct a sphere, the SphereGeometry class is used , which takes over:
- radius (default is 1)
- widthSegments - number of horizontal segments (triangles). Minimum value is 3, default value is 8
- heightSegments - the number of vertical segments. Minimum value is 2, default value is 6
By the way, the more you specify the number of triangles, the smoother the surface of the sphere will be.
Next, we try to use another material - MeshNormalMaterial - a multicolor material that maps normal vectors to RGB colors:
There are many types of material. Some materials can be combined and applied to the same shape at the same time. More details can be found here .
The final step is to set the render loop:
And we get the following:
Let's try to create a more complex shape and apply a more complex material.
As an example, let's take the MeshPhongMaterial , which takes light into account. Therefore, first we need to add lights to the scene. Below we add a SpotLight with a yellow tint and set its position on the coordinate axis:
SpotLight , as mentioned above, is emitted from one point in one direction, along a cone that expands with distance from the light source. A point light, in addition to color, can take on arguments: intensity, distance, angle, penumbra, decay , and also cast shadows.
You can read about other types of light and their possibilities here .
Now let's define the shape itself:
The TorusGeometry class is intended for constructing tori or “rolls”. This class takes on the following parameters:
- radius, default 1;
- pipe diameter, default 0.4;
- radialSegments or number of triangle segments, default 8;
- tubularSegments or number of face segments, default 6
Add material:
This material is intended for shiny surfaces. We give it a golden color, and add a specular property that affects the gloss of the material and its color. The default color is 0x111111 - dark gray.
Render, and this is what we ended up with:
A little more about Three.js features
To include Three.js in your project, you just need to run npm install three .
If you are bundling files using Webpack or Browserify , which allows you to require ('modules') in the browser, bundling all your dependencies, you have the option to import the module into your source files and continue using it normally:
It is also possible to use ES6 syntax import :
Or, if you only want to import specific parts of the Three.js library, for example Scene :
Conclusion
With the help of almost a couple of lines of code, we created 2 simple shapes, and one a little more complex. Naturally, Three.js has a lot more options. Three.js has a lot of out-of-the-box shapes, materials, lighting types, etc. inside. These are just a few of the basics.
The Three.js library allows you to create and create really healthy things. Here are some sticky examples:
Example 1
Example 2
Example 3
If you want to start learning 3D in JavaScript, you can find everything you need here or here .
WMK-TECH Copyright © 2021. All rights reserved.


No comments:
Post a Comment