If you're working with Natural Language Processing, knowing how to deploy a model is one of the most important skills you'll need to have.
Model deployment is the process of integrating your model into an existing production environment. The model will receive input and predict an output for decision-making for a specific use case.
“Only when a model is fully integrated with the business systems, we can extract real value from its predictions”. — Christopher Samiullah
There are different ways you can deploy your NLP model into production, like using Flask, Django, Bottle or other frameworks. But in today’s article, you will learn how to build and deploy your NLP model with FastAPI.
In this article, you will learn:
- How to build a NLP model that classifies IMDB movie reviews into different sentiments.
- What is FastAPI and how to install it.
- How to deploy your model with FastAPI.
- How to use your deployed NLP model in any Python application.
So let’s get started.🚀
How to Build an NLP Model
First, we need to build our NLP model. We are going to use the IMDB Movie dataset to build a simple model that can classify if a movie review is positive or negative. Here are the steps you should follow to do that.
Import the Important packages
First, we need to import some Python packages to load the data, clean the data, create a machine learning model (classifier), and save the model for deployment.
# import important modules
import numpy as np
import pandas as pd
# sklearn modules
from sklearn.model_selection import train_test_split
from sklearn.pipeline import Pipeline
from sklearn.naive_bayes import MultinomialNB # classifier
from sklearn.metrics import (
    accuracy_score,
    classification_report,
    plot_confusion_matrix,
)
from sklearn.feature_extraction.text import TfidfVectorizer, CountVectorizer
# text preprocessing modules
from string import punctuation
# text preprocessing modules
from nltk.tokenize import word_tokenize
import nltk
from nltk.corpus import stopwords
from nltk.stem import WordNetLemmatizer
import re #regular expression
# Download dependency
for dependency in (
    "brown",
    "names",
    "wordnet",
    "averaged_perceptron_tagger",
    "universal_tagset",
):
    nltk.download(dependency)

import warnings
warnings.filterwarnings("ignore")
# seeding
np.random.seed(123
Load the dataset from the data folder:
# load data
data = pd.read_csv("../data/labeledTrainData.tsv", sep='\t')
And then show a sample of the dataset:
# show top five rows of data
data.head()
Our dataset has 3 columns:
- Id — This is the id of the review
- Sentiment — either positive (1) or negative (0)
- Review — comment about the movie
Next, let's check the shape of the dataset:
# check the shape of the data
data.shape
(25000, 3)
The dataset has 25,000 reviews.
Now we need to check if the dataset has any missing values:
# check missing values in data
data.isnull().sum()
id 0
sentiment 0
review 0
dtype: int64
The output shows that our dataset does not have any missing values.
How to Evaluate Class Distribution
We can use the value_counts() method from the Pandas package to evaluate the class distribution from our dataset.
# evalute news sentiment distribution
data.sentiment.value_counts()
1 12500
0 12500
Name: sentiment, dtype: int64
In this dataset, we have an equal number of positive and negative reviews.
How to Process the Data
After analyzing the dataset, the next step is to preprocess the dataset into the right format before creating our machine learning model.
The reviews in this dataset contain a lot of unnecessary words and characters that we don’t need when creating a machine learning model.
We will clean the messages by removing stopwords, numbers, and punctuation. Then we will convert each word into its base form by using the lemmatization process in the NLTK package.
The text_cleaning() function will handle all necessary steps to clean our dataset.
stop_words =  stopwords.words('english')
def text_cleaning(text, remove_stop_words=True, lemmatize_words=True):
    # Clean the text, with the option to remove stop_words and to lemmatize word
    # Clean the text
    text = re.sub(r"[^A-Za-z0-9]", " ", text)
    text = re.sub(r"\'s", " ", text)
    text =  re.sub(r'http\S+',' link ', text)
    text = re.sub(r'\b\d+(?:\.\d+)?\s+', '', text) # remove numbers

    # Remove punctuation from text
    text = ''.join([c for c in text if c not in punctuation])

    # Optionally, remove stop words
    if remove_stop_words:
        text = text.split()
        text = [w for w in text if not w in stop_words]
        text = " ".join(text)

    # Optionally, shorten words to their stems
    if lemmatize_words:
        text = text.split()
        lemmatizer = WordNetLemmatizer()
        lemmatized_words = [lemmatizer.lemmatize(word) for word in text]
        text = " ".join(lemmatized_words)

    # Return a list of words
    return(text)
Now we can clean our dataset by using the text_cleaning() function:
#clean the review
data["cleaned_review"] = data["review"].apply(text_cleaning)
Then split data into feature and target variables like this:
#split features and target from  data
X = data["cleaned_review"]
y = data.sentiment.values
Our feature for training is the cleaned_review variable and the target is the sentiment variable.
We then split our dataset into train and test data. The test size is 15% of the entire dataset.
# split data into train and validate
X_train, X_valid, y_train, y_valid = train_test_split(
    X,
    y,
    test_size=0.15,
    random_state=42,
    shuffle=True,
    stratify=y,
)
How to Create an NLP Model
We will train the Multinomial Naive Bayes algorithm to classify if a review is positive or negative. This is one of the most common algorithms used for text classification.
But before training the model, we need to transform our cleaned reviews into numerical values so that the model can understand the data.
In this case, we will use the TfidfVectorizer method from scikit-learn. TfidfVectorizer will help us to convert a collection of text documents to a matrix of TF-IDF features.
To apply this series of steps (pre-processing and training), we will use a Pipeline class from scikit-learn that sequentially applies a list of transforms and a final estimator.
# Create a classifier in pipeline
sentiment_classifier = Pipeline(steps=[
                               ('pre_processing',TfidfVectorizer(lowercase=False)),
                                 ('naive_bayes',MultinomialNB())
                                 ])
Then we train our classifier like this:
# train the sentiment classifier
sentiment_classifier.fit(X_train,y_train)
We then create a prediction from the validation set:
# test model performance on valid data
y_preds = sentiment_classifier.predict(X_valid)
The model’s performance will be evaluated by using the accuracy_score evaluation metric. We use accuracy_score because we have an equal number of classes in the sentiment variable.
accuracy_score(y_valid,y_preds)0.8629333333333333
The accuracy of our model is around 86.29% which is good performance.
How to Save the Model Pipeline
We can save the model pipeline in the model’s directory by using the joblib Python package.
#save model
import joblib
joblib.dump(sentiment_classifier, '../models/sentiment_model_pipeline.pkl')
Now that we've built our NLP model, let's learn how to use FastAPI.
What is FastAPI?
FastAPI is a fast and modern Python web framework for building different APIs. It provides higher performance, it's easier to code, and it comes up with automatic and interactive documentation.

FastAPI is built upon two major Python libraries — Starlette (for web handling) and Pydantic (for data handling and validation). FastAPI is very fast compared to Flask because it brings asynchronous function handlers to the table.
If you want to know more about FastAPI, I recommend you read this article by Sebastián Ramírez.
In this article, we will try to use some of the features FastAPI has to serve our NLP model.
How to Install FastAPI
Firstly, make sure you install the latest version of FastAPI (with pip):
pip install fastapiYou will also need an ASGI server for production such as uvicorn.
pip install uvicornHow to Deploy an NLP Model with FastAPI
In this section, we are going to deploy our trained NLP model as a REST API with FastAPI. We'll save the code for our API in a Python file called main.py. This file will be responsible for running our FastAPI app.
Import packages
The first step is to import packages that will help us build the FastAPI app and run the NLP model.
# text preprocessing modules
from string import punctuation
# text preprocessing modules
from nltk.tokenize import word_tokenize
import nltk
from nltk.corpus import stopwords
from nltk.stem import WordNetLemmatizer
import re  # regular expression
import os
from os.path import dirname, join, realpath
import joblib
import uvicorn
from fastapi import FastAPI
How to Initialize a FastAPI App Instance
We can use the following code to initialize the FastAPI app:
app = FastAPI(
    title="Sentiment Model API",
    description="A simple API that use NLP model to predict the sentiment of the movie's reviews",
    version="0.1",
)
As you can see, we have customized the configuration of our FastAPI application by including the:
- Title of the API
- Description of the API.
- Version of the API.
How to Load the NLP Model
To load the NLP model, we'll use the joblib.load() method and add the path to the model directory. The name of the NLP model is sentiment_model_pipeline.pkl:
# load the sentiment model
with open(
    join(dirname(realpath(__file__)), "models/sentiment_model_pipeline.pkl"), "rb"
) as f:
    model = joblib.load(f)
How to Define a Function to Clean the Data
We will use the same function called text_cleaning() from Part 1 that cleans the review data by removing stopwords, numbers, and punctuation. Finally, we'll convert each word into its base form by using the lemmatization process in the NLTK package.
def text_cleaning(text, remove_stop_words=True, lemmatize_words=True):
    # Clean the text, with the option to remove stop_words and to lemmatize word
    # Clean the text
    text = re.sub(r"[^A-Za-z0-9]", " ", text)
    text = re.sub(r"\'s", " ", text)
    text = re.sub(r"http\S+", " link ", text)
    text = re.sub(r"\b\d+(?:\.\d+)?\s+", "", text)  # remove numbers
    # Remove punctuation from text
    text = "".join([c for c in text if c not in punctuation])
    # Optionally, remove stop words
    if remove_stop_words:
        # load stopwords
        stop_words = stopwords.words("english")
        text = text.split()
        text = [w for w in text if not w in stop_words]
        text = " ".join(text)
    # Optionally, shorten words to their stems
    if lemmatize_words:
        text = text.split()
        lemmatizer = WordNetLemmatizer()
        lemmatized_words = [lemmatizer.lemmatize(word) for word in text]
        text = " ".join(lemmatized_words)
    # Return a list of words
    return text
How to Create a Prediction Endpoint
The next step is to add our prediction endpoint called “/predict-review” with the GET request method.
@app.get("/predict-review")An API endpoint is the point of entry in a communication channel when two systems are interacting. It refers to touchpoints of the communication between an API and a server.
Then we define a prediction function for this endpoint. The name of the function is predict_sentiment() with a review parameter.
The predict_sentiment() function will do the following tasks:
- Receive the movie review.
- Clean the movie review by using the text_cleaning() function.
- Make a prediction by using our NLP model.
- Save the prediction result in the output variable (either 0 or 1).
- Save the probability of the prediction in the probas variable and format it into 2 decimal places.
- Finally, return prediction and probability results.
@app.get("/predict-review")
def predict_sentiment(review: str):
    """
    A simple function that receive a review content and predict the sentiment of the content.
    :param review:
    :return: prediction, probabilities
    """
    # clean the review
    cleaned_review = text_cleaning(review)

    # perform prediction
    prediction = model.predict([cleaned_review])
    output = int(prediction[0])
    probas = model.predict_proba([cleaned_review])
    output_probability = "{:.2f}".format(float(probas[:, output]))

    # output dictionary
    sentiments = {0: "Negative", 1: "Positive"}

    # show results
    result = {"prediction": sentiments[output], "Probability": output_probability}
    return result
Here are all blocks of codes in the main.py file:
# text preprocessing modules
from string import punctuation
# text preprocessing modules
from nltk.tokenize import word_tokenize
import nltk
from nltk.corpus import stopwords
from nltk.stem import WordNetLemmatizer
import re  # regular expression
import os
from os.path import dirname, join, realpath
import joblib
import uvicorn
from fastapi import FastAPI

app = FastAPI(
    title="Sentiment Model API",
    description="A simple API that use NLP model to predict the sentiment of the movie's reviews",
    version="0.1",
)

# load the sentiment model
with open(
    join(dirname(realpath(__file__)), "models/sentiment_model_pipeline.pkl"), "rb"
) as f:
    model = joblib.load(f)


# cleaning the data
def text_cleaning(text, remove_stop_words=True, lemmatize_words=True):
    # Clean the text, with the option to remove stop_words and to lemmatize word
    # Clean the text
    text = re.sub(r"[^A-Za-z0-9]", " ", text)
    text = re.sub(r"\'s", " ", text)
    text = re.sub(r"http\S+", " link ", text)
    text = re.sub(r"\b\d+(?:\.\d+)?\s+", "", text)  # remove numbers

    # Remove punctuation from text
    text = "".join([c for c in text if c not in punctuation])

    # Optionally, remove stop words
    if remove_stop_words:
        # load stopwords
        stop_words = stopwords.words("english")
        text = text.split()
        text = [w for w in text if not w in stop_words]
        text = " ".join(text)

    # Optionally, shorten words to their stems
    if lemmatize_words:
        text = text.split()
        lemmatizer = WordNetLemmatizer()
        lemmatized_words = [lemmatizer.lemmatize(word) for word in text]
        text = " ".join(lemmatized_words)

    # Return a list of words
    return text

@app.get("/predict-review")
def predict_sentiment(review: str):
    """
    A simple function that receive a review content and predict the sentiment of the content.
    :param review:
    :return: prediction, probabilities
    """
    # clean the review
    cleaned_review = text_cleaning(review)

    # perform prediction
    prediction = model.predict([cleaned_review])
    output = int(prediction[0])
    probas = model.predict_proba([cleaned_review])
    output_probability = "{:.2f}".format(float(probas[:, output]))

    # output dictionary
    sentiments = {0: "Negative", 1: "Positive"}

    # show results
    result = {"prediction": sentiments[output], "Probability": output_probability}
    return result
How to Run the API
The following command will help us run the FastAPI app we have created.
uvicorn main:app --reloadHere are the settings we have defined for uvicorn to run our FastAPI app.
- main: the file main.py that has the FastAPI app.
- app: the object created inside of main.py with the line app = FastAPI().
- — reload : Enables the server to automatically restart whenever we make changes in the code.

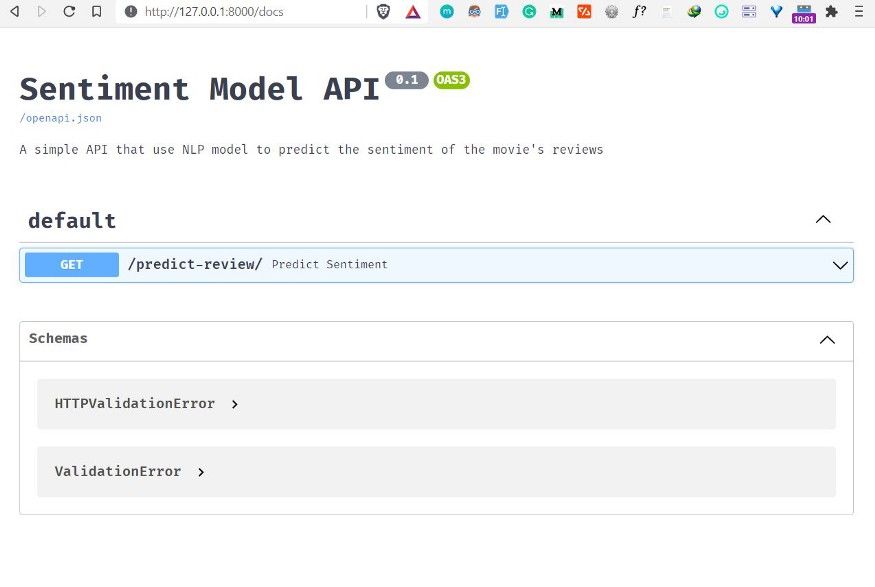
FastAPI provides an Automatic Interactive API documentation page. To access it navigate to http://127.0.0.1:8000/docs in your browser and then you will see the documentation page created automatically by FastAPI.

The documentation page shows the name of our API, the description, and its version. It also shows a list of available routes in the API that you can interact with.
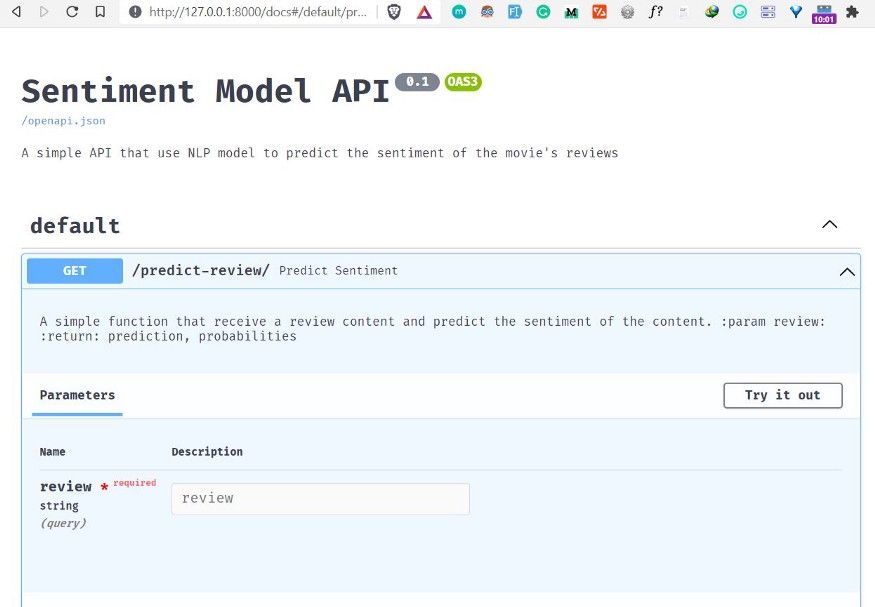
To make a prediction, first click the “predict-review” route and then click on the button “Try it out”. This allows you to fill the review parameter and directly interact with the API.

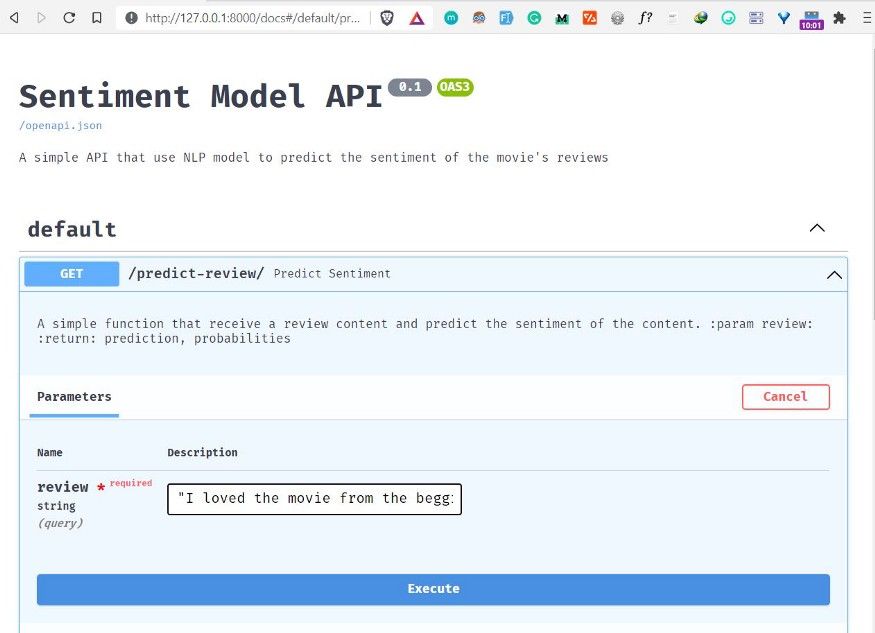
Fill the review field by adding a movie review of your choice. I added the following movie review about Zack Snyder’s Justice League movie released in 2021.
“I loved the movie from the beginning to the end. Just like Ray fisher said, I was hoping that the movie doesn’t end. The begging scene was mind blowing, liked that scene very much. Unlike ‘the Justice League’ the movie show every hero is best at their own thing, make us love every character. Thanks, Zack and the whole team.”
Then click the execute button to make a prediction and get the result.

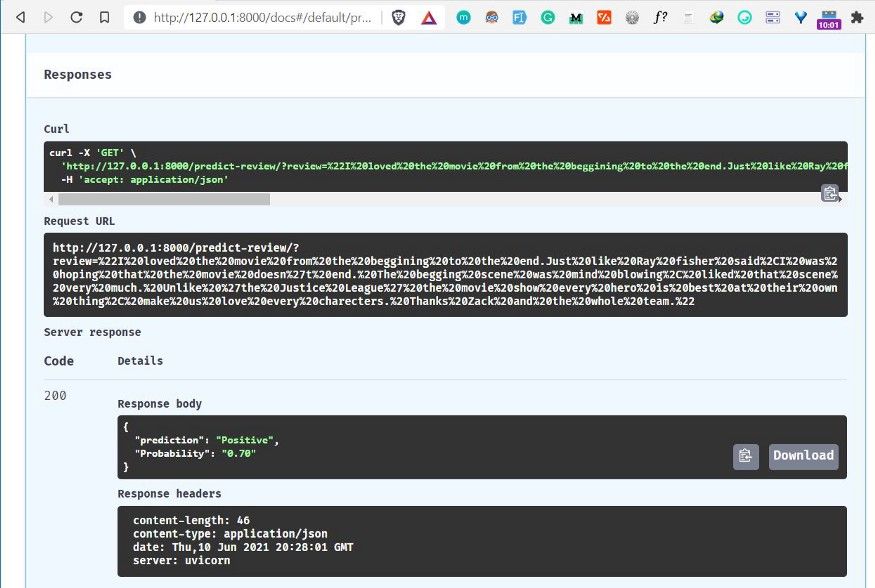
Finally, the result from the API shows that our NLP model predicts the review provided has a Positive sentiment with the probability of 0.70:

How to Use an NLP Model in Any Python Application
To use our NLP API in any Python application, we need to install the requests Python package. This package will help us send HTTP requests to the FastAPI app we have developed.
To install the requests package, run the following command:
pip install requestsThen create a simple Python file called python_app.py. This file will be responsible for sending our HTTP requests.
We first import the requests package:
import requests as rAdd a movie review about the Godzilla vs Kong (2021) movie:
# add review
review = "This movie was exactly what I wanted in a Godzilla vs Kong movie. It's big loud, brash and dumb, in the best ways possible. It also has a heart in a the form of Jia (Kaylee Hottle) and a superbly expressionful Kong. The scenes of him in the hollow world are especially impactful and beautifully shot/animated. Kong really is the emotional core of the film (with Godzilla more of an indifferent force of nature), and is done so well he may even convert a few members of Team Godzilla."
Then add the review in a key parameter to pass to the HTTP request:
keys = {"review": review}Finally, we send a request to our API to make a prediction of the review:
prediction = r.get("http://127.0.0.1:8000/predict-review/", params=keys)Then we can see the prediction results:
results = prediction.json()

print(results["prediction"])
print(results["Probability"])
This will show the prediction and its probability.
Here are the results:
Positive
0.54
Wrapping Up
Congratulations 👏👏, you have made it to the end of this article. I hope you have learned something new and now know how to deploy your NLP model with FastAPI.
If you want to learn more about FastAPI, I recommend taking this full FastAPI course created by Bitfumes.
You can download the project source code used in this article here.
If you learned something new or enjoyed reading this article, please share it so that others can see it. Until then, see you in the next article!.
You can also find me on Twitter @Davis_McDavid

No comments:
Post a Comment