is post was written by a guest contributor, Mickey Boxell, Product Manager at Oracle.
As part of our continuing commitment to open standards and supporting a broad and varied ecosystem, we're pleased to announce that JFrog has extended its Artifact Management support to Oracle Cloud Infrastructure Container Engine for Kubernetes.
Container Engine for Kubernetes helps you deploy, manage, and scale Kubernetes clusters in the cloud. With it, organizations can build dynamic, containerized applications by incorporating Kubernetes into services running on Oracle Cloud Infrastructure.
Overview
To stay competitive, companies are releasing software faster than ever before. Asking distributed teams to produce updates and features at a high rate creates new operational challenges and an opportunity for system vulnerabilities to arise. This complexity also can cause testing problems and generally slow down the pace of software releases. One way to prevent these issues is by using a universal repository to prevent developers from choosing their own versions of software and using artifacts from different sources.
JFrog Artifactory is a repository tool for sharing libraries and third-party components at scale. Artifactory centralizes control, storage, and management of binaries throughout the software release cycle. It’s easy to integrate with various build tools and coding languages. With it, you can tag libraries with searchable metadata for speed, security, and quality. JFrog Enterprise+ provides all the features of Artifactory, plus high availability, Xray for package security scanning, and Mission Control for real-time, centralized control of your environment.

In this post, we walk through the steps to install JFrog Artifactory on Oracle Cloud Infrastructure, a Generation 2 cloud that was built and optimized to help enterprises run their most demanding workloads securely. For more detailed installation information, see the Artifactory installation guide.
Install Artifactory on a VM
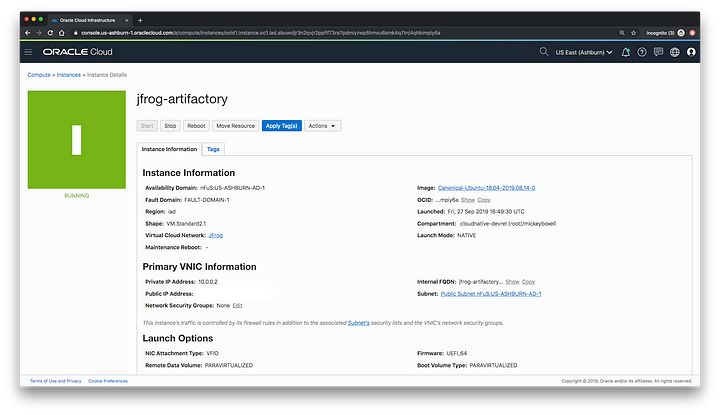
- Provision an Oracle Cloud Infrastructure Compute VM instance for Artifactory.For this post, we used the VM.Standard2.1 instance shape, which exceeds the Artifactory system requirements. The instance was provisioned with a public IP address and a x64-bit Canonical-Ubuntu-18.04 image, which is the most up-to-date Ubuntu version supported by Artifactory. Keep in mind that Oracle Linux can be used as well. The Artifactory systems requirements page includes more information about technical prerequisites.
 Artifactory VM
 - After provisioning the VM, ensure that JDK 8 or later is installed and that the JAVA_HOME environmental variable is set to the JDK installation. To do this, update the list of packages by running sudo apt update, and install the JDK by running apt install default-jre.
- Update $JAVA_HOME with vi ~/.bashrc and add the following lines to the end of the file:
$ export JAVA_HOME=/usr/bin/java
$ export PATH=$JAVA_HOME/bin:$PATH
The next step describes how to install Artifactory as a Docker container. Alternatively, you can use the following installation options: - Install Docker on the VM by following the documentation for installing Docker Engine on Ubuntu.
- After Docker is installed, pull the Artifactory Pro Docker image:
docker pull docker.bintray.io/jfrog/artifactory-pro:latest - Run the image in a container:
docker run --name artifactory -d -p 8081:8081 docker.bintray.io/jfrog/artifactory-pro:latest - Create a Docker named volume and pass it to the container. By default, the named volume is a local directory under /var/lib/docker/volumes/<name>, but it can be set to work with other locations. For details, see the documentation for Docker volumes.The following example creates a Docker named volume called artifactory_data and mounts it to the Artifactory container under /var/opt/jfrog/artifactory:
$ docker volume create --name artifactory5_data
$ docker run --name artifactory-pro -d -v artifactory5_data:/var/opt/jfrog/artifactory -p 8081:8081` `docker.bintray.io/jfrog/artifactory-pro:latest
Even if the container is stopped and removed, the volume persists and can be attached to a new running container using the preceding command. - Run the following command to verify that the container is running:
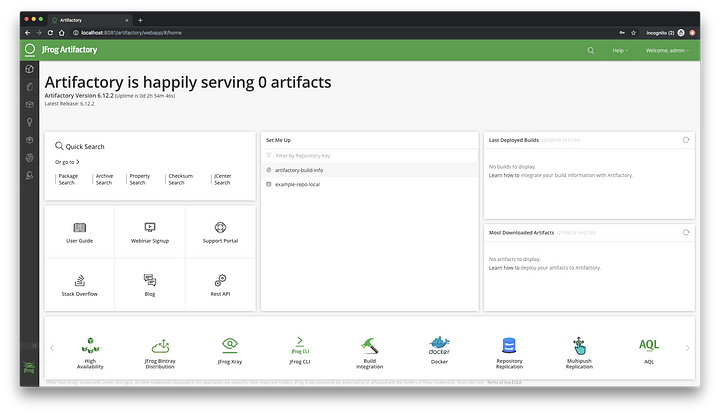
$ docker ps CONTAINER ID IMAGE COMMAND CREATED STATUS PORTS NAMES c5146646a363 docker.bintray.io/jfrog/artifactory-pro:latest "/entrypoint-artifac…" 2 days ago Up 2 days 0.0.0.0:8081->8081/tcp artifactory - Artifactory serves traffic over port 8081, so after the installation is completed, connect to the Artifactory console by navigating to http://<ip_address>:8081/artifactory/webapp/#/home.
 JFrog Artifactory Dashboard
Install Artifactory on a Kubernetes Cluster
As an alternative to installing JFrog Artifactory on an Oracle Cloud VM, you can install it on Oracle Container Engine for Kubernetes. Container Engine for Kubernetes is a standard, conformant, developer-friendly, container-native, and enterprise-ready managed Kubernetes service for running highly available clusters with the control, security, and predictable performance of Oracle Cloud Infrastructure. For more information about installing Artifactory on Kubernetes clusters, see the Installing on Kubernetes section of the JFrog documentation.
The installation uses Helm, a package management tool for Kubernetes applications. The Helm Hub provides several options, including the default Artifactory chart and a chart designed for high availability. The high-availability chart deploys Artifactory Pro/Artifactory Edge (or OSS/CE if a custom image is set), along with a PostgreSQL database using the stable/postgresql chart, and an NGINX server. It also provides instructions for changing the underlying database, deploying a small, medium, or large installation, exposing Artifactory with Ingress, and other optional modifications.
This post assumes that you have a Kubernetes cluster with a version greater than 1.8 and that Helm is installed. Use the following steps to install Artifactory on Container Engine for Kubernetes.
- Add the JFrog Helm repository to the Helm client:
$ helm repo add jfrog https://charts.jfrog.io - Install the chart with the release name artifactory:
$ helm install --name artifactory jfrog/artifactoryWhen the installation is completed, you are prompted to get the Artifactory URL and the default credentials:1. Get the Artifactory URL by running these commands: NOTE: It may take a few minutes for the LoadBalancer IP to be available. You can watch the status of the service by running 'kubectl get svc -w artifactory-nginx' export SERVICE_IP=$(kubectl get svc --namespace default artifactory-nginx -o jsonpath='{.status.loadBalancer.ingress[0].ip}') echo http://$SERVICE_IP/ 2. Open Artifactory in your browser Default credential for Artifactory: user: admin password: password
The Artifactory chart documentation on the Helm Hub provides more information about updating your deployment, specifying resource limits, and configuring storage.
Next Steps
After you install Artifactory on a VM or Kubernetes cluster, configure it as you would on any platform. For further testing, get a 30-day free trial of Artifactory and a free trial of Oracle Cloud Infrastructure. For information about using Artifactory, see the Artifactory Getting Started page.
No comments:
Post a Comment