Git as a Version Control System
According to the git official site, git is a free and open-source distributed version control system designed to handle everything from small to very large projects with speed and efficiency. The development of git began on 3 April 2005 by Linus Torvald, the Linux founder and developer when many developers of the Linux kernel gave up access to BitKeeper.


Above illustration clearly explains to us about the functionality of git as a versioning tool. It lets us work with a single file instead of many files with their own version. Working with basic versioning (many files) tends to be untrackable and unstructured. We can not track our revision as well. But, using git, any revision or changes will be recorded on the git system and as users, we can move back to a certain version of files as we want to. From git logs, we can track what the revision in our works, from the beginning.
As the collaboration tool, git moves basic collaboration way like using email, SMS, chat, etc to the collaborated system. Basic collaboration tends to be not integrated, misunderstanding, bad logs, and Inefficient for a big project with a lot of people working in it.
Git is designed for text-based data, for instance codes, books, papers, article, etc
Many companies and projects out there had selected git as their VCS, like Google, Facebook, Microsoft, Twitter, LinkedIn, and others. So, this is why we need to learn the basic git commands for our future work and career in the tech company.
On a very basic level, there are two awesome things git allows us to do:
- We can track changes in our files
- It simplifies working on files and projects with multiple people
How to Install Git
It seems easy to install git on your computer. But it depends on your operating system as well. For Windows user, you might need to head over to git official site to download it. Luckily, for Linux user, just open our favourite terminal and run the script as follow:
sudo apt-get update
sudo apt-get upgrade
sudo apt-get install git
After the installation, everything would be okay. Check our git version with the following command.
# Check our git version
git --version
Configuration
For the first step, before talking deeper about git and its environment, we need to configure our git. We provide a username and email to it.
# Setup the git configuration
git config --global user.name "your-username"
git config --global user.email "your-email"

Git as Versioning Tools
For our first touch with git, let’s create a directory, for instance, git-stk in my case and move into that directory. Then, begin our practice with git init. Important to note that git status will print the status on our works like is there any changes in the directory or files. As long as we didn't do any changes, the command of git status will print no commits yet.

So, what does git init means? Simply, this command will create a .git folder that contains several folders and files, like hooks, info, objects, refs, config, description, and HEAD in order to track our works. The logs of our changes will be recorded there.

To interact with git commands, let’s create a new markdown file, namely README.md that filled with a sentence of “First line of README.md file”.

Let’s check the current status with git status command. It prints with red marks indicating that we have done any changes folders or files within the git-stk. It also means that our changes are not marked yet. We are in the modified state in git lifecycle.

To mark our change in file README.md, run git add command. To look up the differences of status between modified and staged state, just run git status again. The green mark indicates that our changes have been marked and now we are in the staged state.

git add command (Image by Author)Our README.md file has been marked but has not been recorded yet. Record our changes like when we were working on Microsoft Word or other tools with git commit which is followed by the commit messages.

Git Lifecycle
So far, we have conducted experiments within a git environment and assigned git commands. But now, we will look deeper into git lifecycle. What we did before is what we see in git lifecycle. The git lifecycle is divided into four states namely:
- Modified: any changes didn’t been marked yet. We can do anything here, manipulate files, create or delete a new folder, and other things
- Staged: a condition when our changes have been marked but didn’t been recorded yet
- Committed: folders or files successfully are been recorded into our .git folder

Keep Tracking our Logs
Can you imagine if we did some mistakes within our folders? Can we just move backwards to our last commit or two last commits? The answer is of course we can. Git keeps our changes (commits) and we can go anywhere if it is necessary for our works. Okay, here is the new git command you must know: git log. We will record our entire commits, so we might easily track our works or commits.
On the previous commit, we created file namely README.md. Now, we will modify that file and inspect its logs using git logs command. First, add our README.md file with the sentence “Second line of README.md file” and then commit it. Just follow and run the scripts based on the following figure.

Check out the status until it prints “Nothing to commit”. It means that we have committed all of our changes. Okay, to track our works (commits), we just run git log and it will print the author (username and email), date-time of changes, messages, and SHA.
git log --oneline: print logs just in one linegit log --graph: show logs in a beautiful way with the author’s linegit log --author=<username>: show logs for the certain author (if we work with many users in it)git log <filename>: show logs for certain file
We must add commit messages as clear and simple as possible because it will help us to track our works

One of the must-to-know command on git is git diff. It helps us to compare between commits on branches, specific files, or an entire directory. For instance, we will compare our two commits.
The pattern is git diff <SHA-before> <SHA-after>. Input <SHA-before> and <SHA-after> with SHA of our commits.

git diff to compare two conditions in git (Image by Author)According to the output, we get information about the differences between our first commit and second commit on README.md file. It is useful, right?
Move Backward to the Previous States
As a human, we’re not perfect, right? Sometimes we get some mistakes that impact other things. It applies to tech company too, for instance as data science team, we are developing new features to our machine learning flows. But found a bug. We must trace back from the beginning of works, looking into line per line of codes. Git simplifies our works with the move backwards feature. Instead of looking from the beginning of works, we can track based on the previous commit before a bug was found.
There are three commands to move back on git. It is used as our needs.
git checkout: it is like a time machine, we can restore the condition of the project file to the designated time. However, this is temporary. These are not stored in the git databasegit reset: this command makes us unable to go back to the future. We will lose our commits. After the git logs were reset, we need to write a new commitgit revert: will take the existing file condition in the past, then merge them with the last commit
We can call the git checkout command to check the file condition at each commit. To return from the past use the command
git checkout master

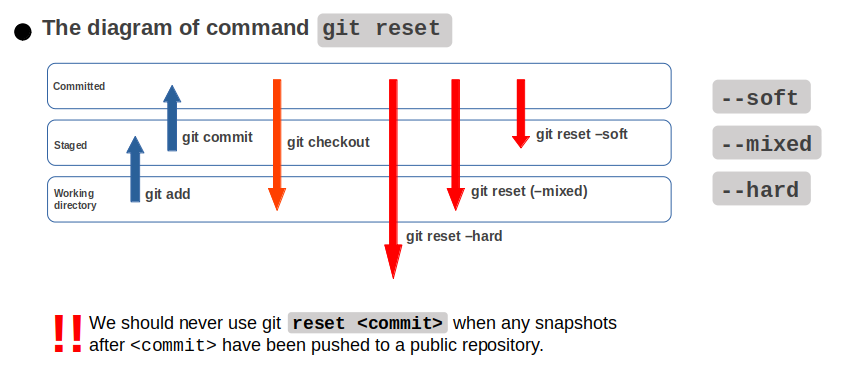
git reset command in git (Image by Author)When we decide to use git reset, there are three options we can select. It depends on our problem and which states we want to go to. Let’s check them out and try on your computer!
git reset --soft: will restore a file to the staged stategit reset --mixed: will restore a file to the modified stategit reset --hard: will restore a file to the committed state
The git reflog is an amazing resource for recovering project history. We can recover almost anything—anything we’ve committed via the reflog.
We’re probably familiar with the git log command, which shows a list of commits. The git reflog is similar, but instead shows a list of times when HEAD changed.
The HEAD in Git is the pointer to the current branch reference, which is, in turn, a pointer to the last commit you made or the last commit that was checked out into your working directory.
That also means it will be the parent of the next commit you do. It’s generally simplest to think of it as HEAD is the snapshot of your last commit
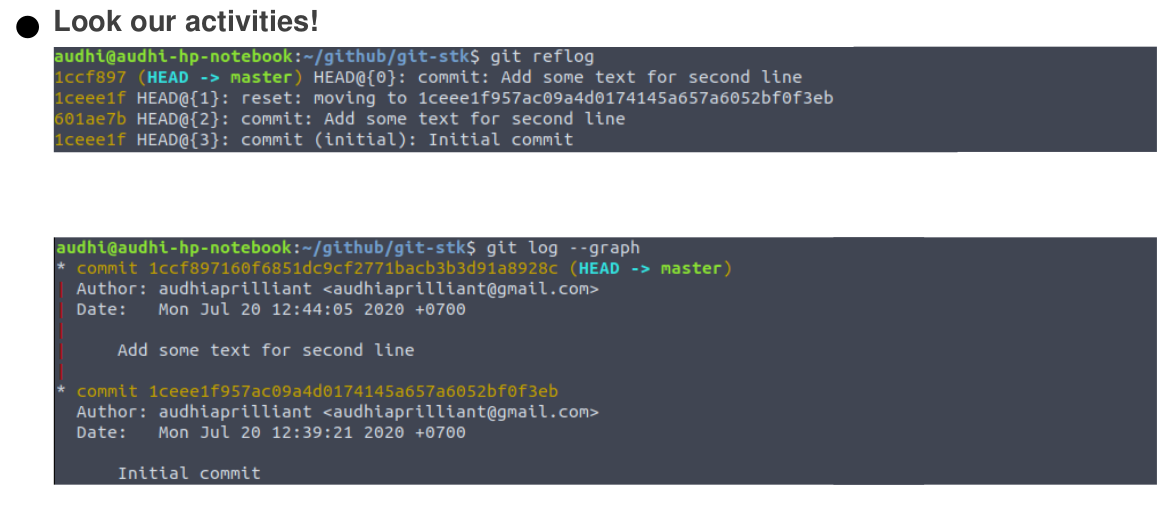
git reflog to recover project history (Image by Author)Let’s modify our README.md file again to show us the git checkout command. We just add a new line with “Third line of README.md file”. After that, like the previous step, add it into the committed state.
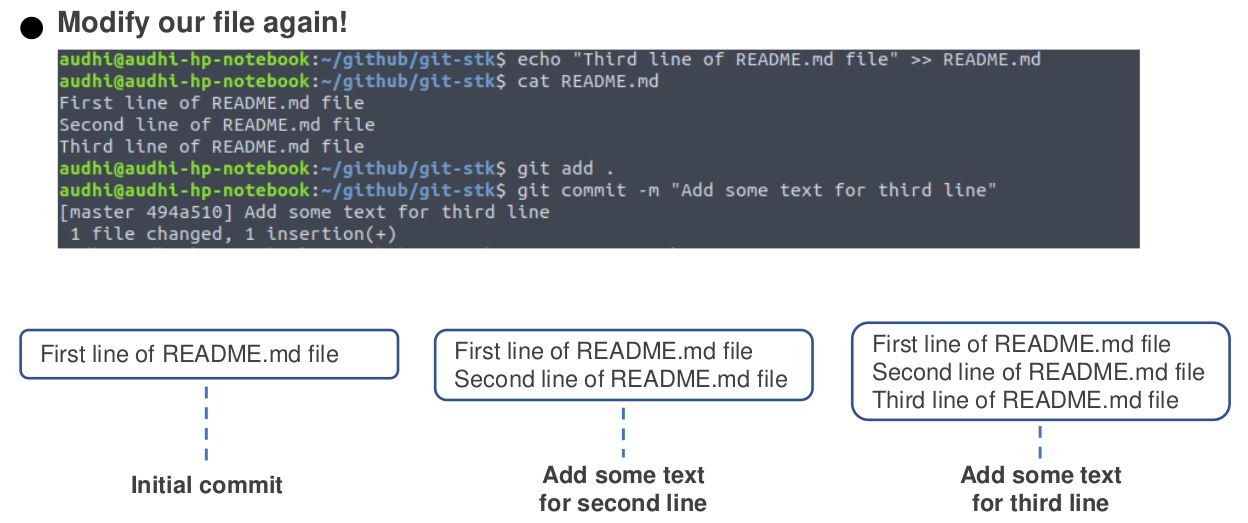
Remember that we have restored our file with git reset and it removed our last commit. Then, using git checkout, we will check the file condition at each commit.
Remember: Until this step, we just have three commits
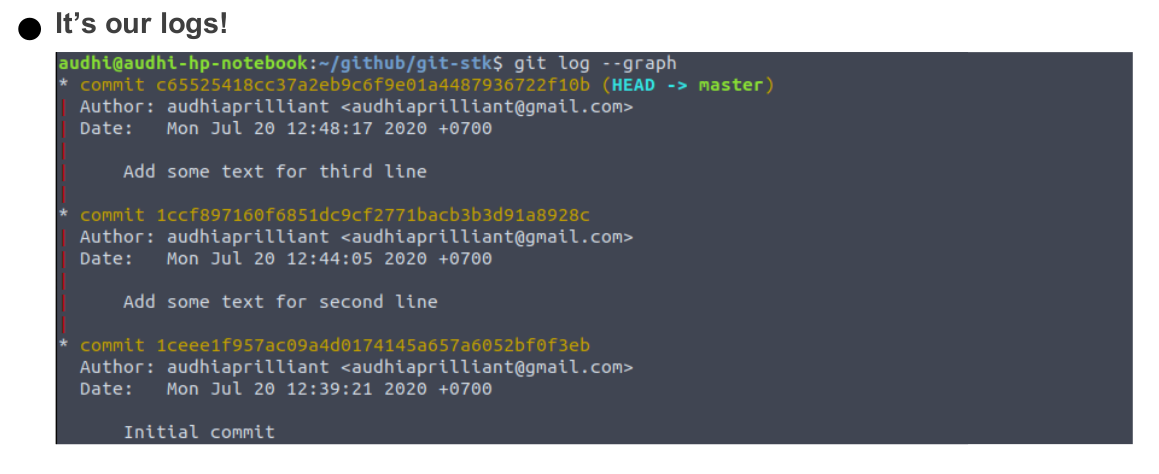
To check our first commit, we use the HEAD pointer. Follow the instruction to understand what does git checkout HEAD mean. It helps us track our content in README.md file each commits, are there any changes? What kind of changes?
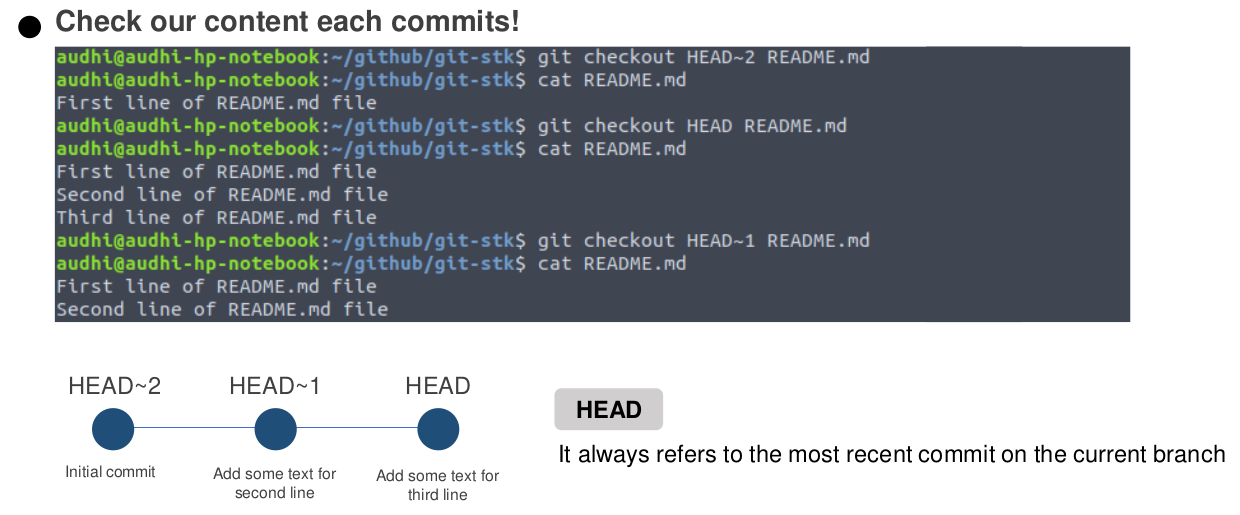
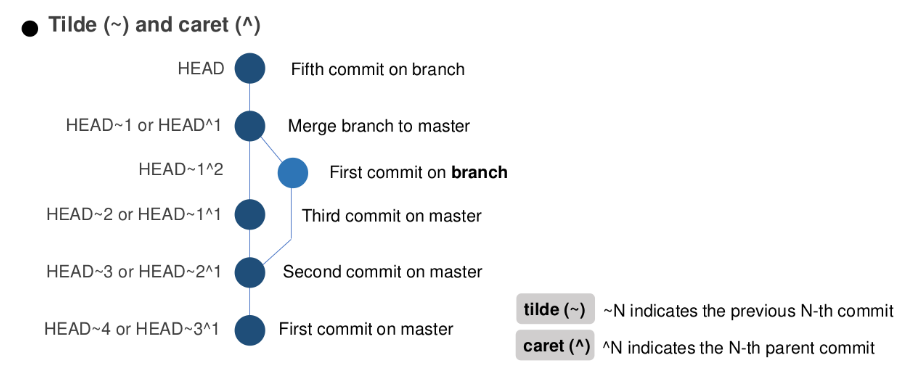
git checkout command (Image by Author)To understand the functionality of tilde (~) and caret (^) on HEAD, please look at the following figure. It lets us go to every commits on every branch in our works.
Git as Collaboration Tools — Branching
When talking about git as a versioning tool, we just talk about how git helps us keeping the version of our files. But, now we will talk git as a collaboration tool.
The default branch name in Git is
master
When developing new features on our codes, it is recommended to create a new branch. Let the master branch as our main codes. If our features are already done and there is no bug found, just merge with the master branch.
In this case, we will create a new branch namely new_branch that add two new lines on the README.md file.
The
git checkoutcommand is also used to move and create branches
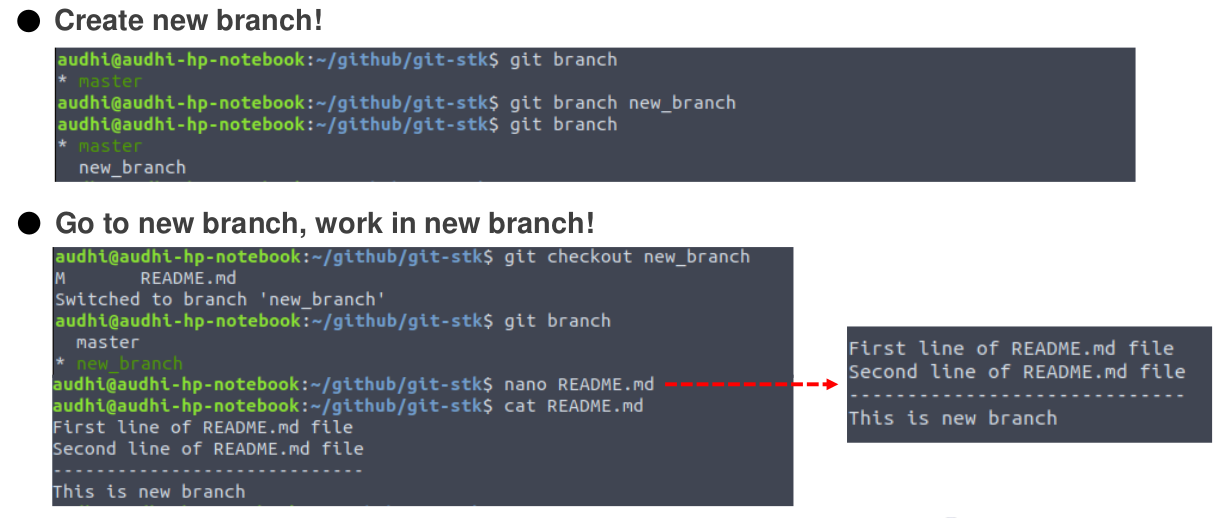
Add a modification to committed state on the new_branch branch and return to the master branch. Check the README.md file. Our modification on new_branch is not applied to the master because we worked on a different branch. It keeps our main codes clean and safe.
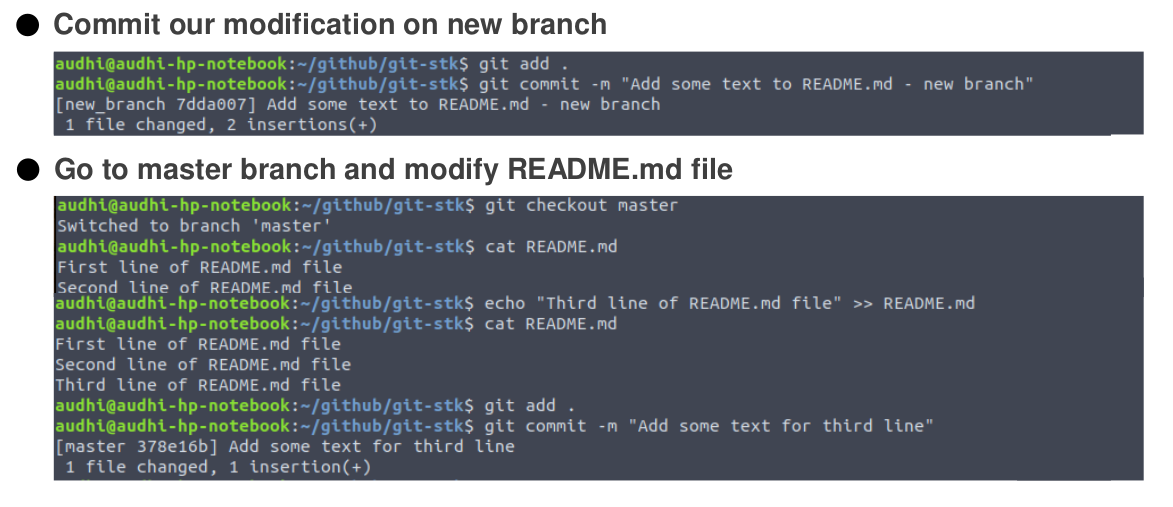
Look at git logs and now you will find a new branch on red mark. Yeah, this indicates there are any commits on another branch.
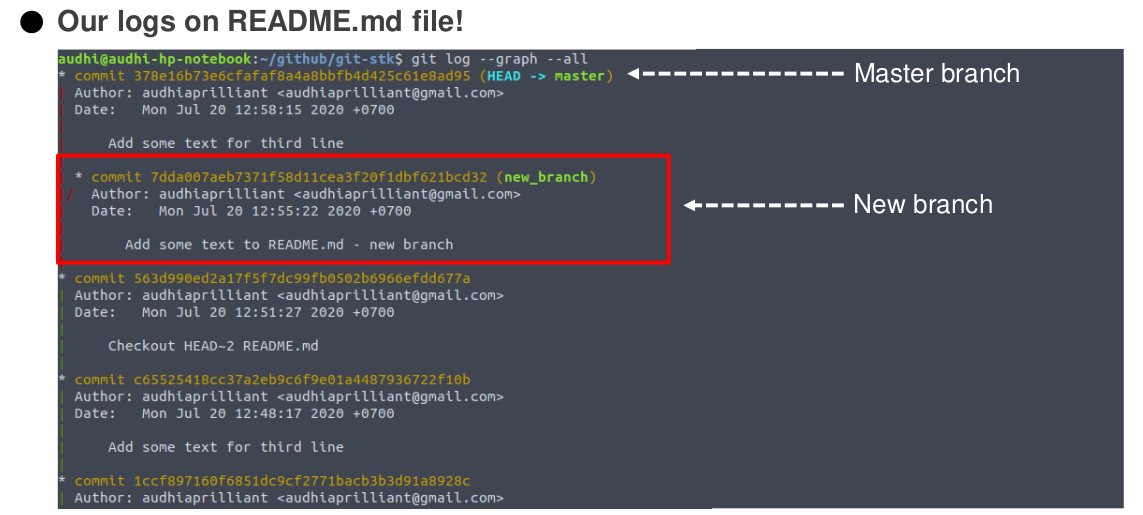
We just created a new branch and commits in it. Now, we must merge that branch to the master and clean any conflicts.
Git as Collaboration Tools — Merging
When we are working with a team, we must have many branches with its features. Our next task is to merge these branches and manage conflict within it. It is helped by git merge command. When files on the master are selected as the main file or code, we must merge another branch to the master. So we need to go to master! If our codes conflict, as the main developer or project leader, it is our task to choose whether codes are removed or added it into the master.
The two branch codes are separated by
======
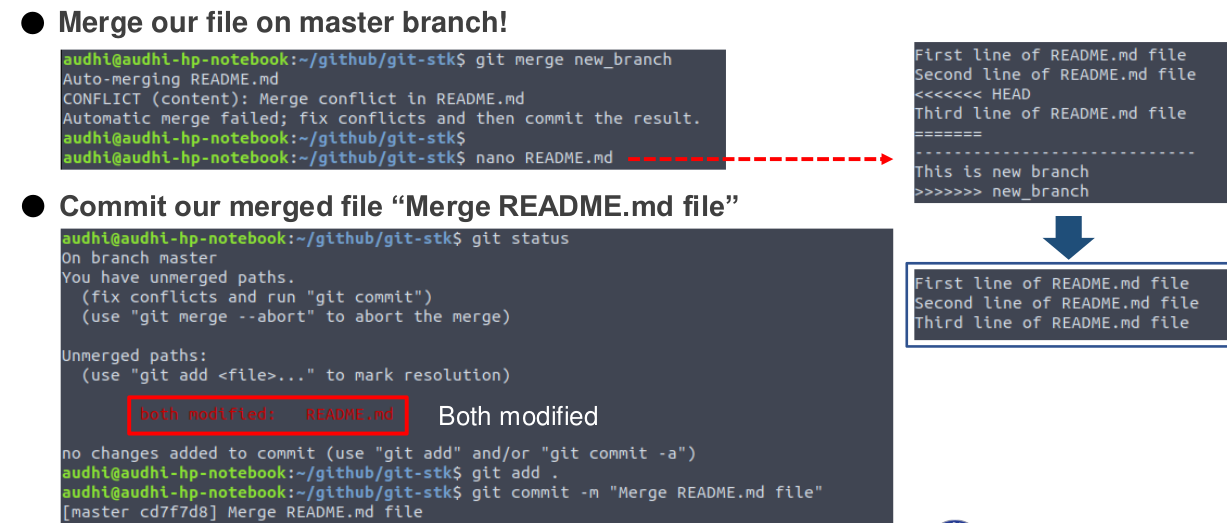
After our merging is done properly, just check out the git logs. Voila! We have merged new_branch to the master. Our master is clean now! This is the simple task of merging on git.

Show what revision and author last modified each line of a file, we can use git blame command.
git blame L <start><end>
- annotate only the given line range
- may be specified multiple times
- overlapping ranges are allowed

Git as Collaboration Tools — Remote Repository
After talking a lot about git as versioning tools next, we talk git as collaboration tools via the remote repository. There are many platforms providing services to collaborate our scripts to people or our team, for instance, GitHub, GitLab, Bitbucket, and etc. For this tutorial, we use GitHub. So you might need to register your account and follow the instructions!
Please log in to GitHub page and create a new repository. Choose your own repo name and click create repository to create the new one.
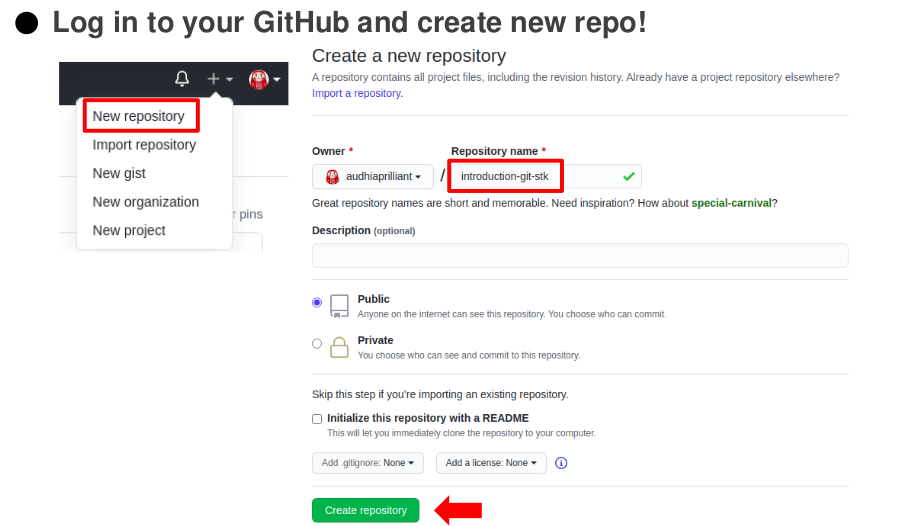
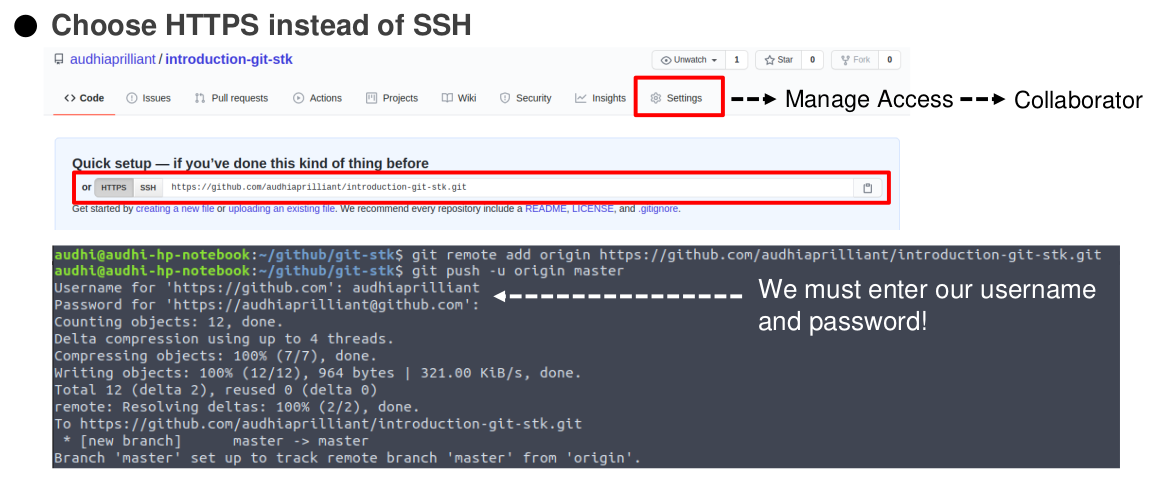
Our aim is to upload our local repository to the remote repository on GitHub. So, after the new repository is created, we can copy our remote repository link (via SSH or HTTPS) to the terminal and run git remote add command. It will create a new connection to a remote repository.
Run git push to upload our local repository to a remote repository. This command takes two argument <remote-name> <branch-name> .
<remote-name>: a remote name, for instance,origin<brach-name>: a branch name, for instance,master(default)
Using the SSH protocol, we can connect and authenticate to remote servers and services. With SSH keys, we can connect to GitHub without supplying our username or password at each visit
Summarization
We are here right now, coders! To summarize our tutorial, I just create this simple cheat sheet to help you understand the basic git commands we have already learned.
git config: get and set repository or global optionsgit init: create an empty git repository or reinitialize an existing onegit status: show the working tree statusgit add: add or mark file contents to the stagedgit commit: record changes to the repositorygit log: show commit logsgit checkout: switch branches or restore working tree filesgit branch: list, create or delete branchesgit merge: join two or more development histories togethergit blame: show what revision and author last modified each line of a filegit remote: manage set of tracked repositoriesgit push: update remote refs along with associated objects
Notes
You might be want to get the resume of this basic git tutorial, just visit my GitHub page https://audhiaprilliant.github.io/git-version-control-system/. It would be great to share and learn together with everyone across the world! Thanks!
References
[1] Anonim, Git (2020), https://docs.github.com/.


No comments:
Post a Comment