This tutorial is just a demonstration of how we can make use of simple scripting languages (like javascript). In this case, to train and predict using a neural network in the browser. We are going to use javascript. The main objective of this blog is to make use of a browser not only for using the internet but also for training a model behind the scenes.
In this tutorial, we’re going to build a model that infers the relationship between two numbers where y = 2x -1 (y equals 2x minus 1).
So let’s begin with our tutorial.
Things we need for this tutorial
1. A simple HTML file containing a .js snippet.
2. A Google Chrome Browser.
3. A text editor to edit html file.
1. A simple HTML file containing a .js snippet.
2. A Google Chrome Browser.
3. A text editor to edit html file.
Let’s start with creating a basic html file
<!DOCTYPE html>
<html>
<head>
 <title>Training a model on browser</title>
</head>
<body></body>
</html>
Now we need to import tensorflow.js library
<script src="https://cdn.jsdelivr.net/npm/@tensorflow/tfjs@latest"></script>
Note: this must be included inside <head> tag
Creating a function for training
function doTraining(model) {
//here we are going to write logic for training
}
We need to make function asynchronous so that it can run in the background without affecting our webpage.
async function doTraining(model){
            const history =
                  await model.fit(xs, ys,
                        { epochs: 500,
                          callbacks:{
                              onEpochEnd: async(epoch, logs) =>{
                                  console.log("Epoch:"
                                              + epoch
                                              + " Loss:"
                                              + logs.loss);

                              }
                          }
                        });
        }
Function Explanation:
We are calling model.fit() asynchronously inside our function, in order to do that we need to pass the model as a parameter to our async function.
We have used await with the model so that it can wait until the training finished. It won’t affect our web page because of async call.
We have used javascript callbacks for after training purposes like in this case we have called onEpochEnd to print the final loss after the training completes.
We have used await with the model so that it can wait until the training finished. It won’t affect our web page because of async call.
We have used javascript callbacks for after training purposes like in this case we have called onEpochEnd to print the final loss after the training completes.
Now that we are ready with our function we can proceed with prediction.
Creating a model with single neural network
const model = tf.sequential();model.add(tf.layers.dense({units: 1, inputShape: [1]}));model.compile({loss:'meanSquaredError',
                       optimizer:'sgd'});
Model Summary
model.summary()
//pretty simple

P.S.: Those who are thinking why did the summary display Trainable params: 2 (two)
There are two params because of Weights and Biases i.e w and c
There are two params because of Weights and Biases i.e w and c
Sample numeric data for training our equation
const xs = tf.tensor2d([-1.0, 0.0, 1.0, 2.0, 3.0, 4.0], [6, 1]);const ys = tf.tensor2d([-3.0, -1.0, 2.0, 3.0, 5.0, 7.0], [6, 1]);
Explanation:
Just like we use numpy in python , we need to use tf.tensor2d() function for defining a two-dimensional array.
It’s important to mention shape of array to the tensor2d function.
It’s important to mention shape of array to the tensor2d function.
let xs = [-1.0, 0.0, 1.0, 2.0, 3.0, 4.0] # array[6,1] # shape of that array
Asynchronously training and predicting
doTraining(model).then(() => {
            alert(model.predict(tf.tensor2d([10], [1,1])));
        }); #calling the function
We are going to use Promise.js for asynchronously calling the training function and then predicting a value based on the trained model.
Those who are new to javascript can check what is Promise.js from here.
Adding some data to show on webpage.
<h1 align="center">Press 'f12' key or 'Ctrl' + 'Shift' + 'i' to check whats going on</h1>
We can also add some data that will be displayed on web page just like a sample running website.
The final html file will look like this
<!DOCTYPE html>
<html>
<head>
 <title>Training a model on browser</title>
 <script src="https://cdn.jsdelivr.net/npm/@tensorflow/tfjs@latest"></script><script lang="js">
        async function doTraining(model){
            const history =
                  await model.fit(xs, ys,
                        { epochs: 500,
                          callbacks:{
                              onEpochEnd: async(epoch, logs) =>{
                                  console.log("Epoch:"
                                              + epoch
                                              + " Loss:"
                                              + logs.loss);

                              }
                          }
                        });
        }
        const model = tf.sequential();
        model.add(tf.layers.dense({units: 1, inputShape: [1]}));
        model.compile({loss:'meanSquaredError',
                       optimizer:'sgd'});
        model.summary();
   const xs = tf.tensor2d([-1.0, 0.0, 1.0, 2.0, 3.0, 4.0], [6, 1]);
   const ys = tf.tensor2d([-3.0, -1.0, 2.0, 3.0, 5.0, 7.0], [6, 1]);
        doTraining(model).then(() => {
            alert(model.predict(tf.tensor2d([10], [1,1])));
        });
    </script>
</head>
<body>
 <h1 align="center">Press 'f12' key or 'Ctrl' + 'Shift' + 'i' to check whats going on</h1>
</body>
</html>
You can also download this file from here.
Finally training and predicting your model on browser
Open your html file with Google Chrome and check the developer console by pressing ‘F12’ key.

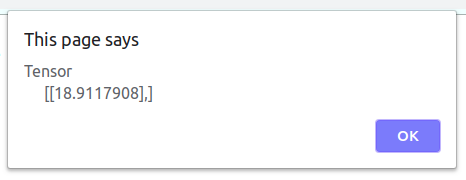
You can see the training epochs with their loss inside the developer console. An alert box will be automatically displayed on a webpage with prediction results as soon as the training completes.

This is an alert box displaying the prediction for our input number which is 10.
According to the equation Y = 2X-1 the output for input x = 10 should be
y = 19. Our model predicted 18.91 which is close enough.
y = 19. Our model predicted 18.91 which is close enough.
Thank You
Please feel free to share your doubts or suggestions. I am one of the members of team Nsemble.ai, we love to research and develop challenging products using artificial intelligence. Nsemble have developed several solution in the domain of Industry 4.0 and E-commerce. We will be happy to help you.


No comments:
Post a Comment