Friday, June 18, 2021

google Codelab

 Codelabs are interactive instructional tutorials, which can be authored in Jupyter notebooks and markdowns using some simple formatting conventions. You can also author codelabs using Google docs. This repo contains all the tools and documentation you’ll need for building and publishing your own codelabs.

Demo

What's special about this tool?

  • Powerful and flexible authoring flow via Jupyter notebooks and markdowns
  • Optional support for authoring in Google docs
  • Ability to produce interactive web or markdown tutorials without writing any code
  • Easy interactive previewing
  • Usage monitoring via Google Analytics
  • Support for multiple target environments (kiosk, web, markdown, offline, etc.)
  • Support for anonymous use - ideal for public computers at developer events
  • Looks great, with a responsive web implementation
  • Remembers where the student left off when returning to a codelab
  • Mobile friendly user experience

Can I use this to create my own codelabs and serve my own codelabs online?

Yes, this repo can be used by anyone to author their own codelabs and to serve up their own codelabs on the web.

How to prepare your Tutorial

Setup Jupyter

We chose jupyter notebooks as an ideal choice for preparing tutorials because it integrates markdown with code, images and million other things. If you do not have a jupyter environment setup locally, you can choose Colab or Binder to prepare your notebook on cloud for free.

Create Tutorial

Write down your tutorial in colab as per these markdown instructions.

How to setup your own codelab site

This step is a one-time setup process. We will use GitHub to maintain and host our codelab site for free.

Clone

Login to your git account and go to this site and click Use this template button.

clone

Name

Give your site a name and click on Include all branches.

rename

Let it bake

Wait for 3-4 minutes till this yellow dot becomes green. Git Actions is preparing your site in the background. Go to Actions tab to see the process.

bake

How to Customize your site

You can customize both landing page and codelabs. Codelab customization is mainly done via tags that we provide during the creation of jupyter notebook based tutorials.

You can customize the following items in landing page by simple modifications.

  1. Change Header and Logo
  2. Add Category
  3. Add View
  4. Change Footer

Change Header and Logo

  1. To change header and main page content, go to site > app > views > default and change index.html content as well as view.json contents accordingly.
  2. To change logo, go to site > app > images and replace my-logo.svg with your logo.

Note: assuming the basic knowledge of html formattings. scope is mainly limited to find and replace things anyway.

Add Category

  1. Go to site > app > styles > _categories.scss and add your category at the bottom in this format: @include codelab-card(['gitaction'], $color-weave-green, 'gitaction.svg'); where gitaction is the category.
  2. Go to site > app > images > icons and add svg icon with the same name as your category.
  3. To use it, while creating codelab, add this category in the categories mata tag.

Add View

  1. site > app > views and duplicate the medium folder.
  2. rename the folder name to any name you want for your view.
  3. Edit its json accordingly and add any image with the same name as your view.

Note: Refer to this medium folder for guidance, and delete it afterwards if required.

Change Footer

To change footer, go to site > app > views > default and change index.html content accordingly.

How to add new Codelabs

To add a new codelab to the codelab site, pull the repo, add the notebook and push it back to the master.

Pull the repo

Pull the repo using git pull origin master where origin is pointed to your repo where codelabs site is hosted. If repo is already there, you can opt for git pull --rebase origin master instead.

Add tutorial notebook

Add your tutorial notebook in the _notebook folder. Make sure the notebook format is following the codelab markdown guidelines and the extension is .ipynb.

Push the repo

Push the updated repo changes to master branch using the standard set of add -> commit -> push chain. e.g. you can use git add . && git commit -m 'new build' && git push origin master to push the changes.

Git actions workflow named CI would automatically start deploying latest changes of the master branch. You can check the status in Actions tab of your git repo.

To access the codelabs site, go to your github pages URL. The typical URL format is https://<user_name>.github.io/<repo_name>.

Verify the functionality and modify/enhance the process as per requirements.

Important resources

  1. Codelab Formatting Guide
  2. Google Codelabs site
  3. Codelab Tool Official GitHub
  4. Check out this excellent tutorial
  5. Check out this another tutorial

Acknowledgements

Google Codelabs exists thanks to the talents and efforts of many fine volunteers, including: Alex Vaghin, Marc Cohen, Shawn Simister, Ewa Gasperowicz, Eric Bidelman, Robert Kubis, Clare Bayley, Cassie Recher, Chris Broadfoot, Sam Thorogood, Ryan Seys, and the many codelab authors, inside and outside of Google, who have generated a veritable treasure trove of content.

Sunday, June 13, 2021

What the Pip

 ython is often a good fit for Data Science, however, package management remains a topic of confusion for many, doing it well even more so. There are several reasons why learning the ropes is time well spent:

  • We can automate tedious and time-consuming manual tasks
  • We can share dependency changes with other developers
  • We can guarantee repeatable code builds and test runs

This article aims to do just that, taking the reader through the complexities and best practices involved in managing dependencies for Python projects, assuming little-to-no prior knowledge of the subject matter. We will start from the very beginning, so feel free to skip any sections that are already familiar.

What is a package, anyway?

A package is a collection of related code modules, typically bundled together and distributed to provide useful, common functionality to other software systems. Just as functions allow us to reuse our own code, packages provide a standard way of reusing third-party code.

The terms package and dependency will be used interchangeably throughout this article.

The Python Packaging Index (PyPI) is the distribution platform of choice for Python packages, which are commonly installed using the Package Installer for Python command-line tool (pip).

pip install <package>

This method of dependency management suffices for small projects. As our code grows and comes to rely on more packages, however, the effort required to memorise and install each one becomes non-trivial. For this reason, a project’s dependencies are typically listed in a requirements file located in the root directory.

/my_project
requirements.txt
/src
/test
...

Ideally, this file will be version-controlled with the source to ensure that changes in dependencies are available to all developers.

git add requirements.txt
git commit -m "Add requirements"
git push

The -r option allows us to install from a requirements file using pip.

pip install -r requirements.txt

So far, we have avoided describing the contents of this file as it will be a topic of hot debate throughout the article. For now, it is enough to know that each line must contain the name of a python package.

Once upon a time in the wild, wild west…

A project’s requirements file was a lawless place where dependencies roamed unpinned and free. By unpinned, we mean that packages are not tied to any specific version: pip will download the latest release on every install. For example:

pandas
requests
boto3

Why is this an issue?

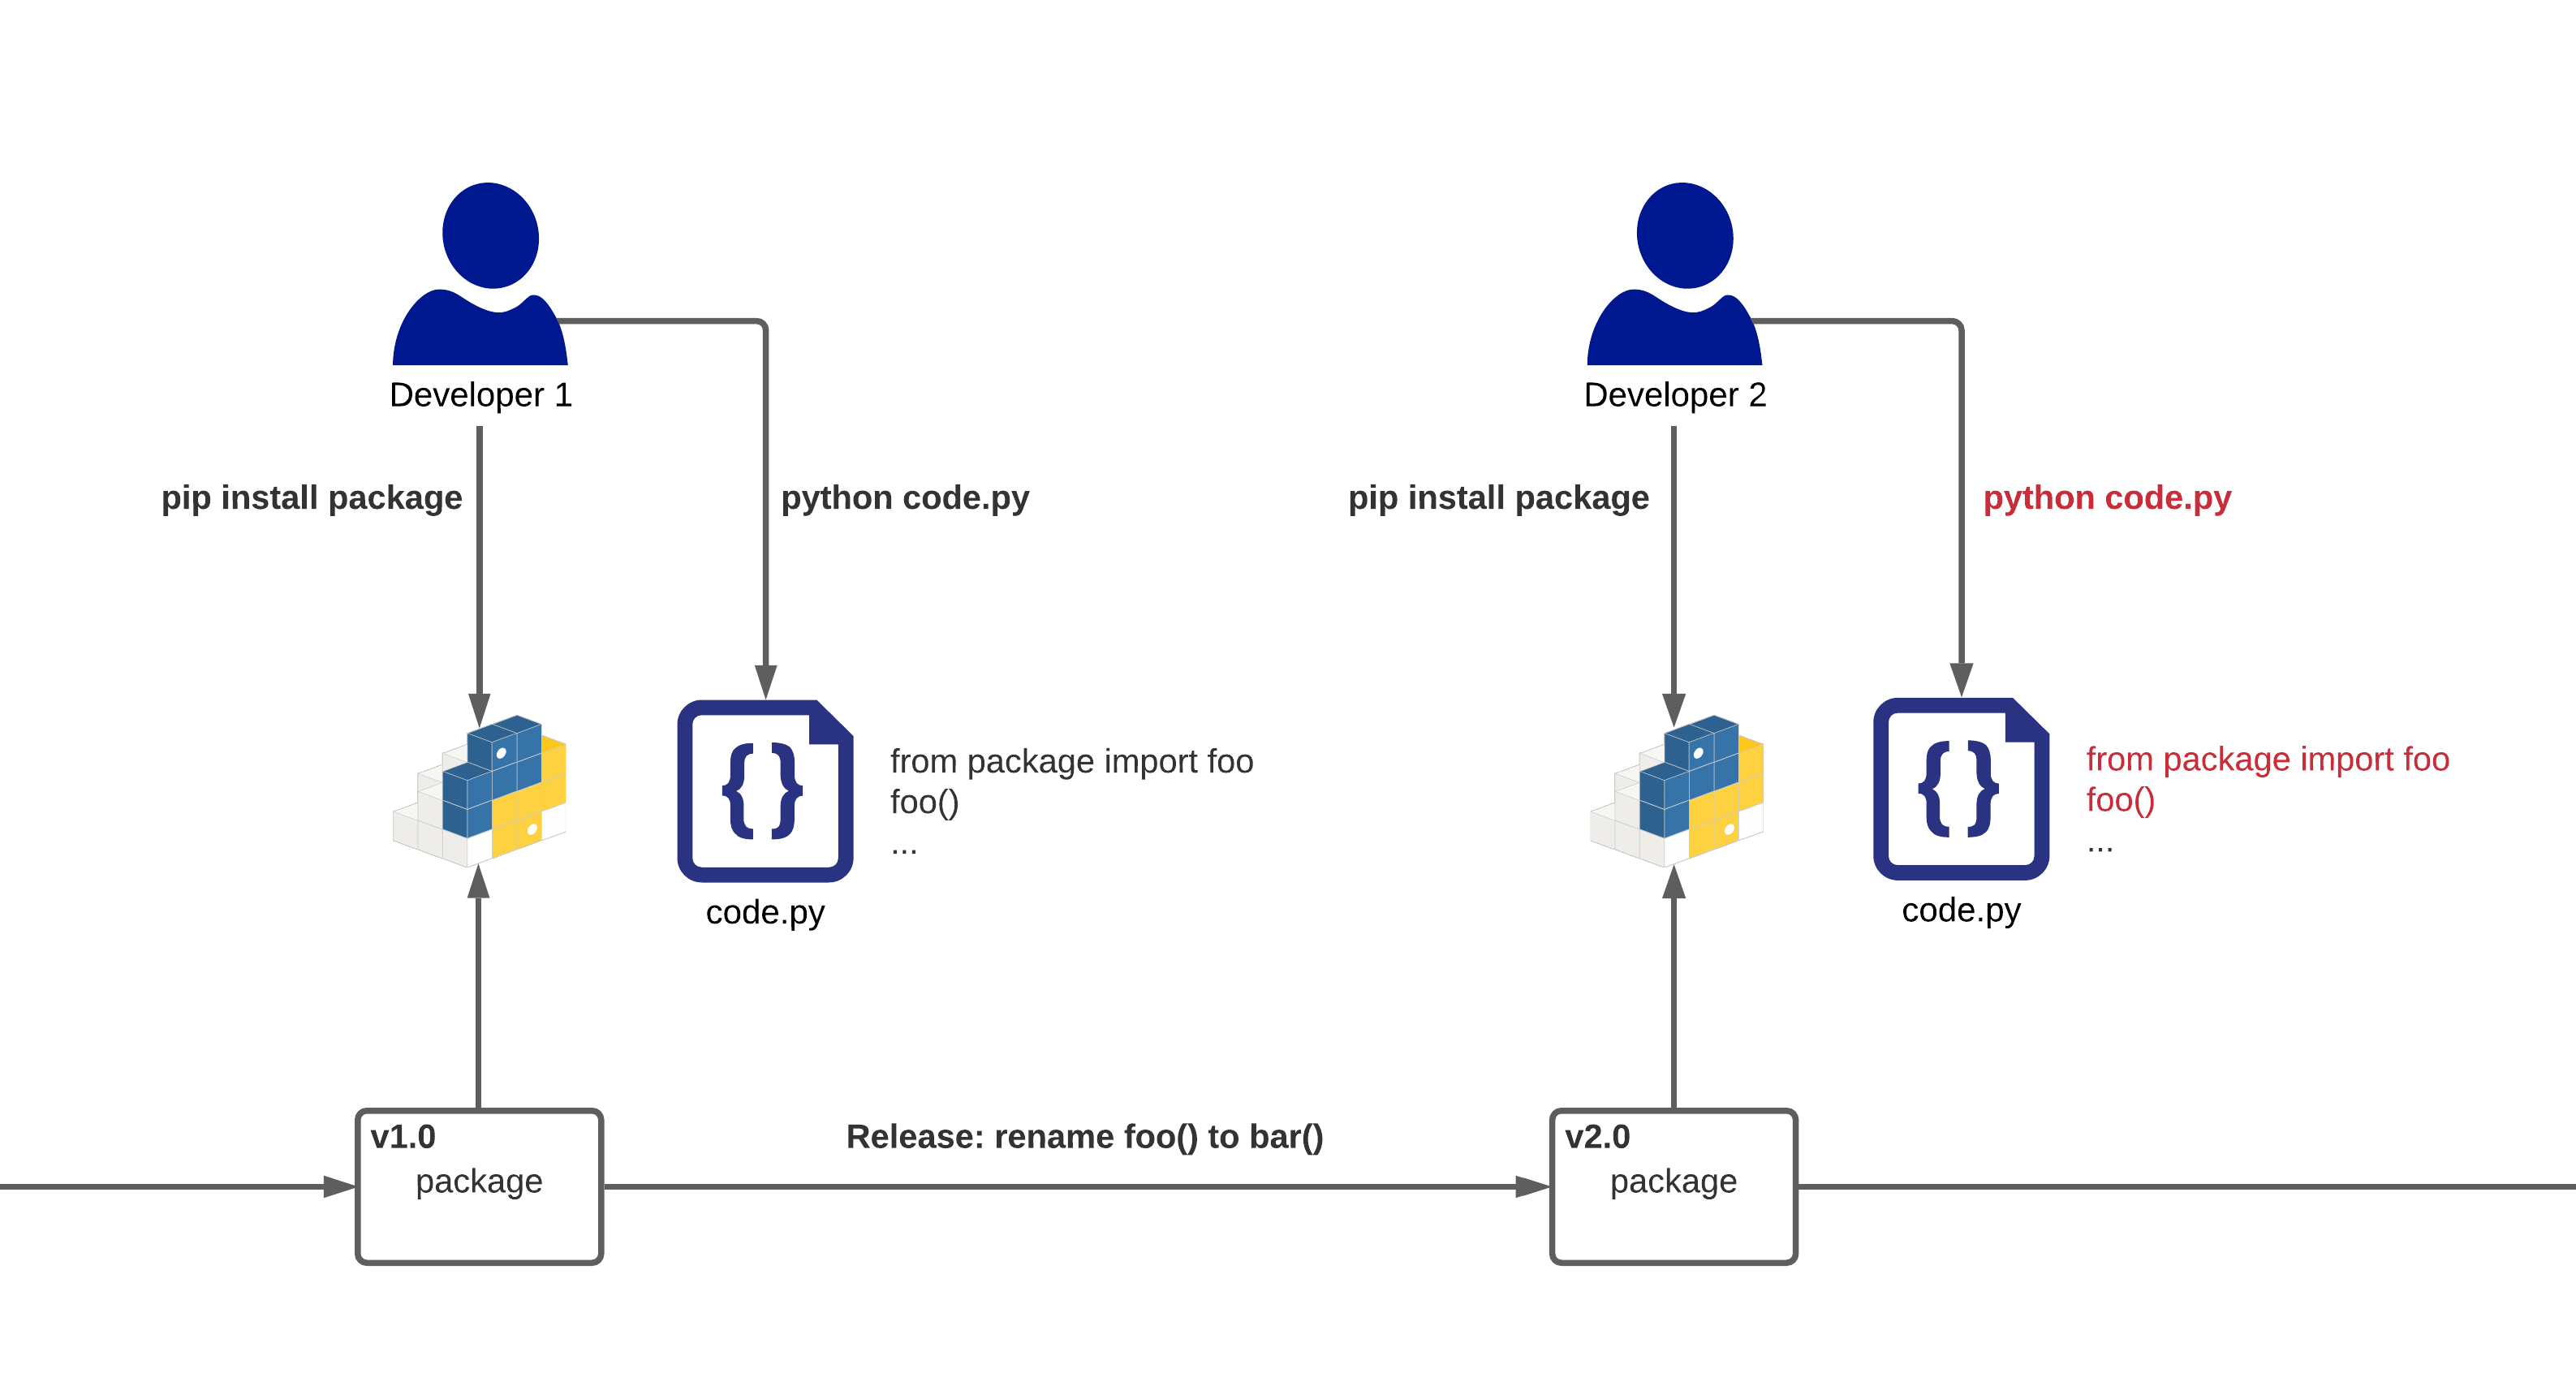
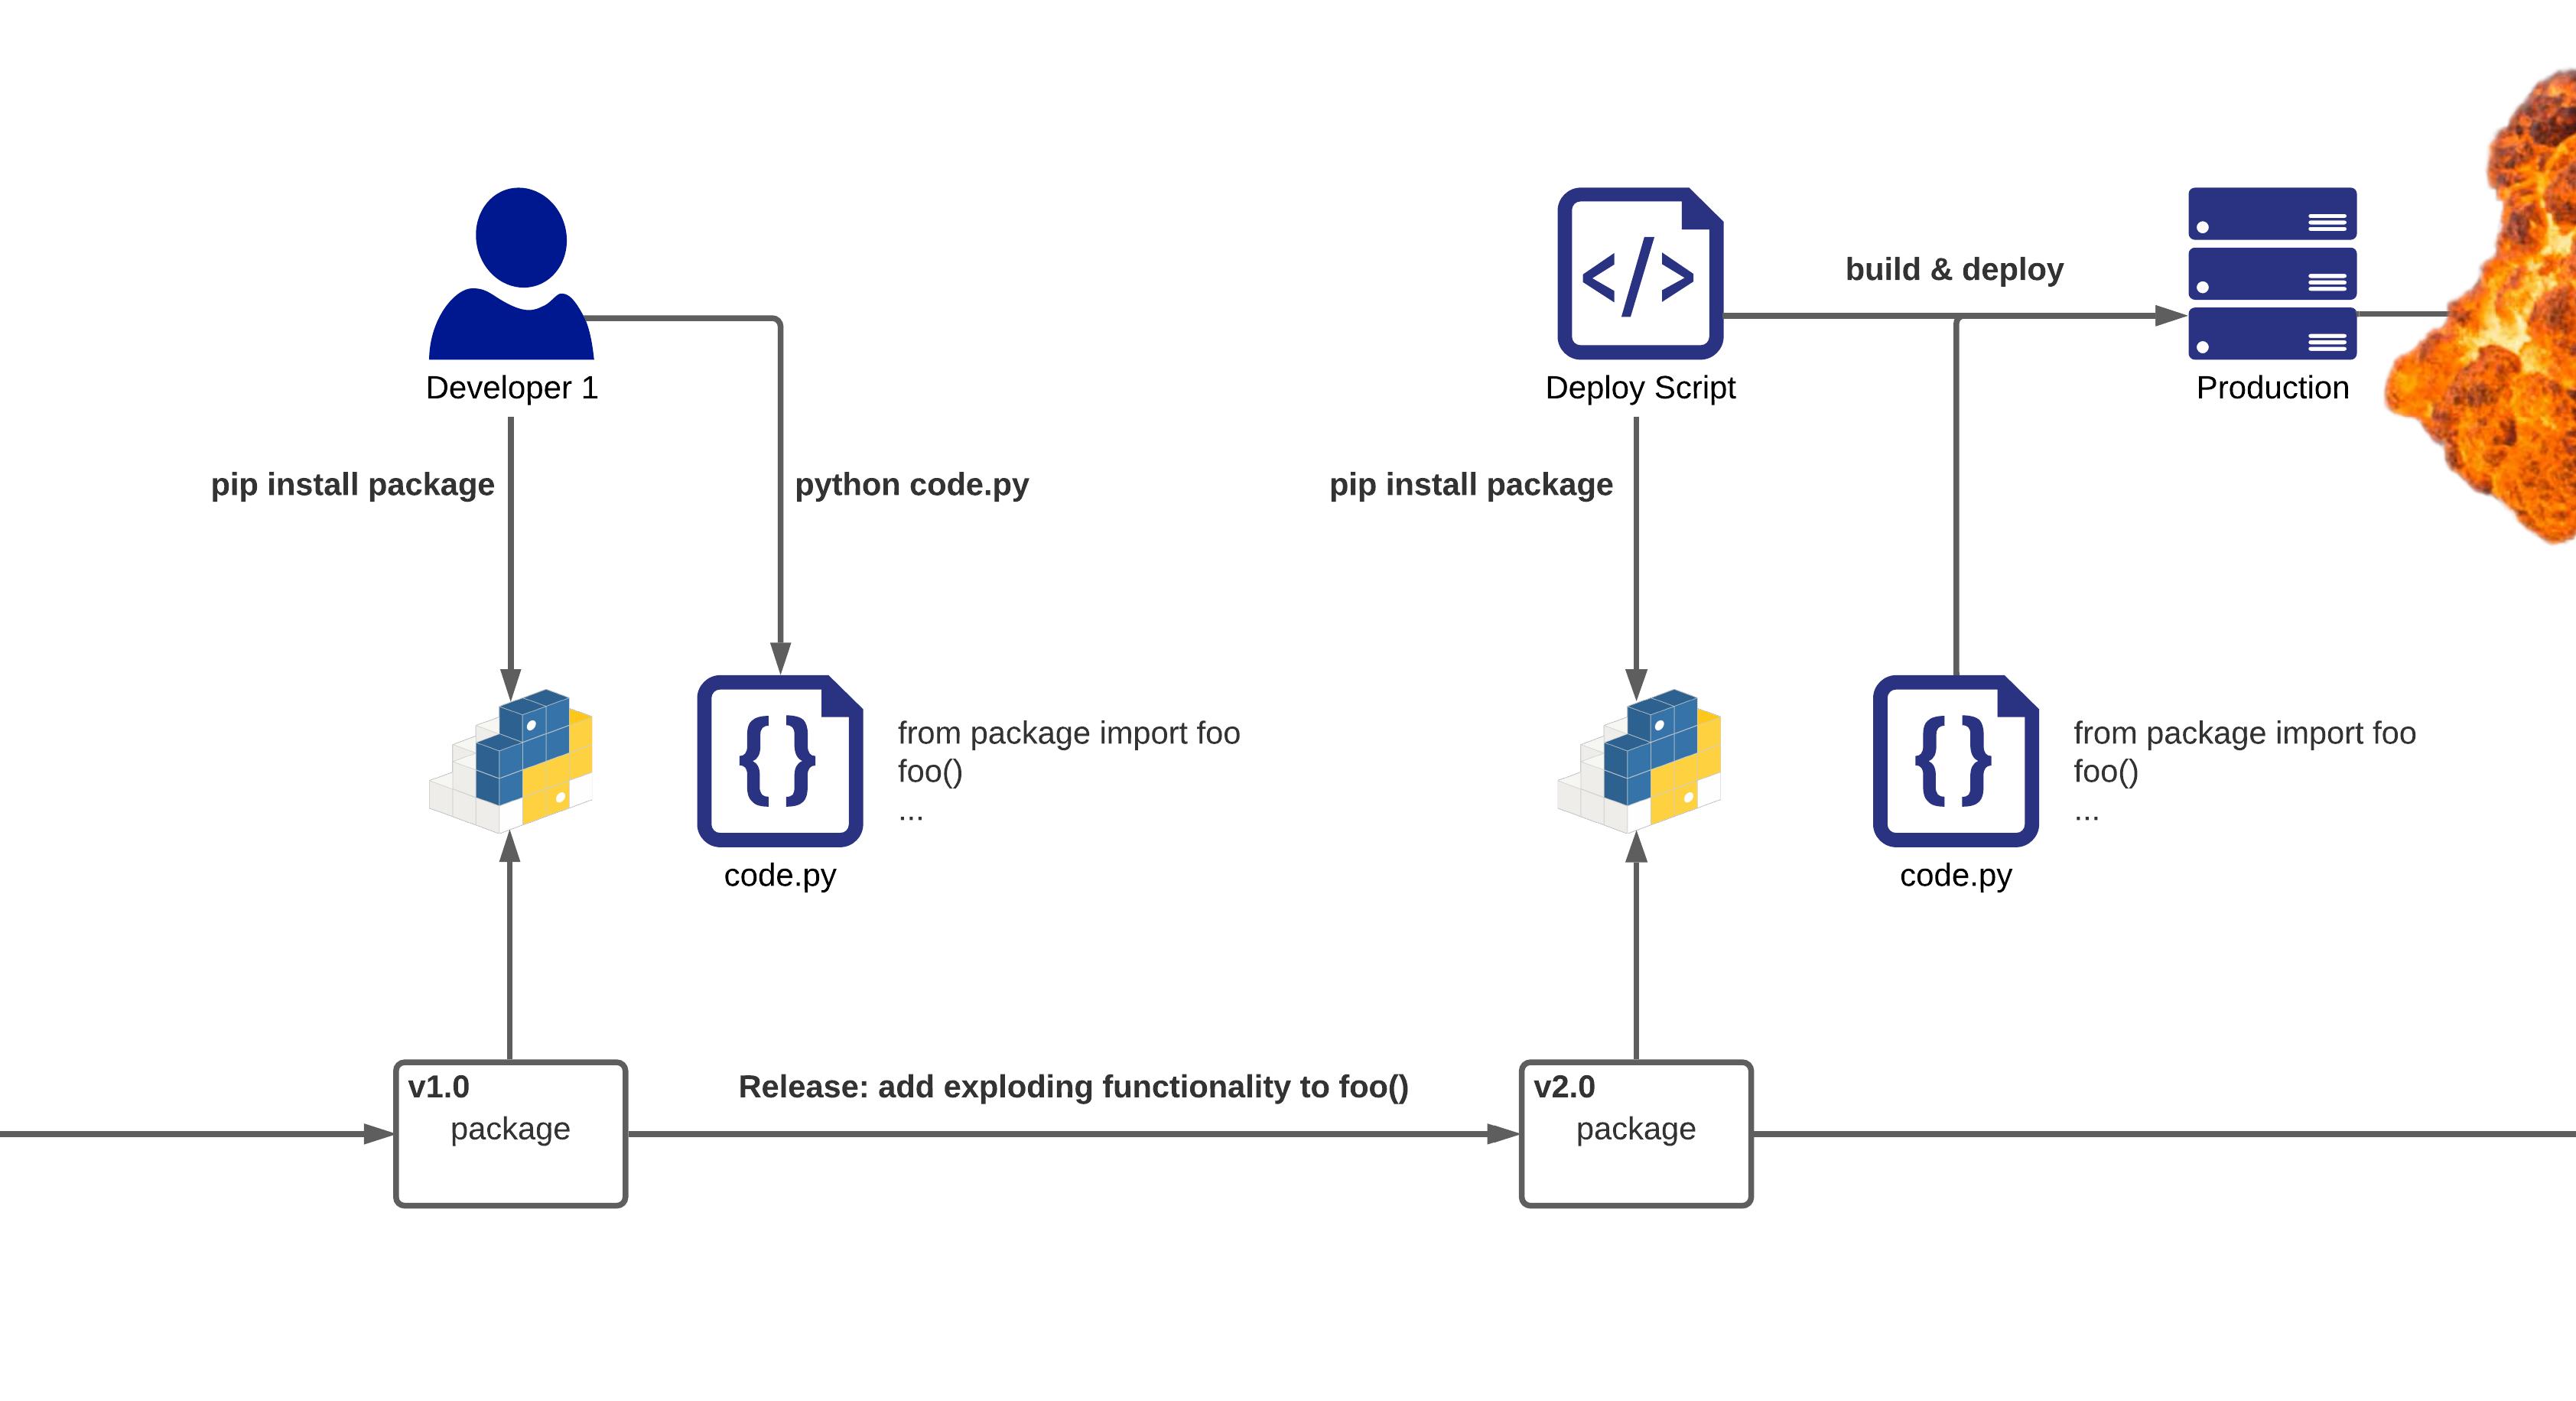
The inability to guarantee a package’s version has troubling implications, especially when a breaking change is released to its public API.

A developer installs a package, then writes and runs some valid Python code using it. At this point in time, everything looks peachy!

Later, however, the package releases a breaking change. An individual installing afterwards receives this change, since the dependency is unpinned, and the same code fails with an ImportError.

This is a headache for developers, who cannot guarantee that code will behave reliably on each others’ machines. If we replace another developer with an automated test run, we can see how it will be prone to intermittent failure. Replace them with a deployment script, and such breakages could reach live systems.

Put a pin in it

That is to say our dependencies must be pinned! Pinning refers to the process of specifying which versions to install explicitly, guaranteeing that package resolution is predictable across different machines at different times.

A simple approach would be to pin each package to its currently installed version, which we can find through examination using pip.

pip show <package>

We then pin our requirements file by manually adding the version number after each package name.

pandas==1.2.4
requests==2.25.1
boto3==1.17.92

This is certainly an improvement over leaving everything unpinned, but suffers from a few drawbacks:

Manually updating packages is tedious, especially as our requirements file grows large. Failing to do so, however, will leave our dependencies stale: unable to benefit from improvements, patches, or security fixes.

More importantly, there is no guarantee that the packages we rely on are pinning their own dependencies! Unpinned packages may still crop up transitively unless we pin the entire dependency tree.

This, in turn, adds noise to our requirements file: It becomes difficult to distinguish between direct and transitive packages, and even more cumbersome to manage each version by hand.

Automation to the rescue

Luckily, there are tools which do the hard work for us; notably, pip-tools:

pip-tools: A set of tools to keep your pinned Python dependencies fresh.

pip install pip-tools

Let’s take a look at the two utilities it provides, pip-compile and pip-sync, using our previous unpinned requirements file as an example. By convention, this file should now be given the extension .in.

Keeping a copy of the unpinned packages in this way makes it easy to view and manage direct project dependencies, separating pinned requirement clutter from the crux of the matter.

/my_project
requirements.in
/src
/test
...

From the unpinned dependencies, pip-compile will generate pinned ones for us, handling the tedium of finding suitable versions and adding appropriate constraints.

pip-compile requirements.in

The output is a familiar requirements.txt file, which we should never need to modify ourselves.

/my_project
requirements.in
requirements.txt
/src
/test
...

Examining requirements.txt, it should please us to find that the entire dependency tree has been pinned, ensuring that subsequent installs will be predictable and repeatable. We can also see where each package comes from, improving traceability for debugging.

#
# This file is autogenerated by pip-compile
# To update, run:
#
# pip-compile requirements.in
#
boto3==1.17.92
# via -r requirements.in
botocore==1.20.92
# via
# boto3
# s3transfer
certifi==2021.5.30
# via requests
chardet==4.0.0
# via requests
idna==2.10
# via requests
jmespath==0.10.0
# via
# boto3
# botocore
numpy==1.20.3
# via pandas
pandas==1.2.4
# via -r requirements.in
python-dateutil==2.8.1
# via
# botocore
# pandas
pytz==2021.1
# via pandas
requests==2.25.1
# via -r requirements.in
s3transfer==0.4.2
# via boto3
six==1.16.0
# via python-dateutil
urllib3==1.26.5
# via
# botocore
# requests

Whenever we want to update all packages, we can run pip-compile again to regenerate our pinned requirements with the latest versions: much easier than manually bumping them ourselves!

Individual packages can be updated using the --upgrade-package argument.

pip-compile --upgrade-package pandas

Subsequently, pip-sync allows us to install these pinned dependencies. It is best to do so inside a virtual environment so that package version across different projects do not install over each other.

python -m venv .venv
source .venv/bin/activate
pip-sync

With these tools in our belt, we’re well on our way to becoming a Python package pro!

But wait, there’s more!

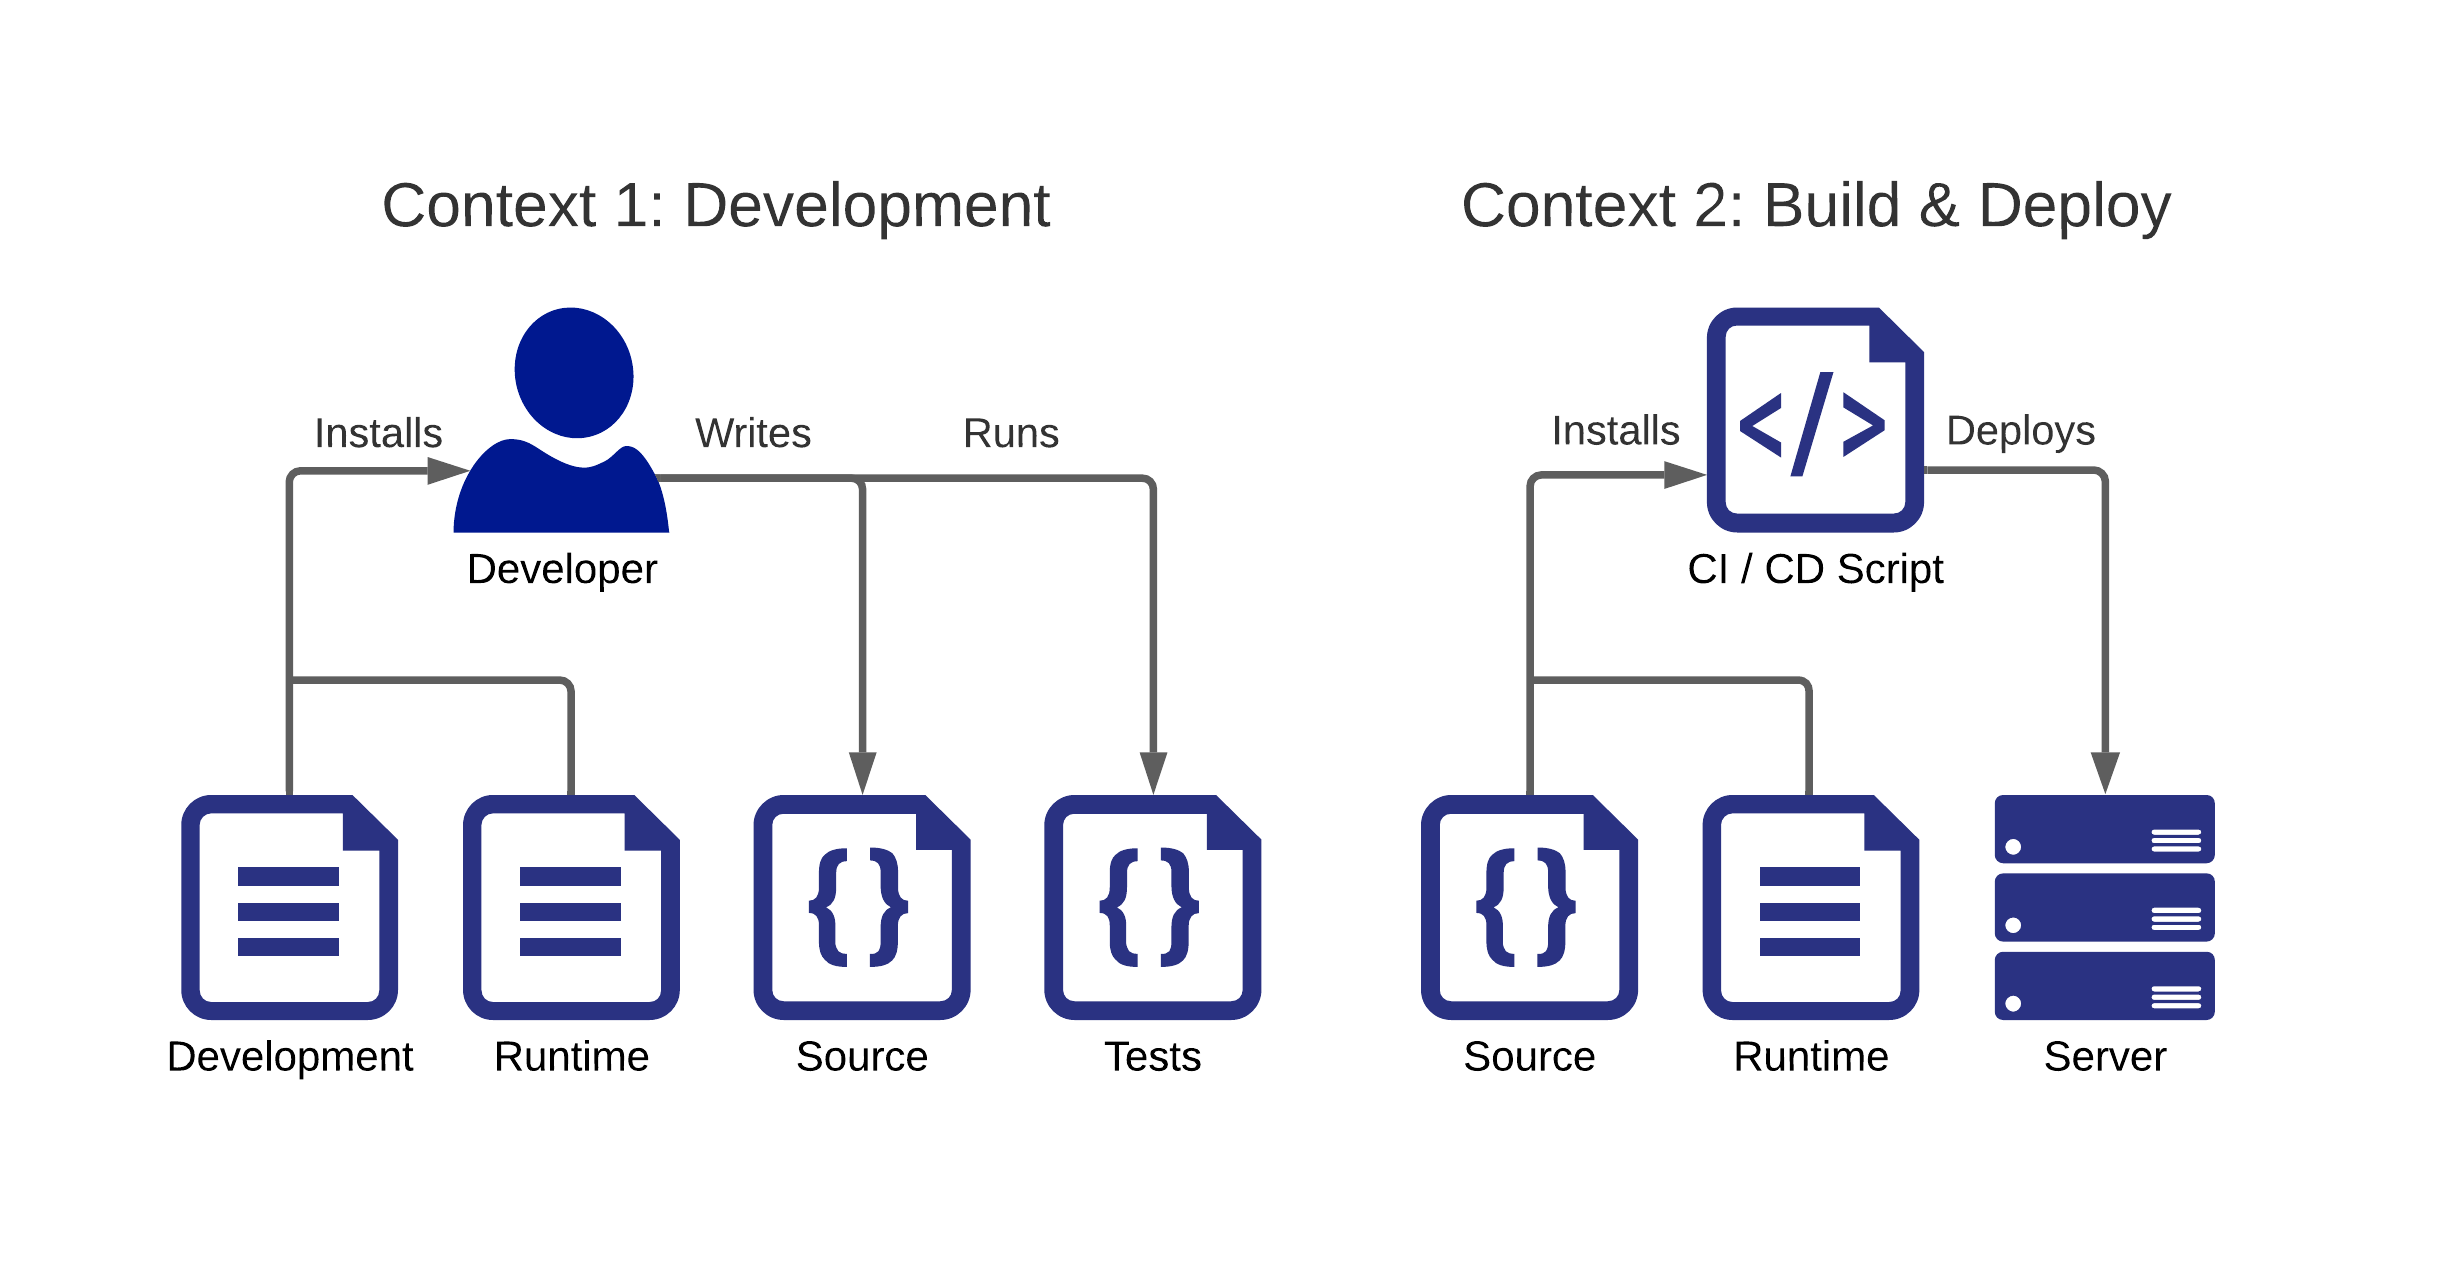
So far, we have discussed packages as runtime dependencies of software systems. The story does not end there, however, as additional packaged tools may aid in the development process: linters, testing frameworks, deployment libraries, to name a few.

Managing tool versions in the same manner is desirable for the same reasons outlined earlier, but such tools are needed only in certain contexts. While helpful to developers and their tests, these packages are not used by the source itself, allowing them be ignored when bundling with code for deployment. This reduces the size and potential attack surface of build artefacts.

A common method of achieving this separation is to keep multiple requirements files: each one specifying the packages needed in a particular context. We will use two such files.

/my_project
requirements.in
requirements-dev.in

/src
/test
...

requirements.in contains our familiar unpinned runtime dependencies.

pandas
requests
boto3

requirements-dev.in contains our unpinned development dependencies.

black
pytest
safety

Once again, it is imperative that package versions stay fixed during development, testing, and deployment to guarantee code predictability. Since each requirements file is independent, shared packages will likely be pinned to different versions. Using pip-sync to install both .txt files together will highlight the issue, but not fix it.

pip-compile requirements.in
pip-compile requirements-dev.in
pip-sync *.txt
Incompatible requirements found: ...

As a remedy, we begin by adding a reference between our runtime and development requirements.

-r requirements.in
black
pytest
safety

Then, we can make use of a new tool, pip-compile-multi:

pip-compile-multi: Compile multiple requirements files to lock dependency versions.

pip-compile-multi functions similarly to pip-compile, allowing us to compile multiple sets of dependencies together while also tracking references. Packages already pinned in our runtime requirements will be omitted from the development requirements so that the former acts as a single source of truth for shared package versions. This allows us to install both sets of requirements together without conflicts.

pip-compile-multi *.txt
pip-sync *.txt

In Summary

  • Packages allow us to reuse useful, common functionality developed by third-parties within our software systems.
  • Python packages are distributed using PyPI and installed using pip.
  • Python packages are typically listed within a requirements file for ease of management and to allow them to be version controlled.
  • Packages should be pinned to ensure that installs are predictable and repeatable across different machines at different times.
  • Pip-tools pins packages for us, making them easier to update. This allows us to benefit from improvements, patches, and security fixes.
  • Splitting requirements by application and development contexts allows us to minimise the size of build artefacts.
  • Pip-compile-multi compiles multiple requirements files together, preventing shared package versions from conflicting.

Thank you for taking the time to read this article! I hope it has proven useful, and any feedback is much appreciated.

Thursday, June 10, 2021

Advanced Python Made Easy

 Python, created by Guido van Rossum in 1991, is an interpreted, high level-general purpose programming language. Most of us, working in software engineering field must have used Python in our work life. In this post, I’m going to cover the advanced python constructs and how you can efficiently use them to improve your code readability and performance. This is the part 1 and to be followed by Part 2 (coming soon).

1. Comprehensions

You must have heard about list comprehensions (Python 2.0). Comprehensions in Python are the constructs that allows sequence built from other sequences and while the list comprehensions are quite popular/frequently used, Python 3.0 introduced Dictionary and set comprehensions.

#Example Codelist_one=[5,10,15, 20]
new_list=[]
for x in list_one:
new_list.append(x**3)
print(new_list)

Output —

[125, 1000, 3375, 8000]

With list comprehension —

list_two=[5,10,15,20]
new_list=[x**3 for x in list_two]
print(new_list)

Output —

[125, 1000, 3375, 8000]

With condition —

#With conditionlist_three=[13,20,25,45]
new_list=[x**3 for x in list_three if x%2==0]
print(new_list)

Output —

[8000]

Dictionary Comprehension

dict_one=[10,20,30,40]
new_dict={x: x**2 for x in dict_one if x%2==0}
print(new_dict)

Output —

{10: 100, 20: 400, 30: 900, 40: 1600}

2. Default Dict

Default Dict, a part of high performance container datatypes, is a sub class of dict that returns a dictionary object. It never raises a key error and is initialized with a default factory function.

from collections import defaultdicttuition_balance= defaultdict(lambda:200)tuition_deposits = {'Naina' : 100, 'Steve' : 300, 'Benedict' : 200}for name,deposits in tuition_deposits.items():
tuition_balance[name]+=deposits
print(dict(tuition_balance))

Output —

{'Naina': 300, 'Steve': 500, 'Benedict': 400}

3. NamedTuple

NamedTuples are light weight, memory efficient object types which belongs to collections module. These are dict like constructs where you can access the attribute values by index, key name or getattr() function.

from typing import NamedTuple
class Account(NamedTuple):
name:str
value: float

Account(name='Naina',value=100)

Output —

Account(name='Naina', value=100.1)from collections import defaultdict
tuition_balances= defaultdict(lambda:200)
tuition_deposits = [Account(name='Naina', value=100),
Account(name='Steve', value= 300),
Account(name='Benedict',value=200)]
for deposit in tuition_deposits:
tuition_balances[deposit.name]+=deposit.value
print(dict(tuition_balances))

Output —

{'Naina': 300, 'Steve': 500, 'Benedict': 400}

4. Type Hinting

If you are working with complicated data structures, then type hints are very helpful to sort out the complexity and to make your code more readable (especially when you want to refer the code later).

def calc(x:set, y:set) ->set:
var_one = x + y
var_two = x | y
var_three = x & y
return var_three
a: set = {5,6,20,30,10,4,22}
b: set = {20,30,45,6,7,3,22}
result : set=calc(a,b)
print(result)

Output —

{6, 20, 22, 30}

Thanks for Reading. Keep coding .


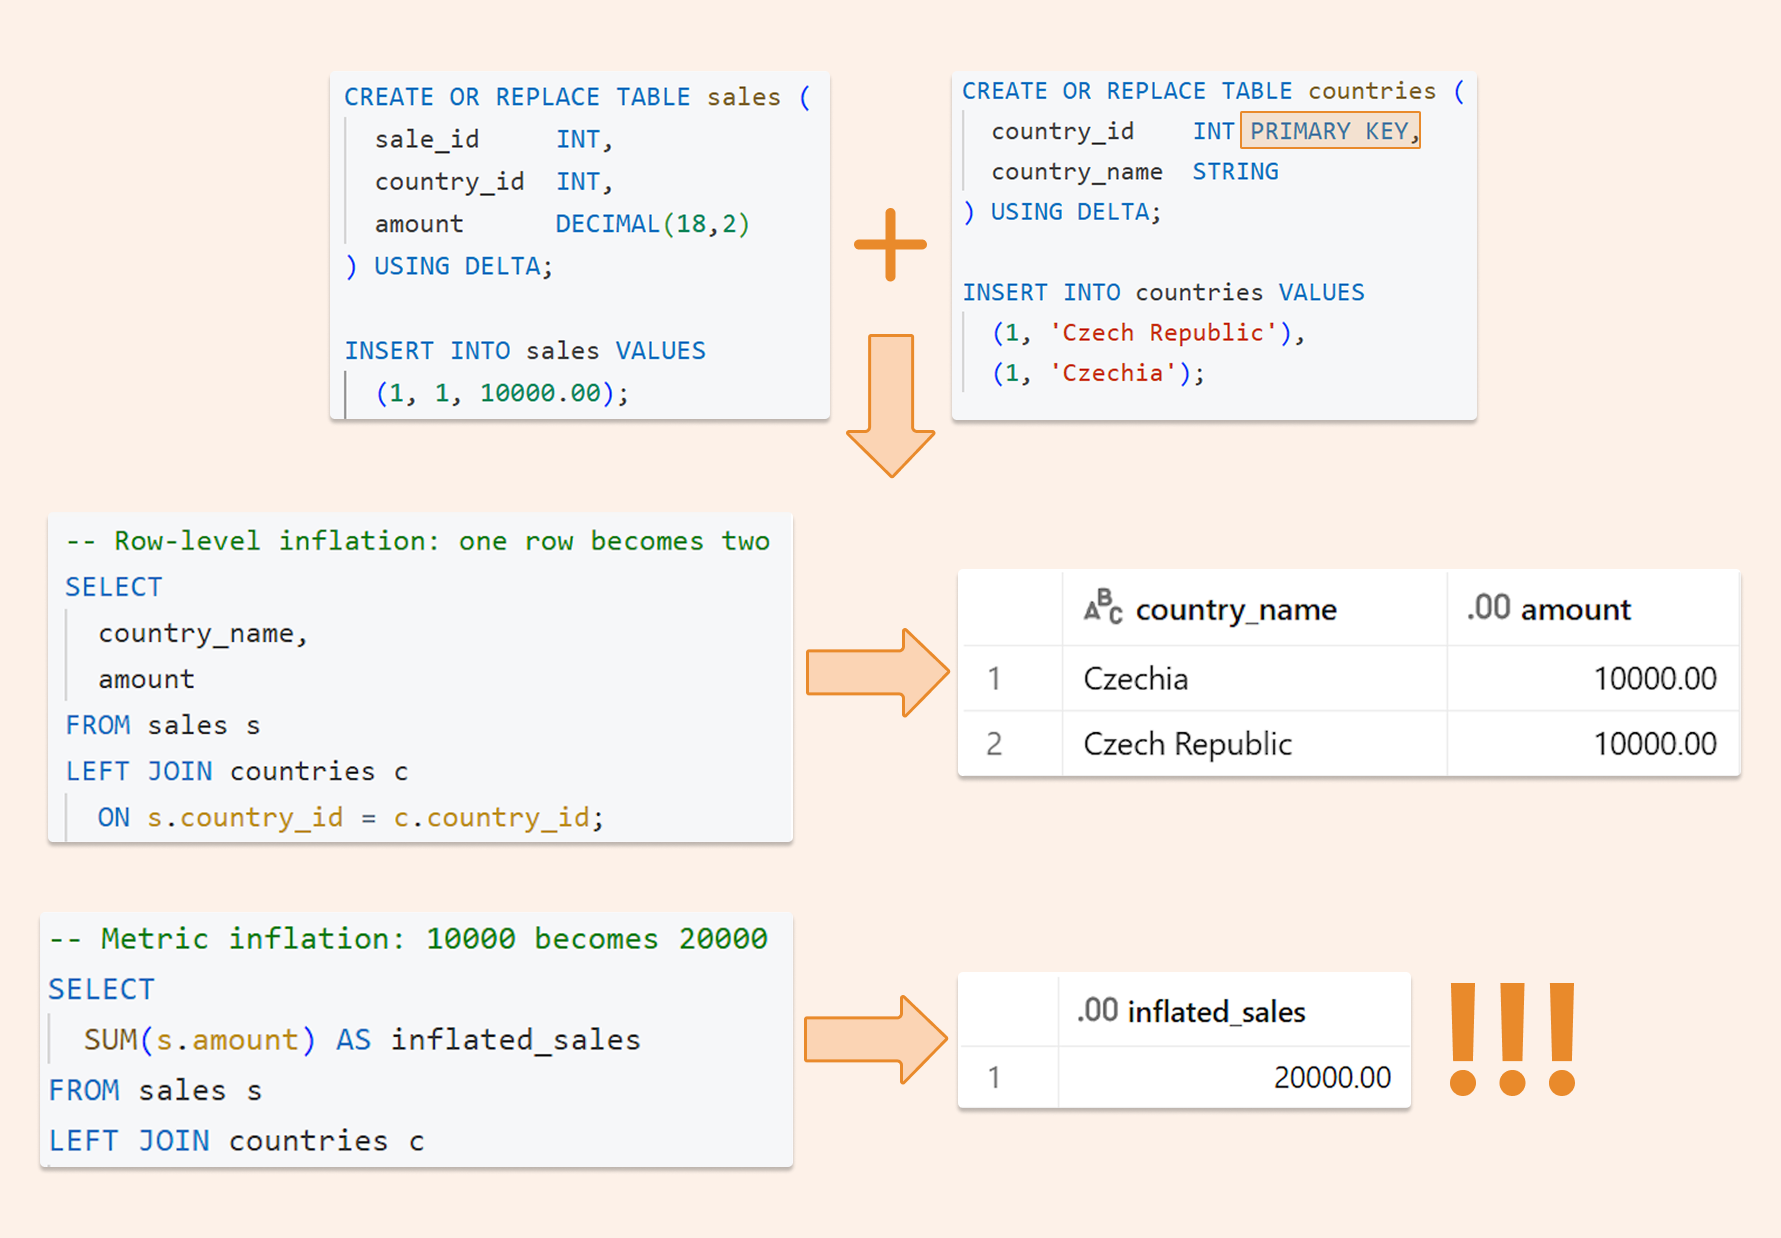
Deduplicating Data on the Databricks Lakehouse: Making joins, BI, and AI queries “safe by default.”

  Imagine this: your manager asks the AI analytics tool: "What were our top-selling products last quarter?" The AI generates perfe...