Using Software Engineering methods to design and build a fully responsive and adaptive mobile, desktop, and web application.
What you will be learning in this series:
- What software engineering methods are and how to use them from Scratch to Hatch.
- How to design and build your Flutter application structure.
- How to design and develop the Flutter application data models and backend.

In the beginning, you should know some software engineering concepts.
Who are you?
You’re a software engineer who wants to build and support a software product and virtually everyone in the industrialized world uses it either directly or indirectly.
What are the steps?
Customers and other stakeholders express the need for a software product, engineers build the software product, and end-users apply the software to solve a specific problem or to address a specific need.
What is the work product?
A computer program runs in one or more specific environments and services one or more end-users' needs.
If you’re accountable for your product or working in an agile team, and you can share your opinions with the rest of the team members, you have to know about these definitions and try your best to build a successful software product.
Software Lifespan

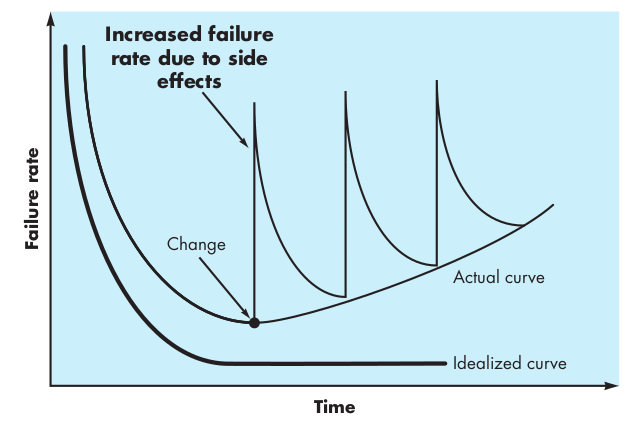
If we have a software product, during its life, the software will undergo change. As changes are made, it is likely that errors will be introduced, causing the failure rate curve to spike, as shown in the “actual curve”. Before the curve can return to the original steady-state failure rate, another change is requested, causing the curve to spike again. Slowly, the minimum failure rate level begins to rise — the software is deteriorating due to change.
Another aspect of wear illustrates the difference between hardware and software. When a hardware component wears out, it is replaced by a spare part. There are no software spare parts. Every software failure indicates an error in design or in the process through which design was translated into machine-executable code. Therefore, the software maintenance tasks that accommodate requests for change involve considerably more complexity than hardware maintenance.
Software engineering methods strive to reduce the magnitude of the spikes and the slope of the actual curve in the above Figure.
OK, that’s cool. Software engineering seems to be nice for our product. So what is software engineering? As I said, I’m not going to deep dive into the software engineering methods, but I will be reviewing some of its aspects and pick the best approach in cross-platform programming.
Software Engineering
Software engineering encompasses a process, a collection of methods, and an array of tools that allow professionals to build a high-quality software product.
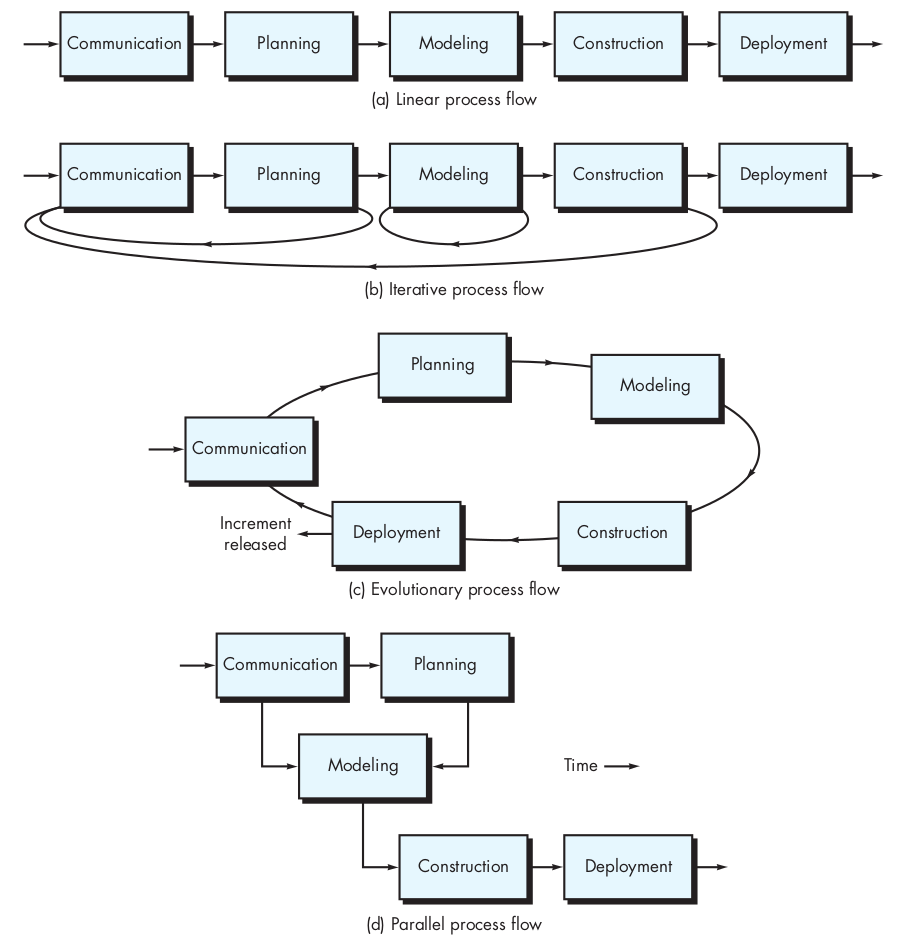
As software engineers, we have to do some activities, and it is called “The Process Framework”. A generic process framework for software engineering encompasses five activities:
- Communication. Before any technical work can commence, it is critically important to communicate and collaborate with the customer (and other stakeholders). The intent is to understand stakeholders’ objectives for the project and to gather requirements that help define software features and functions.
- Planning. Any complicated journey can be simplified if a map exists. A software project is a complicated journey, and the planning activity creates a “map” that helps guide the team as it makes the journey. The map — called a software project plan — defines the software engineering work by describing the technical tasks to be conducted, the risks that are likely, the resources that will be required, the work products to be produced, and a work schedule.
- Modeling. Whether you’re a landscaper, a bridge-builder, an aeronautical engineer, a carpenter, or an architect, you work with models every day. You create a “sketch” of the thing so that you’ll understand the big picture — what it will look like architecturally, how the constituent parts fit together, and many other characteristics. If required, you refine the sketch into greater and greater detail in an effort to better understand the problem and how you’re going to solve it. A software engineer does the same thing by creating models to understand better software requirements and the design that will achieve those requirements.
- Construction. What you design must be built. This activity combines code generation (either manual or automated) and the testing that is required to uncover errors in the code.
- Deployment. The software (as a complete entity or as a partially completed increment) is delivered to the customer, who evaluates the delivered product and provides feedback based on the evaluation.

As I’ll explain later, I’m going to design and program a Flutter project by the feature-driven approach. Hence, we have to accomplish these activities for each feature that drives from communication activity.
So, we have four ways to do that, and you can choose whichever fits your team. For example, if you are working in an agile team, you definitely have a stand-up meeting every day with your team, and you can discuss each feature and iterate each activity until the best construction comes up.
Understanding Requirements
In a big and complicated system, have you ever been wondering about some features that your boss asked of you and, you asked yourself, are they really mandatory for this system? Are they really considered as system requirements?
Before you begin any technical work, it’s a good idea to create a set of requirements for any engineering tasks.
These tasks lead to an understanding of what the business impact of the software will be, what the customer wants, and how end-users will interact with the software. Designing and building an elegant software product that solves the wrong problem serves no one’s needs.
That’s why it’s important to understand what the customer wants before you begin to design and build a software system.
What are the steps? Requirements engineering begins with inception (a task that defines the scope and nature of the problem to be solved). It moves onward to elicitation (a task that helps stakeholders define what is required), and then elaboration (where basic requirements are refined and modified). As stakeholders define the problem, negotiation occurs (what are the priorities, what is essential, when is it required?) Finally, the problem is specified in some manner and then reviewed or validated to ensure that
your understanding of the problem and the stakeholders’ understanding of the problem coincide.
Agile Requirements Elicitation
Within the context of an agile process, requirements are elicited by asking all stakeholders to create user stories. Each user story describes a simple system
requirement written from the user’s perspective. User stories can be written on small note cards, making it easy for developers to select and manage a subset of requirements to implement for the next product increment. Proponents claim that using note cards written in the user’s own language allows developers to shift their focus to communication with stakeholders on the selected requirements rather than their own agenda.
The Gallery Project
That’s enough for just theories. Let’s dig into small projects that I want to use software engineering methods and learn within them.
I want to build a simple gallery project for our friends with Flutter that includes albums, and each album consists of pictures and videos. Since a few plugins support web applications, I decided to use the flutter video plugin for this project.
I have to consider a principle for this product that the gallery application has worldwide scales users.
Let’s write some use-cases that performed by the graduate actor:
- Request for login.
- See images and videos in a list.
- Select an album to change the current album.
- Select an image to control zoom.
- Select a video to watch and control it.
- Use the gallery from Web/Mobile/Desktop.
- Change the gallery language to their language.
- Change the gallery theme.
- Change the Web/Desktop windows dimension size.
- Access to any desired album by a specific route URL.
Some of its requirements are similar in many applications like multilanguage and theme support, and I will add them to the gallery.
As I noted earlier, there are many ways to build a flutter application. For example, you can use just
statefullwidgets to control everything in your states, but do you really do that? Can you give your codes to someone else and ask them to explain your states? This is one way, and it could be the easiest and faster way, and in some cases, it could be the only way to do that, but in a complicated and world-wide scales systems, there is no answer by going to this way programming.
Use-Case Diagram
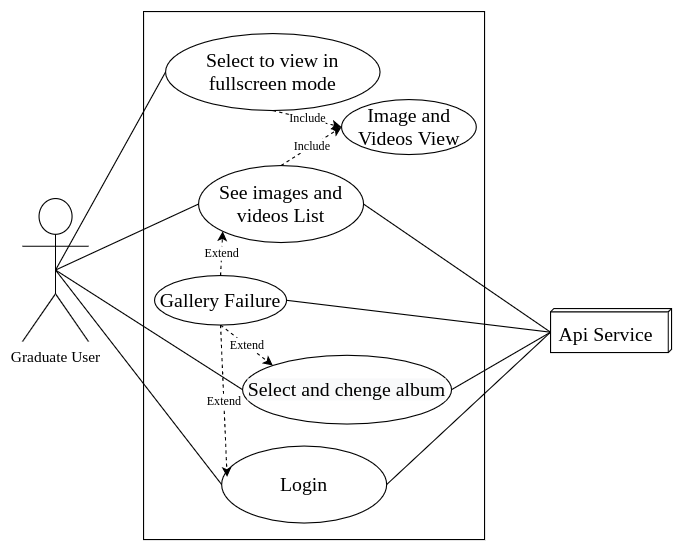
In many cases, there is no need to create a graphical representation of a usage scenario. However, diagrammatic representation can facilitate understanding, particularly when the scenario is complex. I’m going to build the graphical representations with this free tool (https://app.diagrams.net/). Let’s make an example for our Use-Case Diagram:

I will use these use-cases in the gallery application later. Since I made a use-case for the gallery application, not the whole system, so I considered API as an external service, and I won’t check the API server out. I will explain what a good restful API is and how much the bad API impacts our application performances.
Activity Diagram
One of the most important and mandatory for a complicated system is the Activity Diagram. The activity diagram allows you to represent the flow of activities described by the use case and at the same time indicate which actor (if there are multiple actors involved in a specific use case) has responsibility for the action described by an activity rectangle. Responsibilities are represented as parallel segments that divide the diagram vertically, like the lanes in a swimming pool. In the gallery application, I have more scenarios, and I just represent some flows of activities for simplicity:

Seems familiar to you? Yes, I will always use this representation for the gallery application state managers. I will use this diagram for the gallery state manager later.
We could have some other types of diagrams like the State Diagram that represents active states for each class and the events(triggers) that cause changes between these active states, and the Sequence Diagram indicates how events cause transitions from object to object. They could be useful for the gallery state management, but we aren’t going to represent them for simplicity, and the activity diagram is sufficient for our app.
Class Diagram
Let’s move on to gallery models. We need a Class Diagram for this phase. I’m going to draw the classes that represent the gallery application models. Here’s the gallery class diagram:

As you can see, I have models for account and authentication and gallery. With each HTTP request, I have some models for HTTP exceptions and bad requests. I will use all of these models in the gallery application, and you will understand what the relations between them are.
Application Architecture
Now it’s time to design the gallery architecture. As of today, I have experience with almost each state management in Flutter, and personally, I prefer the Bloc pattern and its architecture for almost every cases, since Bloc makes it easy to separate presentation from business logic, making your code fast, easy to test, reusable, and more important predictable and understandable. You can check Bloc documentation, but if you stay up with this series, you can learn about Bloc.

I want to separate the gallery data layer from the UI layer because we can understand the gallery application super easy. And if you could accomplish that without using a state manager library, I would recommend you use just InheritedWidget or StatefullWidget, and I will check this too with a portfolio website example.
I think you understood one problem! Where’s the gallery data came from?

The data layer can be split into two parts:
- Repository
- Data Provider
This layer is the lowest level of the application and interacts with databases, network requests, and other asynchronous data sources and provides the Bloc's required data.
Micro-Services vs. Monolithic architecture
We have two options to use Blocs in the gallery application; Micro-Services and Monolithic:

Their difference is obvious. We aim to make the project as easy as possible. Hence, to locate every Bloc, Data and Presentation layers together in one place called a Monolithic application and, therefore, it makes our application hard to understand. So, we’re going to use the Micro-Service application. It looks like the other gallery layers don’t concern with the gallery presentation layer, and we can add any service whenever we want for any new feature and use another service by adding their dependency in their pubspec.yaml.
This architecture is more comprehensible, more reusable, more testable, more collaborative, and works amazingly for a big team and complicated systems. You don’t need to use this architecture unless your project is big and complicated. If you’re not agreed with me, first use this link to do some research about them, and if you decide otherwise, there are no worries, you can use a monolithic application alongside this article.
Final Words
That’s enough for this part. In the next part, I will cover the gallery construction phase and try to construct the gallery application based on what we planned, and cover some other software engineering concepts for the rest of the product lifecycle.
Before starting the next part, if you are curious about alternative software engineering methods or you want to learn every detail of the methods that I covered, you can read software engineering books like Sommerville or Pressman software engineering books.
Thank you for reading. I hope you enjoyed it. This article takes me so much time researching and developing in both software engineering and flutter programming, so if you found this article helpful, please clap and share this article. If you have any suggestions to make this article better, don’t hesitate to contact me or write a comment down below and I’d reply to you fast if I weren’t asleep.
You can go to the next part with this link.
Follow Flutter Community on Twitter: https://www.twitter.com/FlutterComm


No comments:
Post a Comment