Have you ever wanted to build a machine learning application with a heavy model on the backend, a React user-friendly interface on the frontend, and a serverless cloud architecture all around so that your product is scalable to tens, hundreds, or even thousands of users?
Well, this is not as difficult as it sounds, and in this article, I will show how to build an application like this. To make this tutorial a bit fun, I’ll walk through the process of building Cartoonify.

Cartoonify is a toy application I made from scratch to turn pictures into cartoons. I know this may seem a bit funny, but believe me, there is serious work behind this app that you can leverage elsewhere. I’ll let you read this post to believe me 😀 or check the code on my Github.

Here’s what motivated me in starting this project:
- Give Generative Adversarial Networks (GANs) a try. I’ve been fascinated by these models lately. Trying the CartoonGAN model to turn your face into a cartoon seemed like real fun
- Learn about deploying an application on a serverless architecture using different services of AWS (Lambda, API Gateway, S3, etc.)
- Practice my React skills. I was used to Plotly, Dash, and Streamlit and I wanted, for once, to build something custom and less mainstream
- Use Netlify to deploy this React app. I saw demos of how easy this process was and I wanted to try it to convince myself
Building Cartoonify was so fun I decided to talk about it a video series. Here’s a short introduction:
0. Prerequisites to build and deploy Cartoonify 🛠
If you want to run and deploy Cartoonify, here are some prerequisites first:
- An AWS account (don’t worry, deploying this app will cost you almost nothing)
- A free account on Netlify
- Docker installed on your machine
- node and npm (preferably the latest versions)
- torch and torchvision to test CartoonGAN locally (optional)
If you’ve got everything, you’re now ready to go.
Please follow these four next steps.
1. CartoonGAN — an AI artist?
This section provides some details about the model. If you’re not interested in it, you can move to the next part about deployment.
The main idea behind this network
Before testing CartoonGAN, the model behind this application, let’s talk about it first to understand the underlying architecture and how it was designed and trained to produce cartoon styles.


CartoonGAN has been introduced in 2018 in this paper with the goal of transforming images into the style of different Japanese cartoons. What CartoonGAN achieves is called style transfer, an image transformation technique that has been first introduced with neural networks in 2015 thanks to the work of Leon A. Gatys on Neural Style Transfer. Style transfer has later been enhanced in 2017 with CycleGAN architectures. CycleGAN approached style transfer by formalizing it as a translation problem between two image distributions whereas Neural Style Transfer framed it as an optimization problem.
CartoonGAN is a mix between Neural Style Transfer and GANs. In fact, it uses a simple GAN architecture (not a cyclic one) and adds a semantic loss inspired by the Neural Style Transfer technique to force the generator in preserving the content of the original image.
The authors went even further to make CartoonGAN’s results as visually appealing as possible: to do this, they added a second loss that forces the generator in creating smooth edges, low-shaded colours, and less textured areas because these are visual features that are very specific to cartoons.
From GANs to CartoonGANs
To understand how CaroonGAN is built, let’s first understand how a typical GAN is trained to generate fake images.


A GAN is composed of two networks: a Generator and a Discriminator.
The goal of the generator is to take some input data (or noise) and create samples that look like a real-world image distribution and the goal of the discriminator is to learn a boundary between the fake samples and the real ones.
These two networks are trained against each other in a min-max game inspired by game theory where the goal of the generator is to fool the discriminator and the goal of the discriminator is to become better at identifying real data and fake data.
At the beginning of the training, these two networks are very bad in their respective tasks and once the training goes on, they get better and better.
When they reach an equilibrium, the generator is so powerful that it dominates the discriminator by totally confusing it. In that case, we can throw the discriminator away and use the generator for the generation task.
and what about generating cartoons?
Training a GAN to generate cartoon data from real photographs is a simple problem that can be framed by considering:
- the real photographs as input data to the generator
- the cartoon data as the real data distribution that the generator will try to fake as much as possible
The beauty with this setup is that you don’t need a one-to-one mapping between photographs and cartoons: this means in practice that if you want to train a custom CartoonGAN to generate your favourite cartoon (let’s say the Simpsons for example), all you have to do then is gather some Simpson images and real photographs with no correspondence whatsoever and then start your training.
To learn more about the training procedure behind CartoonGAN, have a look at the original paper.
Let’s now move to a more hands-on section, where we get to generate cartoon results ourselves.
Test the CartoonGAN locally
First clone the repo of this project.
git clone https://github.com/ahmedbesbes/cartoonify.gitDownload the four pretrained models first. These weights will be loaded inside the Generator model defined in cartoongan/network/Transformer.py
cd cartoongan
bash download_pth.sh
To test one of the four models, head over the notebook cartoongan/notebooks/CartoonGAN.ipynb and change the input image path to your test image.
This notebook calls thecartoongan/test_from_code.py script to make the transformation.
cd cartoongan/notebooks
jupyter notebook

The transform method takes a load_size argument to resize the input image in order to speed up the transformation. If you set it to a high value, the results will look better but the processing will take more time. Throughout this project, we’ll set load_size to 450.
Here are some results obtained with a load_size of 800.


You can watch this section on Youtube to learn more about GANs, the CartoonGAN model and how to build the script test_from_code.py used in transforming the images.
2 — Deploy CartoonGAN on a serverless API using AWS Lambda
The goal of this section is to deploy the CartoonGAN model on a serverless architecture so that it can be requested through an API endpoint … from anywhere on the internet 🌐.
Why does a serverless architecture matter?
In a serverless architecture using Lambda functions, for example, you don’t have to provision servers yourself. Roughly speaking, you only write the code that’ll be executed and list its dependencies and AWS will manage the servers for you automatically and take care of the infrastructure.
This has a lot of benefits:
- Cost efficiency: you don’t have to pay for a serverless architecture when you don’t use it. Conversely, when you have an EC2 machine running and not processing any request, you still pay for it.
- Scalability: if a serverless application starts having a lot of requests at the same time, AWS will scale it by allocating more power to manage the load. If you had the manage the load by yourself using EC2 instances, you would do this by manually allocating more machines and creating a load balancer.
Of course, Serverless architectures cannot be a perfect fit for any use-case. In some situations, they are not practical at all (need for real-time or quick responses, use of WebSockets, heavy processing, etc.).
Since I frequently build machine learning models and integrate them into web applications for inference only, I found that a serverless architecture was interesting in these specific use-cases.
Cartoonify workflow
Let’s have a look at the architecture of the app before deploying the lambda function:


— On the right side, we have a client built in React and on the left side, we have a backend deployed on a serverless AWS architecture.
— The backend and the frontend communicate with each other over HTTP requests. Here is the workflow:
- An image is sent from the client through a POST request
- The image is then received via API Gateway
- API Gateway triggers a Lambda function to execute and passes the image to it
- The Lambda function starts running: it first fetches the pretrained models from S3 and then applies the style transformation on the image it received
- Once the Lambda function is done running, it sends the transformed image back to the client through API Gateway again
Deploy using the Serverless framework
We are going to define and deploy this architecture by writing it as a YAML file using the Serverless framework: an open-source tool to automate deployment to AWS, Azure, Google Cloud, etc.
Isn’t this cool, writing your infrastructure as code?
Here are the steps to follow:
1 — Install the Serverless framework on your machine
npm install -g serverless2 — Create an IAM user on AWS with administrator access and name it cartoonify. Then configure serverless with this user’s credentials (I won’t show you mine 😄 — put yours, buddy)
3 — Bootstrap a serverless project with a python template at the root of this project
serverless create --template aws-python --path backend4 — Install two Serverless plugins to manage the Lambda dependencies and prevent the cold start of the lambda function:
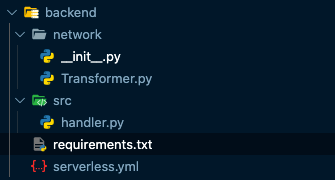
5 — Create a folder called network inside backend and put the following two files in it:
- Transformer.py: a script that holds the architecture of the generator model.
- A blank __init__.py
6 — Modify the serverless.yml file with the following sections:
- The provider section where we set up the provider, the runtime and the permissions to access the bucket. Note here that you’ll have to specify your own S3 bucket.
- The custom section where we configure the plugins
- The package section where we exclude unnecessary folders from production
- The functions section where we create the Lambda function, configure it and define the events that will invoke it. In our case, the lambda function is triggered by a post request on API Gateway on the path
transform.
- The plugins section to list external plugins
7 — List the dependencies inside requirements.txt (at the same level of serverless.yml)
8 — Create an src folder inside backend and put handler.py in it to define the lambda function. Then modify handler.py.
First, add the imports:
Define two functions inside handler.py:
- img_to_base64_str to convert binary images to base64 strings
- load_models to load the four pretrained model inside a dictionary and then keep them in memory
and finally, the lambda_handler that will be triggered by the API Gateway:
Now you’re done. The file structure of the backend should now look like this:

9 — Start docker before deploying
10 — Deploy the lambda function 🚀
cd backend/
sls deploy
Deployment may take up to 10 minutes, so go grab a ☕️.
What happens here, among many things, is that docker will build an image of the Lambda deployment package, then Serverless will extract the dependencies of this environment in a zip before uploading to S3.
Once the lambda function deployed, you’ll be prompted a URL of the API that you can request.
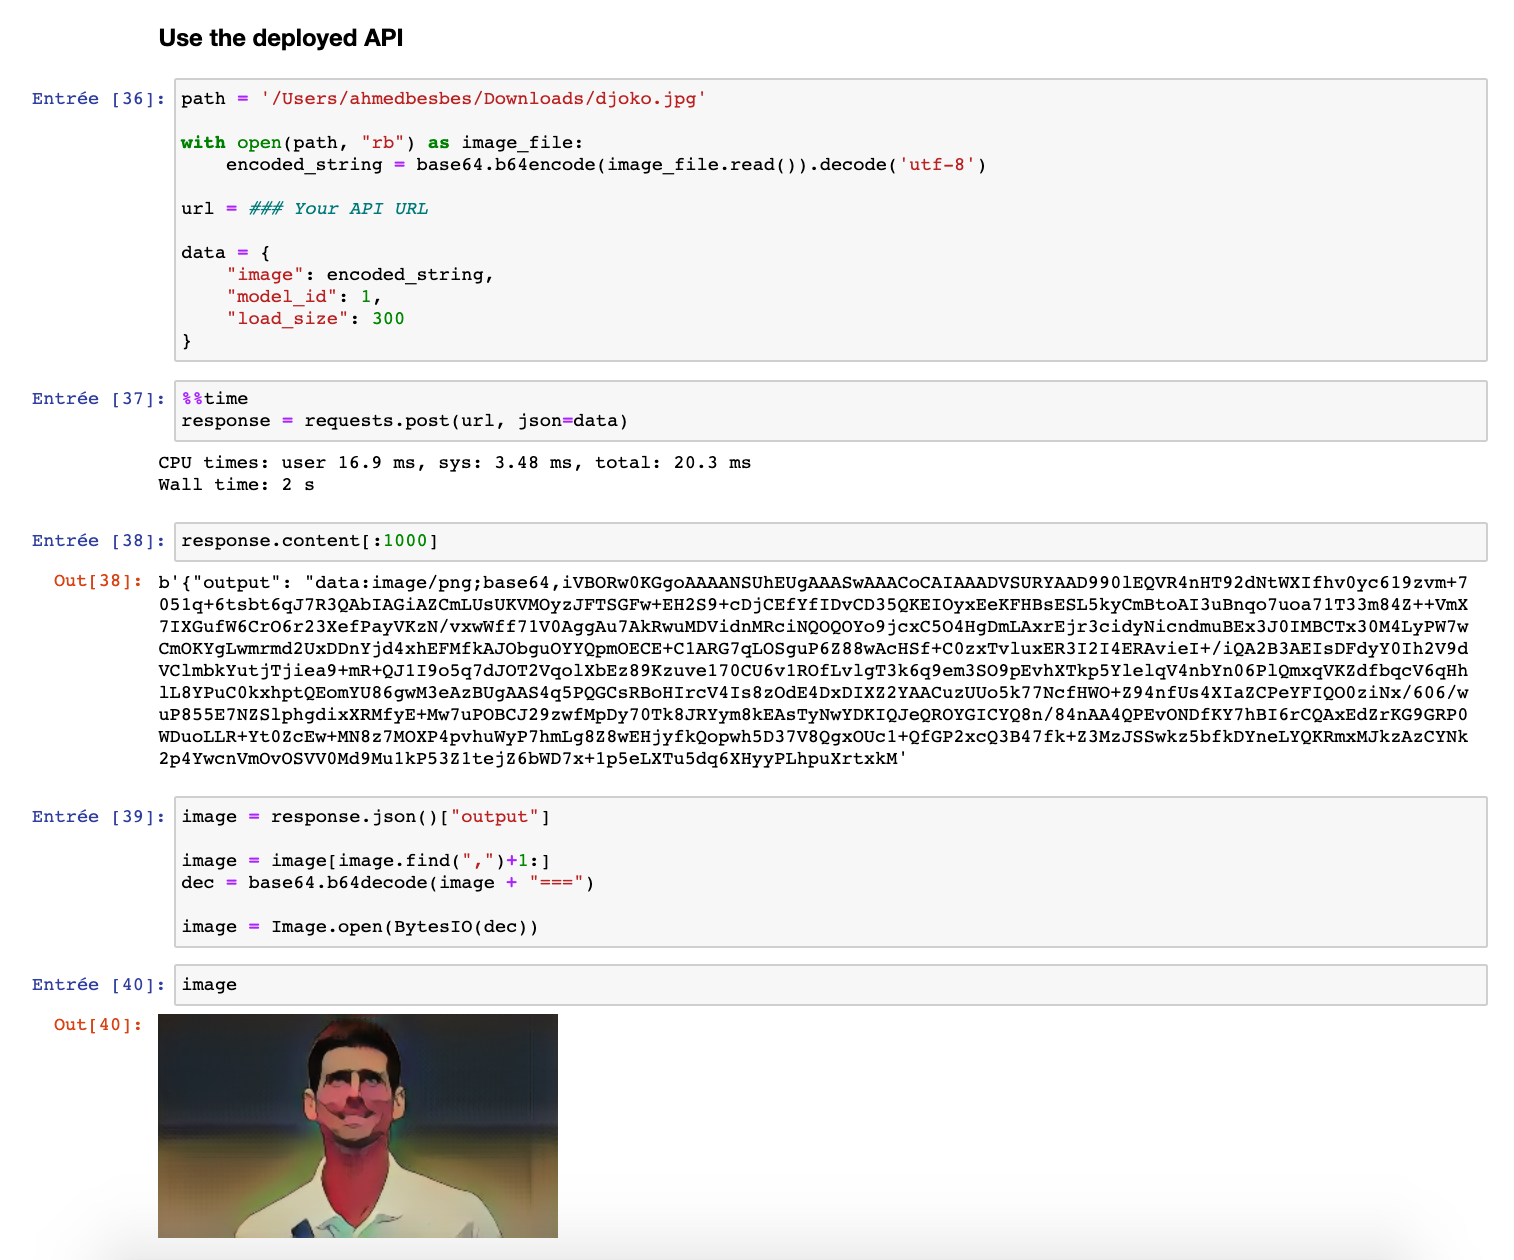
Go to jupyter notebook to test it by loading an image, converting it to base64 and sending it inside a payload.

If you want to follow this section step by step so that you don’t miss anything, you can watch it on Youtube.
3. Build a React interface
This section covers building a simple React interface to interact with the model.
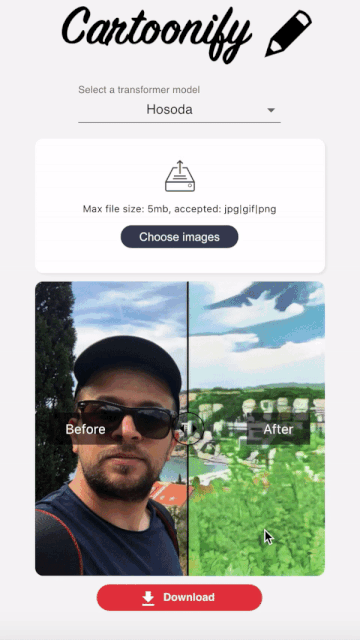
I wanted this interface to be as user-friendly as possible to visualize the style transformation in a very simple way.
I hopefully found this nice react component that allows to compare two images side by side and go from one to another by sliding a cursor.
Before running the React app and building it, you’ll need to specify the API URL of the model you just deployed.
Go inside fontend/src/api.js and change the value of baseUrl
- To run the React app locally:
cd frontend/
yarn install
yarn start
This will start it at http://localhost:3000
- To build the app before deploying it to Netlify
yarn buildThis will create thebuild/folder that contains a build of the application to be served on Netlify.
You can watch this section on Youtube to understand how the code is structured, and the other React components being used.
4. Deploy the React app on Netlify
In this last section, we’ll cover deploying the front interface.
There are many ways to deploy a React app so that it goes live on the internet and anyone can have access to it. One of them is using Netlify: a great platform that automates building and deploying applications in many frameworks (React, Vue, Gatsby, etc.)
- To be able to deploy on Netlify you’ll need an account. It’s free: head over this link to sign up
- Then you’ll need to install netlify-cli
npm install netlify-cli -g- Authenticate the Netlify client with your account
netlify login- And deploy 🚀
cd app/
netlify deploy
Netlify will ask you for the build folder (enter build) and a custom name for your app (this will appear as a subdomain of netlify.com). I’ve already picked cartoonify but you can choose another one 😄.
And this should be it! now your app is live! 💻
But wait? there’s some wrong with the URL: it’s prefixed with an alphanumerical code — I didn’t want that, right?
That’s because you deployed a draft URL!
To have a clean URL, you’ll have to deploy by specifying the prod option:
netlify deploy --prodYou can watch this section on Youtube for a live demo to understand how easy the deployment on Netlify can be.
5. Next — Want to contribute? 😁
If you’ve made this far, I sincerely thank you for your time!
If you like this project and want to improve it, be my guest: I’m open to pull requests and here’s the repo of the project.
If you have a machine learning project where you need to quickly deploy an API on the cloud and request it through a custom frontend, this project should be a boilerplate to kickstart your work, so feel free to reuse the code.
Happy hacking! 💻
WRITTEN BY
AI — Deep Learning engineer | Blogger @ https://ahmedbesbes.com | Creative problem solver. 🇫🇷 🇹🇳
A Medium publication sharing concepts, ideas, and codes.


Download MySQL and do it yourself
If you’re learning SQL for the first time, you’ve probably dabbled with at least one of the following resources: codeacademy, datacamp, and khan academy. Each of these websites provides an interactive, hands-on method for beginners to learn SQL.
These are great, free resources and you absolutely should use them.
But what comes next? How do you bridge the gap from “I know a little SQL” to “I’m comfortable querying and analyzing large datasets in SQL”?
Practice makes perfect — obviously — but how does a beginner get practice?
In this post, I’ll walk through a simple set of steps you can take to build up your skills at home, for free. …
LAYER DEEP DIVE
A tensor’s journey through an LSTM Layer visualized
In building a deep neural network, especially using some of the higher level frameworks such as Keras, we often don’t fully understand what’s happening in each layer. The sequential model will get you far indeed, but when it’s time to do something more complex or intriguing, you will need to dive into the details.
In this article, I’m going to explain exactly what’s happening as you pass a batch of data through an LSTM layer with an example from PyTorch. …
Using Python(pandas) to gather and clean data and Excel/Spreadsheet(Pivot table, VLOOKUP(), Data validation, Conditional formatting, and Charts) to create an interactive dashboard.


Imaginary situation: My manager wants to know the video game market. She has some domain knowledge in gaming industry, but she doesn’t know how to communicate with data. Therefore, she asks me to create an easily-use interactive dashboard for her to further investigate the insights herself.
In real life, the managers might give analysts some must-addressed questions and needs beforehands. So, I imagine some questions and needs she might provide so that I can create the graphs and interactive functions that fit her needs. Below are the needs from my imaginary manager that should be addressed in the dashboard:
1. The manager can choose a specific region and year, and the data and graphs in the dashboard would be altered by them. …
A data driven attempt in predicting English Premier League results using xG Statistics
This is an article on my EPL Prediction series. You can check out the prediction for Game Week 8 and how it fared against the actual performance here.
Expected Goals or xG is the parameter used for prediction. If you are interested in understanding the algorithm for prediction, I recommend that you check out this article where it is explained in detail.
Analysis up to Game-week 8
After 8 game weeks, the Foxes are on top of the table with 18 points with the Reds and Spurs at thier heels with 17 points each. …
Tips and tricks you can use to save time as a Data Analyst and increase your productivity.
Introduction
Today I am going to share with you several tools, packages and code snippets that I have used and developed during my time as a Data Analyst. In our roles as Data Analysts, there are going to be times where you are required to rerun the same report, run a similar report with different parameters or apply the same statistical analysis over differing datasets. Below I will give you a brief overview of some of the tools that you will be able to incorporate into your workflow as a Data Analyst to increase your productivity.
Version Control
For version control, I am currently using Atlassian Bitbucket. Bitbucket is a git repository management platform which you can use to track your code changes or collaborate as a team on the same code base. At the moment, I prefer using Bitbucket as it has an incredibly powerful search function which allows you to input query styled searches with logical operators. Having version control has sped up my productivity when it comes to rerunning the same reports. You can quickly locate the EOFY reports that you run each year instead of rewriting them. …


No comments:
Post a Comment