What is the difference between Virtual Machines (VM) and Containers?
This is a great question and I get this one a lot. The simplest way I can explain the differences between Virtual Machines and Containers is that a VM virtualizes the hardware and a Container “virtualizes” the OS.
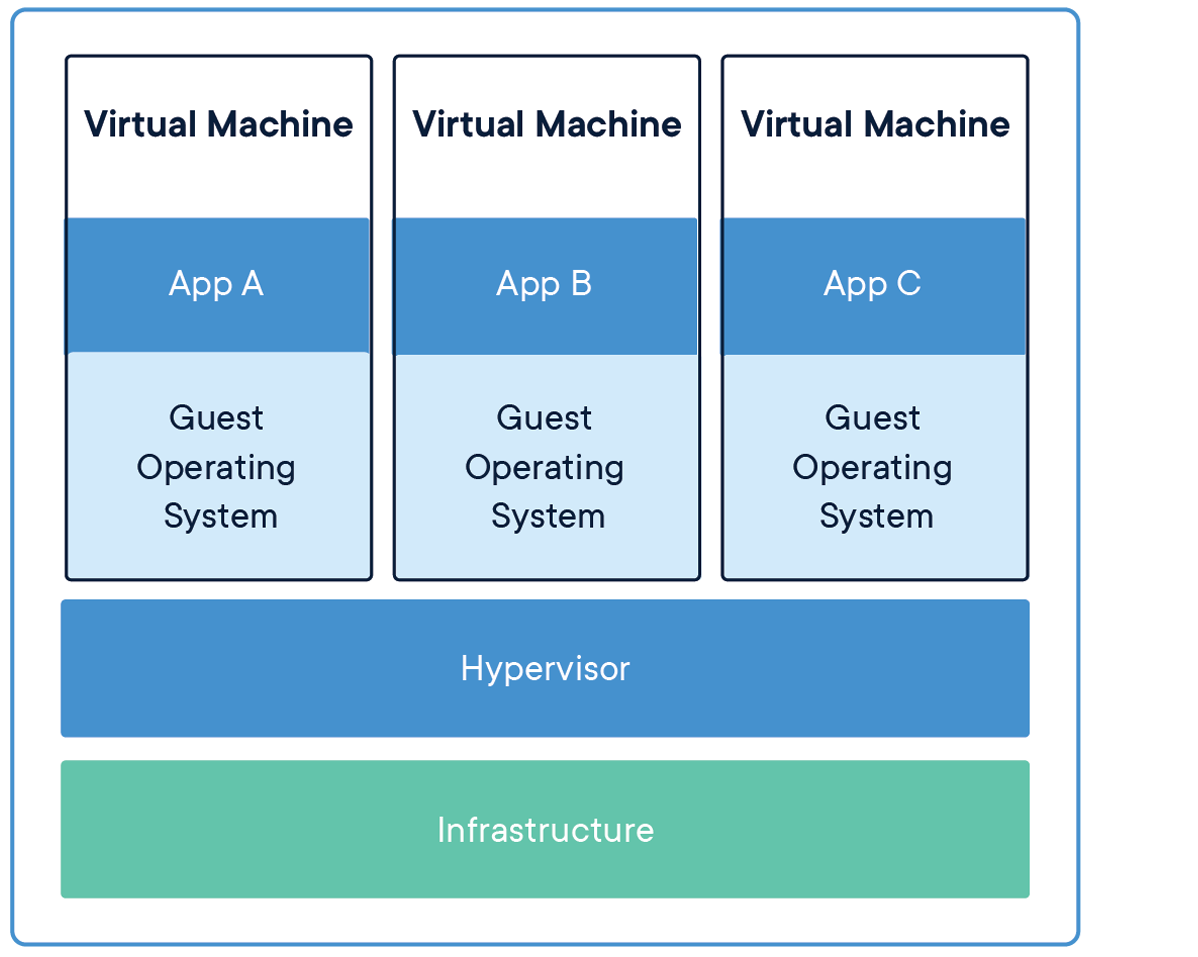
If you take a look at the image above, you can see that there are multiple Operating Systems running when using Virtual Machine technology. Which produces a huge difference in start up times and various other constraints and overhead when installing and maintaining a full blow operating system. Also, with VMs, you can run different flavors of operating systems. For example, I can run Windows 10 and a Linux distribution on the same hardware at the same time. Now let’s take a look at the image for Docker Containers.
As you can see in this image, we only have one Host Operating System installed on our infrastructure. Docker sits “on top” of the host operating system. Each application is then bundled in an image that contains all the configuration, libraries, files and executables the application needs to run.
At the core of the technology, containers are just an operating system process that is run by the OS but with restrictions on what files and other resources they can consume and have access to such as CPU and networking.
Since containers use features of the Host Operating System and therefore share the kernel, they need to be created for that operating system. So, for example, you can not run a container that contains linux binaries on Windows or vice versa.
This is just the basics and of course the technical details can be a little more complicated. But if you understand these basic concepts, you’ll have a good foundation of the difference between Virtual Machines and Containers.
What is the difference between an Image and a Container?
This is another very common question that is asked. I believe some of the confusion stems from the fact that we sometimes interchange these terms when talking about containers. I know I’ve been guilty of it.
An image is a template that is used by Docker to create your running Container. To define an image you create a Dockerfile. When Docker reads and executes the commands inside of your Dockerfile, the result is an image that then can be run “inside a container.”
A container, in simple terms, is a running image. You can run multiple instances of your image and you can create, start and stop them as well as connect them to other containers using networks.
What is the difference between Docker and Kubernetes?
I believe the confusion between the two stems from the development community talking as if these two are the same concepts. They are not.
Kubernetes is an orchestrator and Docker is a platform from building, shipping and running containers. Docker, in and of itself, does not handle orchestration.
Container Orchestration, in simple terms, is the process of managing and scheduling the running of containers across nodes that the orchestrator manages.
So generally speaking, Docker runs one instance of a container as a unit. You can run multiple containers of the same image, but Docker will not manage them as a unit.
To manage multiple containers as a unit, you would use an Orchestrator. Kubernetes is a container orchestrator. As well is AWS ECS and Azure ACI.
Why can’t I connect to my web application running in a container?
By default, containers are secure and isolated from outside network traffic – they do not expose any of its ports by default. Therefore if you want to be able to handle traffic coming from outside the container, you need to expose the port your container is listening on. For web applications this is typically port 80 or 443.
To expose a port when running a container, you can pass the –publish or -p flag.
For example:
$ docker run -p 80:80 nginx
This will run an Nginx container and publish port 80 to the outside world.
You can read all about Docker Networking in our documentation.
How do I run multiple applications in one container?
This is a very common question that I get from folks that are coming from a Virtual Machine background. The reason being is that when working with VMs, we can think of our application as owning the whole operating system and therefore can create multiple processes or runtimes.
When working with containers, it is best practice to map one process to one container for various architectural reasons that we do not have the space to discuss here. But the biggest reason to run one process inside a container is in respect to the tried and true KISS principle. Keep It Simple Simon.
When your containers have one process, they can focus on doing one thing and one thing only. This allows you to scale up and down relatively easily.
Stay tuned to this blog and my twitter handle (@pmckee) for more content on how to design and build applications with containers and microservices.
How do I persist data when running a container?
Containers are immutable and you should not write data into your container that you would like to be persisted after that container stops running. You want to think about containers as unchangeable processes that could stop running at any moment and be replaced by another very easily.
So, with that said, how do we write data and have a container use it at runtime or write data at runtime that can be persisted. This is where volumes come into play.
Volumes are the preferred mechanism to write and read persistent data. Volumes are managed by Docker and can be moved, copied and managed outside of containers.
For local development, I prefer to use bind mounts to access source code outside of my development container.
For an excellent overview of storage and specifics around volumes and bind mounts, please checkout our documentation on Storage.
Conclusion
These are just some of the common questions I get from people new to Docker. If you want to read more common questions and answers, check out our FAQ in our documentation.
The focus for this test is day-to-day activities, you need to know the commands/syntax and not only concepts. Of course, concepts are very important to understand the questions.
What you need to focus on?
Oci-cli
Terraform
Policies
MQL
Quotas
What and how you can move Cross-region
Budgets and Alerts
What is related to Compartments and what is related to the Tenancy
Upload and Download files using the cli and the console
This is the first in a multi-part series on building Docker images for Oracle 19c. In this first part I show how to create a Dockerfile to build images that use the Oracle 19c RPM instead of the “traditional” method where the Oracle Home is unzipped into a target directory. I’ll also demonstrate how to apply a Release Update (RU) to the Oracle Home during the image build to produce a native Oracle 19.7 or 19.8 database.
In the next installment I cover some of the other unique requirements for running Docker images that use the RPM-based installation. In the third part I describe a method to merge multiple images together, creating containers with a low-version Oracle home and database (11g, 12c, 18c) running alongside a preconfigured 19c database home, ready for testing and practicing upgrades to Oracle 19c!
Building images that take advantage of the RPM installer requires a departure from the builds offered in Oracle’s Docker repository. Installing and creating a database is handled differently. Database creation, for example, is addressed in an init script installed as part of the RPM itself, so there’s no need for createDB.sh. The installation response files and template response file aren’t needed, nor is a script to install the database binaries (at least the way I do it).
Let’s dig in, shall we?
For my builds I manage the environment in the Dockerfile a little differently. I prefer a clean environment for containers so I take advantage of Docker’s ARG to set values within the build instead of persisting them in the container’s environment. Using ARG also allows users to pass values when running a container to provide more flexibility and customization in the resulting environment.
FROM oraclelinux:7-slim as base
MAINTAINER Sean Scott <sean.scott@viscosityna.com>

# Set ARGs, keep the environment clean
ARG ORACLE_BASE=/opt/oracle
ARG ORACLE_HOME=/opt/oracle/product/19c/dbhome_1
ARG INSTALL_DIR=/opt/install
ARG ORACLE_SID=ORCLCDB

# ORACLE_DOCKER_INSTALL=true is required for the 19c RPM on Docker
ENV ORACLE_BASE=$ORACLE_BASE \
    ORACLE_HOME=$ORACLE_HOME \
    ORACLE_SID=$ORACLE_SID \
    ORACLE_VERSION=19c \
    PDB_NAME=ORCLPDB \
    PDB_COUNT=1 \
    ORACLE_DOCKER_INSTALL=true \
    SQLPATH=/home/oracle \
    SETUP_DB=setupDB.sh \
    RUN_FILE=runOracle.sh \
    CONFIG_FILE=oracledb_ORCLCDB-19c.conf \
    INIT_FILE=oracledb_ORCLCDB-19c \
    CHECK_DB_STATUS=checkDBStatus.sh

ENV PATH=$ORACLE_HOME/bin:$ORACLE_HOME/OPatch/:/usr/sbin:$PATH \
    CLASSPATH=$ORACLE_HOME/jlib:$ORACLE_HOME/rdbms/jlib \
    LD_LIBRARY_PATH=$ORACLE_HOME/lib:/usr/lib \
    TNS_ADMIN=$ORACLE_HOME/network/admin
If you’re not already familiar with multi-stage builds, the FROM / as syntax tells Docker to create an intermediate image called base that will be used in subsequent steps. Creating a base image provides greater freedom to manipulate things later and also helps reduce image size. (An Oracle 19.7 image, built without multiple stages, is around 13GB. Using multiple stages it’s 9.3GB. Oracle 19.8 is 16.3GB and 9.5GB respectively.)
Note that I’m using ARG to set a default value for ORACLE_BASE, ORACLE_HOME and ORACLE_SID, then using these in the ENV setup. When running a container I can pass a custom value for any of these variables using the -e option.
The RPM installation expects some values including ORACLE_VERSION and ORACLE_DOCKER_INSTALL. Customizing the database means I also need to manipulate the configuration and initialization files set in CONFIG_FILE and INIT_FILE.
For those worried that all these extra lines will add layers to the image, don’t fret. They do create steps but not layers and add nothing to the size of the image itself.
There’s nothing remarkable happening here, besides a much smaller file count!
The next step does nearly all of the OS configuration. I also add some packages I like:
# Build base image with 19c preinstall and Things I Like To Have (epel, git, less, rlwrap, strace, vi), all optional.
# file-5.11, openssl, sudo are necessary (file-5.11 = prereq for 19c RPM, sudo for startup via init.d)
RUN yum -y update; yum -y install oracle-database-preinstall-19c oracle-epel-release-el7 file-5.11-36.el7.x86_64 git less openssl strace sudo vi which && \
    # Create directories, replace OPatch, own things, permissions
    mkdir -p  && \
    chown -R oracle:oinstall $ORACLE_BASE $INSTALL_DIR && \
    chmod ug+x $ORACLE_BASE/*.sh && \
    sync && \
    yum -y install rlwrap && \
    # Create the entrypoint:
    ln -s $ORACLE_BASE/scripts /docker-entrypoint-initdb.d && \
    # Manage the oracle user:
    echo oracle:oracle | chpasswd && \
    # Let oracle run rpm config:
    echo "oracle ALL=(root) NOPASSWD:ALL" > /etc/sudoers.d/oracle && \
    chmod 0440 /etc/sudoers.d/oracle && \
    yum clean all && \
    rm -fr $INSTALL_DIR /tmp/* /var/cache/yum
The 19c preinstallation RPM adds the oracle user and groups, after which I create directories and set ownership.
The most interesting thing is probably adding oracle to the sudoers list. With an RPM installation the configuration and initialization is performed by the root user. Giving oracle unlimited sudo privileges is simpler than narrowing things to specific commands and it’s convenient for containers I use in my personal environment.
The preceding stage in this multi-stage build created the base image. The next stage installs Oracle, updates OPatch, and applies a Release Update. As before, it begins with a FROM and sets some ARG values:
FROM base as builder

ARG DBRPM=oracle-database-ee-19c-1.0-1.x86_64.rpm
ARG DBRU=p31281355_190000_Linux-x86-64.zip
ARG DBRU_ID=31281355
ARG OPATCH=p6880880_190000_Linux-x86-64.zip
ARG INSTALL_DIR=/opt/install
Next, root installs Oracle from the RPM and sets ownership and permissions for two files:
USER root
RUN yum -y localinstall $INSTALL_DIR/oracle-database-ee-19c-1.0-1.x86_64.rpm && \
    # Make the config file editable by oracle:
    chown root:oinstall /etc/sysconfig/$CONFIG_FILE /etc/init.d/$INIT_FILE && \
    chmod 664 /etc/sysconfig/$CONFIG_FILE
As noted above, the configuration and initialization files are special files needed for this installation method. The configuration file is just that—configuration information used during database creation. The initialization file is used by the Linux init process to start the database and listener.
With the database software installed we can proceed to update OPatch and apply the Release Update:
USER oracle
RUN unzip -oq -d $ORACLE_HOME $INSTALL_DIR/$OPATCH && \
    unzip -oq -d $INSTALL_DIR $INSTALL_DIR/$DBRU && \
    # Apply the RU
    $ORACLE_HOME/OPatch/opatch apply -silent $INSTALL_DIR/$DBRU_ID && \
    rm -fr $INSTALL_DIR/*
It’s not technically necessary to remove the contents of the installation directory but old habits, as they say!
This concludes the second stage. At this point the build has created two images, base and builder, that will be combined to create the final image. As you might expect, this begins by starting with the base image and setting some environment variables:
This is followed by copying the ORACLE_BASE directory from the builder image and setting its ownership to oracle:oinstall, the /etc directory that includes the init and config files added by the RPM installation, and copying a database configuration template into the DBCA template directory under the ORACLE_HOME:
This sets the working directory, exposes container resources (ports and mount point), initiates the health check, and executes the run file.
In the next installment I cover the remaining files and tweaks needed to run an RPM build. All files for this build are available in my GitHub repository.
This sets the working directory, exposes container resources (ports and mount point), initiates the health check, and executes the run file.
In the next installment I cover the remaining files and tweaks needed to run an RPM build. All files for this build are available in my GitHub repository.
A VPC is an isolated network where we can have different infrastructure components. We can break down this network into smaller blocks and on AWS we call them subnets. Some subnets can have access to the internet and that is why we call the public subnets and some don’t have any access to the internet and they are called private subnets. Another terminology that we will in context to the network traffic is egress and ingress. Egress means traffic from inside the network to the outside world and ingress traffic from the outside world to the network. As you can expect these rules can be different depending on the use case. We also use security groups, which are traffic rules inside the VPC, that define how the EC2 instances “talk” with each other, basically on which network ports.
For the Spark EKS cluster see will use private subnets for the workers. All the data processing is done in total isolation. But we need egress traffic to the internet, to do updates or install open source libraries. To enable traffic to the internet we use NAT gateways into our VPC. We have to add them to public subnets. In the Terraform code, this is done using the flag enable_nat_gateway.
Another thing we can notice is that we are using three public and private subnets. This is because we want to have network fault tolerance. The subnets are deployed in different availability zones in a region.
The tags are created as per the requirements from AWS. They are needed for the Control plane to recognize the worker nodes. We can go into more detail about the networking, but it is outside of the scope of this tutorial, so if you need more details please have a look into the Github code where you can find the full example.
Again in this snippet, we can see that we declare the cluster inside private subnets. We enable the Clowdwatch logs for all the components of the Control plane. We set the EC2 instance types and number for a config varmodule and as defaults, we use m5.xlarge as the instance type and 3 nodes. We set an EC2 key eks_key if we need to ssh into the worker nodes.
To be able to run the code in this tutorial we need to install a couple of tools. On Mac we can use brew:
Now we can start to initialize Terraform in order to get all the dependencies needed to deploy the infrastructure:
cd deployment/ && terraform init
If everything runs successfully you should be able to see something similar to the image:
We are ready to deploy the infrastructure. To do so run:
terraform apply
It will take some time until the deployment is done, so we can sit back and relax for a bit.
Once done you should see the message Apply complete! Resources: 55 added, 0 changed, 0 destroyed. and the names of the resources deployed.
One additional step we can do to check if the deployment was correct is to see if the worker nodes have been attached to the cluster. For that we setup kubectl:
We should be able to see three nodes when we run the following command:
kubectl get nodes
Step 2: Installing the Spark Operator
Usually, we deploy spark jobs using the spark-submit , but in Kubernetes, we have a better option, more integrated with the environment called the Spark Operator. Some of the improvements that it brings are automatic application re-submission, automatic restarts with a custom restart policy, automatic retries of failed submissions, and easy integration with monitoring tools such as Prometheus.
If we run helm list in the terminal the spark-op chart should be available. Also, we should have a running pod for the spark operator. We can watch what pods are running in the default namespace with the command kubectl get pods.
Step 3: Running a PySpark app
Now we can finally run python spark apps in K8s. The first thing we need to do is to create a spark user, in order to give the spark jobs, access to the Kubernetes resources. We create a service account and a cluster role binding for this purpose:
We define our spark run parameters in a yml file, similar to any other resource declarations on Kubernetes. Basically we are defining that we are running a Python 3 spark app and we are the image uprush/apache-spark-pyspark:2.4.5. I recommend using this image because it comes with a newer version of yarn that handles writes to s3a more efficiently. We have a retry policy if the job fails, it will be restarted. Some resource allocations for the driver and the executors. As the job is very simple, we use just an executor. Another thing we can notice is that we use the spark service account that we defined earlier. To code we are using is a classic example of computing the pi number.
To submit the code we are using kubectl again:
kubectl apply -f spark/spark-job.yml
Upon completion, if we inspect the pods again we should have a similar result:
And if we check the logs by running kubectl logs spark-job-driver we should find one line in the logs giving an approximate value of pi Pi is roughly 3.142020.
That was all folks. I hope you enjoyed this tutorial. We’ve seen how we can create our own AWS EKS cluster using terraform, to easily re-deploy it in different environments and how we can submit PySpark jobs using a more Kubernetes friendly syntax.